

Installing a vanity light can make your bathroom easier to use and give the space a cleaner look. If you’re replacing an existing fixture, the job may be manageable with basic tools, suitable wiring, and a compatible mounting system.
The most important step is making sure the electrical setup is safe before you begin. Turn off the correct circuit breaker and verify that the wires have no power before touching them. A suitable electrical box must also be in place to contain the connections and support the fixture. If the box is missing, the wiring is damaged, or you’re unsure about the connections, stop and contact a qualified electrician.
This guide explains how to install a vanity light, position it above a mirror, avoid common mistakes, and estimate the cost. It also covers situations where a standard replacement method will not work.
Direct Answer
You can install a vanity light yourself when a suitable electrical box, compatible wiring, and secure mounting are already in place. Turn off and verify power first; call an electrician for damaged wiring, missing boxes, or uncertain connections.
Practical Insight Box
Check the electrical box and mounting hardware before removing the old light; a replacement fixture may use different hardware or weigh more. If the box is loose, missing, or unsuitable, pause and have the setup assessed rather than trying to secure the fixture to drywall alone.
Vanity Light Installation: Before-You-Start Checklist
- Confirm that the fixture and electrical box are compatible.
- Switch off the correct circuit breaker and verify that the power is off before touching wiring.
- Follow the fixture manufacturer’s instructions for wiring and mounting.
- Check that the fixture is secure, level, and fully assembled before restoring power.
- Contact a qualified electrician if the wiring, grounding, or electrical box is damaged, missing, or uncertain.
Can You Install a Vanity Light Yourself?
Yes, a capable DIYer may be able to replace an existing bathroom vanity light when the electrical wiring, mounting box, and new fixture are compatible. Moving the light to a different location or adding new wiring is a more involved project and may require an electrician.
Before buying a fixture, check these three things:
- The electrical box: It must be suitable for the fixture and securely attached. A box that is loose, damaged, or unsuitable for the new fixture needs attention.
- The wiring: The existing conductors must be in good condition, and their functions must be understood.
- The mounting system: The new fixture’s mounting plate and fasteners must fit the installation and support the fixture properly.
A basic replacement is different from installing a light where none existed before. A new location may require wiring, an electrical box, wall repairs, and permits under local rules.
The DIY electrical safety guidance recommends turning off the circuit breaker, testing wires before touching them, and avoiding work beyond your skill level.
If you’re renting, get permission before changing a hardwired fixture or altering the wall. Your lease may also require a licensed professional to perform electrical work.
Tools and Materials You Need
Gather your tools before removing the old fixture. Having everything ready helps you avoid leaving exposed wiring while you search for a missing screwdriver or connector.
| Tool or material | Why you need it |
| New vanity light | The replacement fixture must suit the location and existing electrical setup. |
| Screwdrivers | Remove the old fixture and secure the new mounting hardware. |
| Suitable voltage tester | Verify that the circuit is de-energized before touching conductors. |
| Wire connectors | Join compatible conductors according to the fixture instructions. |
| Wire stripper or cutter | Prepare conductors only when required and when you know how to do so safely. |
| Level and tape measure | Help position the fixture straight and at the intended height. |
| Step stool or ladder | Provide stable access to the mounting area. |
| Compatible bulbs | Supply light if bulbs are not included with the fixture. |
| Safety glasses | Protect your eyes while removing hardware and working overhead. |
You may also need a helper to hold a large or awkward fixture during removal and mounting.
Read the new fixture’s installation instructions before starting. Some models use different mounting plates, grounding arrangements, or connection systems. Don’t assume that hardware from the old fixture will work with the new one.
Check the Electrical Box and Fixture Before Starting
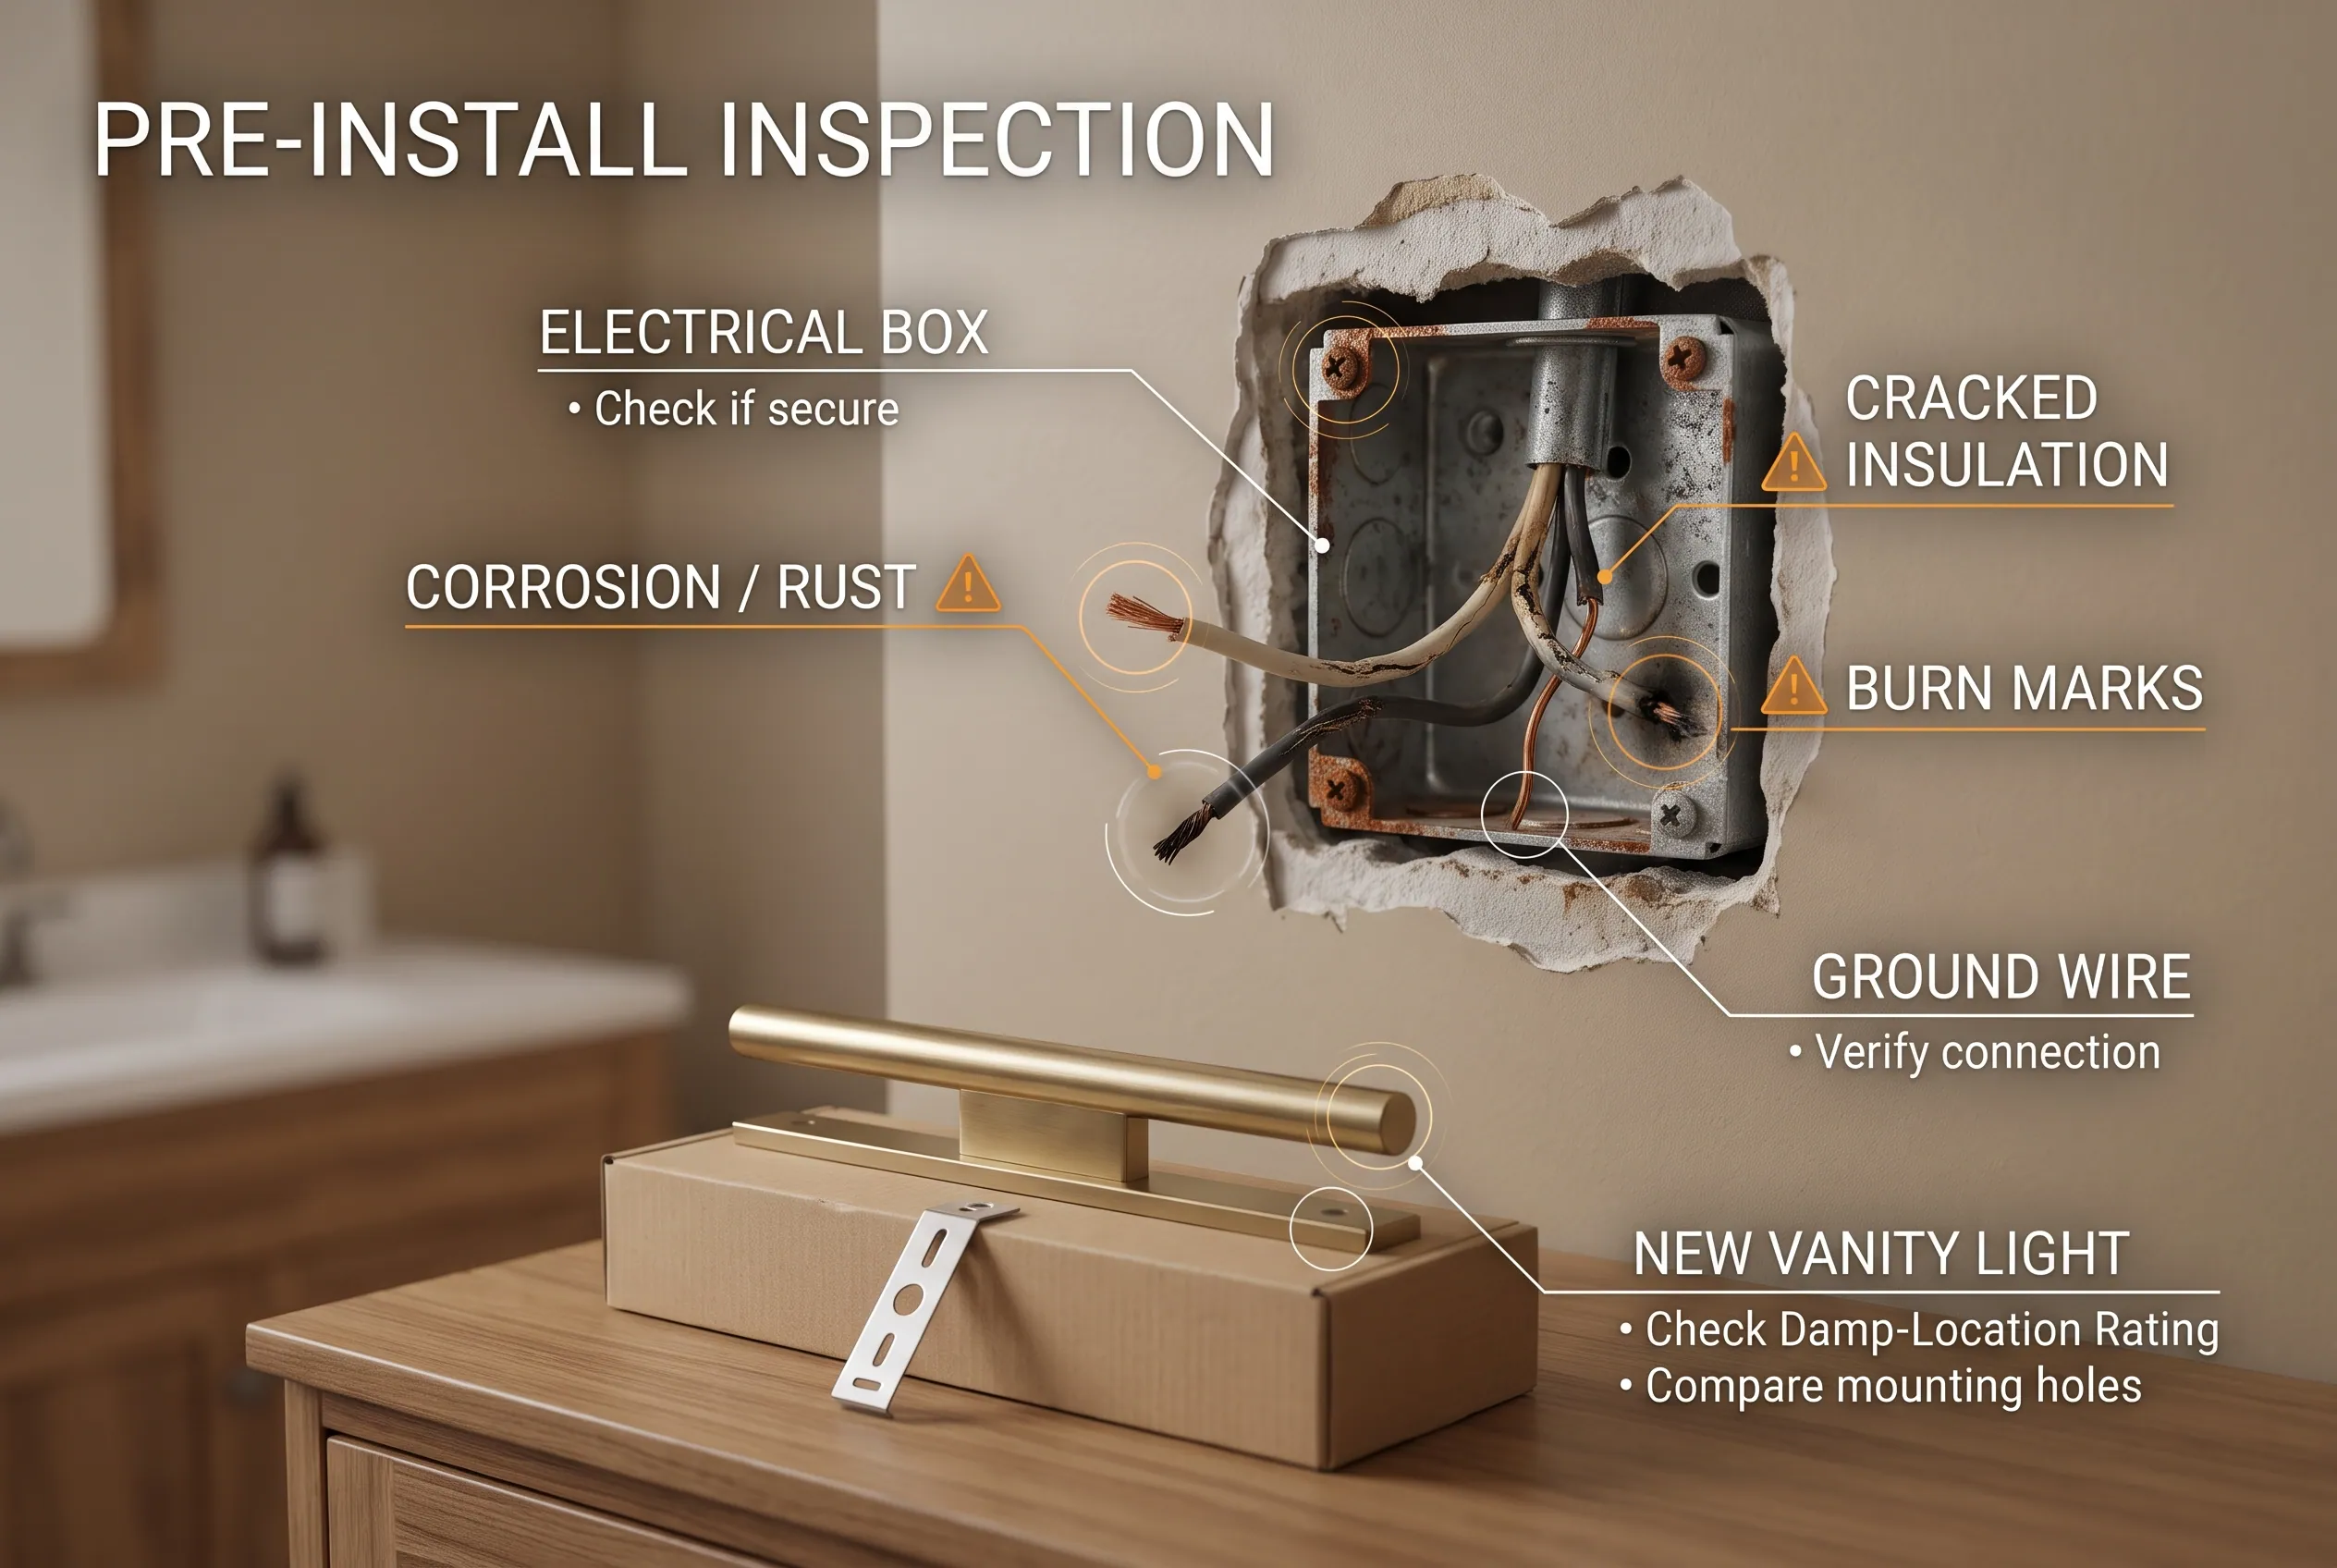
Inspect the setup before disconnecting anything. This is the best time to find a problem without leaving the bathroom light unusable.
First, compare the new fixture’s mounting requirements with the existing electrical box. Check whether the box is secure, the mounting hardware fits, and the fixture can sit against the wall without trapping wires.
Look for obvious signs of damage, such as cracked insulation, burnt marks, corrosion, loose parts, or conductors that appear altered. Do not touch exposed conductors during this inspection.
Stop if you find damaged wiring, an uncertain grounding arrangement, loose or exposed connections, or an unsuitable electrical box. A qualified electrician can determine what needs to be repaired before the new light is installed.
Also check the fixture’s bathroom-location rating and installation instructions. A product intended only for a dry indoor location may not be suitable for the conditions in your bathroom.
If the installation requires a new electrical box or a change to the existing wiring, check local electrical requirements before work begins. Permit rules and the work that homeowners may perform vary by jurisdiction.
How to Install a Vanity Light Step by Step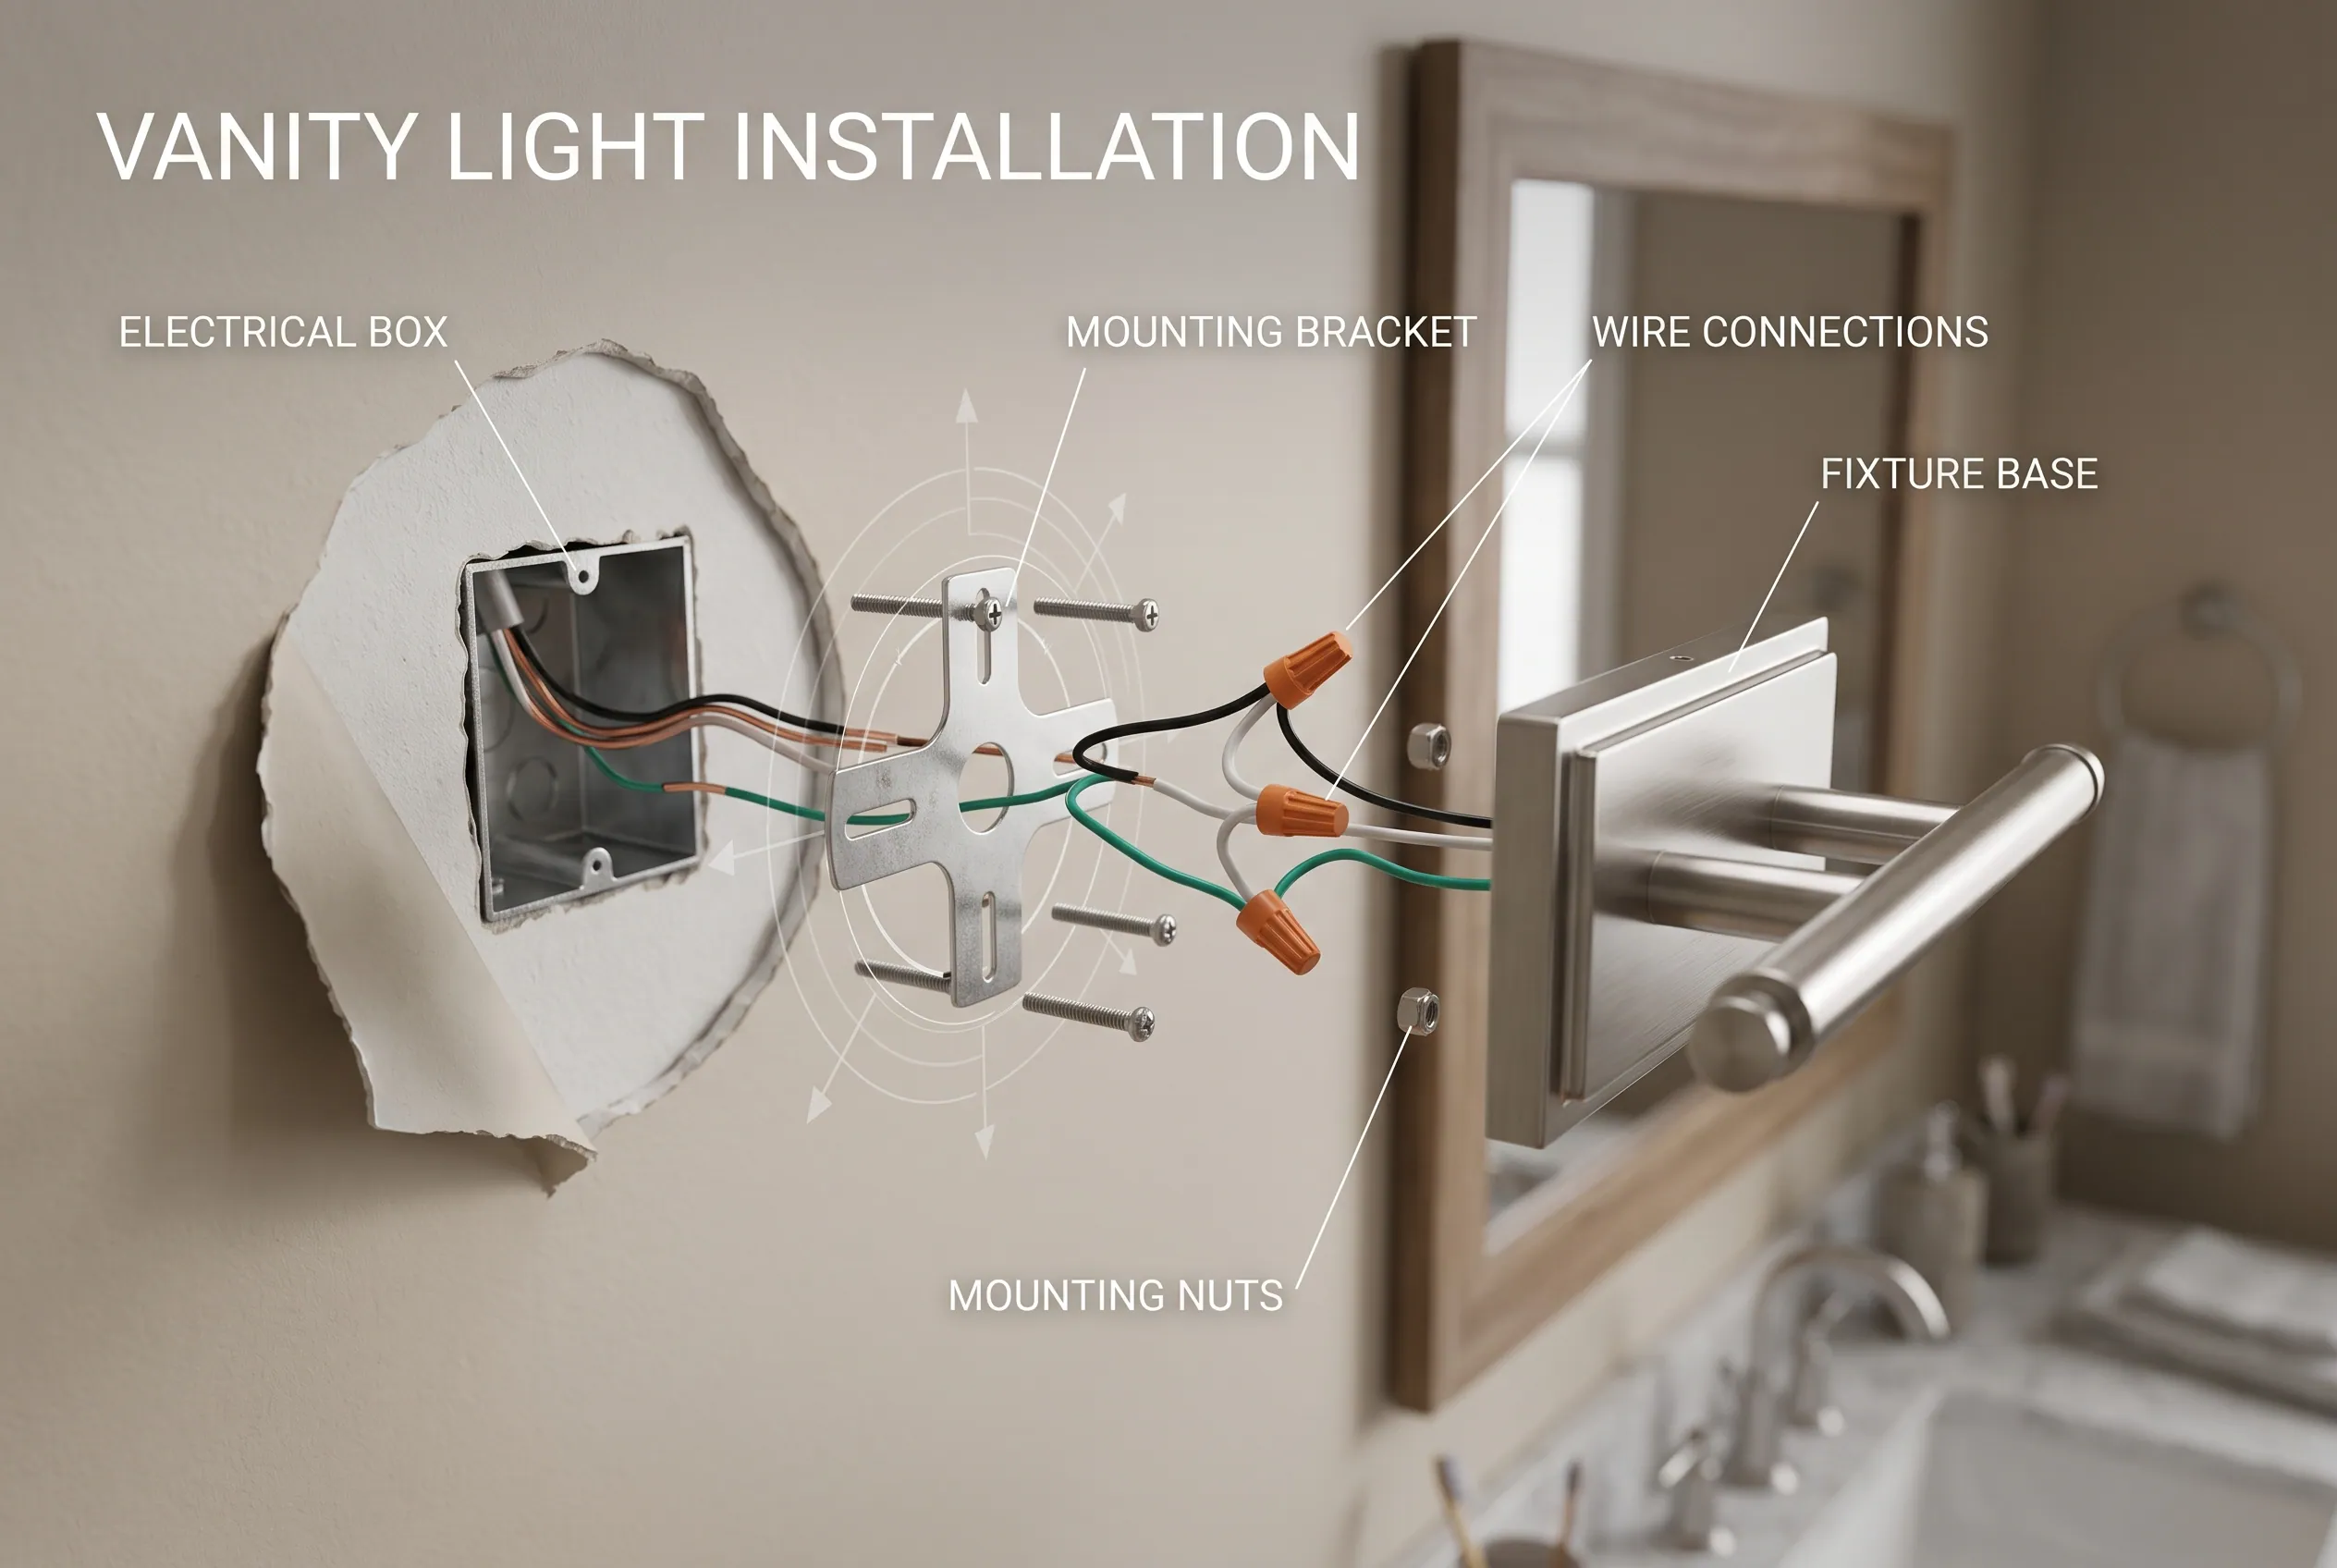
The following steps describe a straightforward replacement where a suitable electrical box and compatible wiring already exist. Follow your fixture’s instructions whenever they differ from a general example.
Step 1: Turn Off the Power and Verify It Is Off
Find the circuit breaker that supplies the vanity light and switch it off. If the bathroom has several circuits, don’t assume that the lighting circuit also controls every nearby outlet.
Switching off the wall control alone is not sufficient. The wiring behind the fixture could still be energized.
Use a suitable voltage tester according to its instructions to verify that the conductors are de-energized before touching them. A non-contact tester can be useful, but it must be used correctly, and its limitations matter. If you cannot confidently verify that the circuit is off, do not continue.
Keep others from turning the circuit back on while you work.
Once you’ve confirmed that the circuit is safely de-energized, place your tools within reach. If you need extra light, use a battery-powered work light rather than relying on another electrical connection you haven’t checked.
Step 2: Remove the Old Fixture
If you’re replacing a vanity light, remove its bulbs and glass shades first. These parts can fall or break while you loosen the fixture.
Support the fixture with one hand or ask a helper to hold it. Remove the decorative nuts or mounting screws, then ease the fixture away from the wall without pulling sharply on the wires.
Once the connections are accessible, look at how the old fixture is attached to the mounting plate or electrical box. You can take a reference photo for comparison, but do not treat the old wiring arrangement as proof that it is correct.
Disconnect the wires only after verifying that power is off. Remove the old mounting hardware if the new fixture requires different parts.
Check the exposed wiring for damage before proceeding. If the wires are brittle, burnt, unusually colored, or arranged in a way you cannot identify, stop and call an electrician.
Step 3: Install the Mounting Bracket
Most vanity lights use a mounting bracket or plate that attaches to the electrical box. The decorative part of the fixture then fastens to this bracket.
Read the instructions to identify the correct bracket and fasteners. Pull the house wires through the opening in the bracket without scraping or pinching their insulation.
Secure the bracket to the appropriate mounting points. Use the supplied hardware when specified, and confirm that the bracket sits firmly against the mounting surface.
Check the alignment with a level before moving on. A bracket that sits crooked can leave the finished light visibly tilted, even when the fixture itself is undamaged.
Do not compensate for a loose or unsuitable electrical box by forcing in larger screws or fastening an ordinary hardwired fixture directly to unsupported drywall. The mounting system must be suitable for the fixture and installation.
Step 4: Connect the Wires Correctly
This is the most important part of the electrical work. Follow the fixture manufacturer’s wiring diagram and the verified function of the existing conductors.
In many conventional US installations, the wires have these common functions:
- Hot: Usually black, this carries power to the fixture.
- Neutral: Usually white, this provides the normal return path.
- Ground: Usually bare copper or green, this provides an important protective path against electrical faults.
These colors are common, not a guarantee. Older wiring, previous repairs, or an unusual setup may differ. Never identify a wire’s function by color alone when the arrangement is uncertain.
With power verified off, connect the matching conductors as directed by the fixture instructions. Use connectors rated for the conductor material, size, and connection involved. If the instructions specify a particular connector or grounding arrangement, follow that requirement.
Connect the grounding conductor as specified. If no suitable grounding conductor is apparent, or you’re unsure how to ground the fixture or mounting plate, stop and get qualified help. Do not improvise a grounding connection to a water pipe or another convenient object.
Inspect the completed connections according to the connector manufacturer’s instructions. Electrical tape is not a substitute for an appropriate connector or a correct connection.
Gently arrange the connected wires so they fit inside the electrical box without being crushed or pulled tight. If they do not fit comfortably, don’t force the fixture into place.
For a product with a special quick-connect system, use that system according to its exact instructions.bathroom light installation guide provides one manufacturer-specific example; its hardware and connection details should not be assumed to apply to every fixture.
Step 5: Secure the Fixture and Install Its Components
Once the mounting bracket and electrical connections are ready, position the fixture base over the bracket. Align the holes or fasteners and secure the fixture according to the supplied instructions.
Tighten the fasteners firmly without overtightening them or damaging the finish. The fixture should sit as intended against the wall, with no loose movement.
Before completing the assembly, check that no wires are caught between the fixture and the wall or mounting plate. Pinched insulation can create an electrical hazard.
Attach the decorative cover, glass shades, and other included components. Install compatible bulbs, staying within the fixture’s stated wattage limit and any specific bulb requirements.
Take a moment to confirm that the fixture is level and that all parts are secure. If the decorative cover will not sit correctly or the fixture rocks when touched lightly, investigate the mounting rather than forcing the parts together.
Step 6: Restore Power and Test the Light
Once the fixture is fully assembled and secured, restore power at the circuit breaker. Turn on the light switch and check whether the fixture operates as expected.
If it does, confirm that the bulbs work, the shades remain secure, and the light sits straight above the mirror.
If it does not work, switch off the breaker again before considering any inspection. Do not remove the fixture or touch its wiring while power is on.
A light that flickers, trips the breaker, produces an unusual smell, or shows signs of heat or sparking should not be used. Switch off the circuit and contact a qualified electrician. Don’t keep resetting a breaker to see whether the problem disappears.
How High Should a Vanity Light Be Above the Mirror?
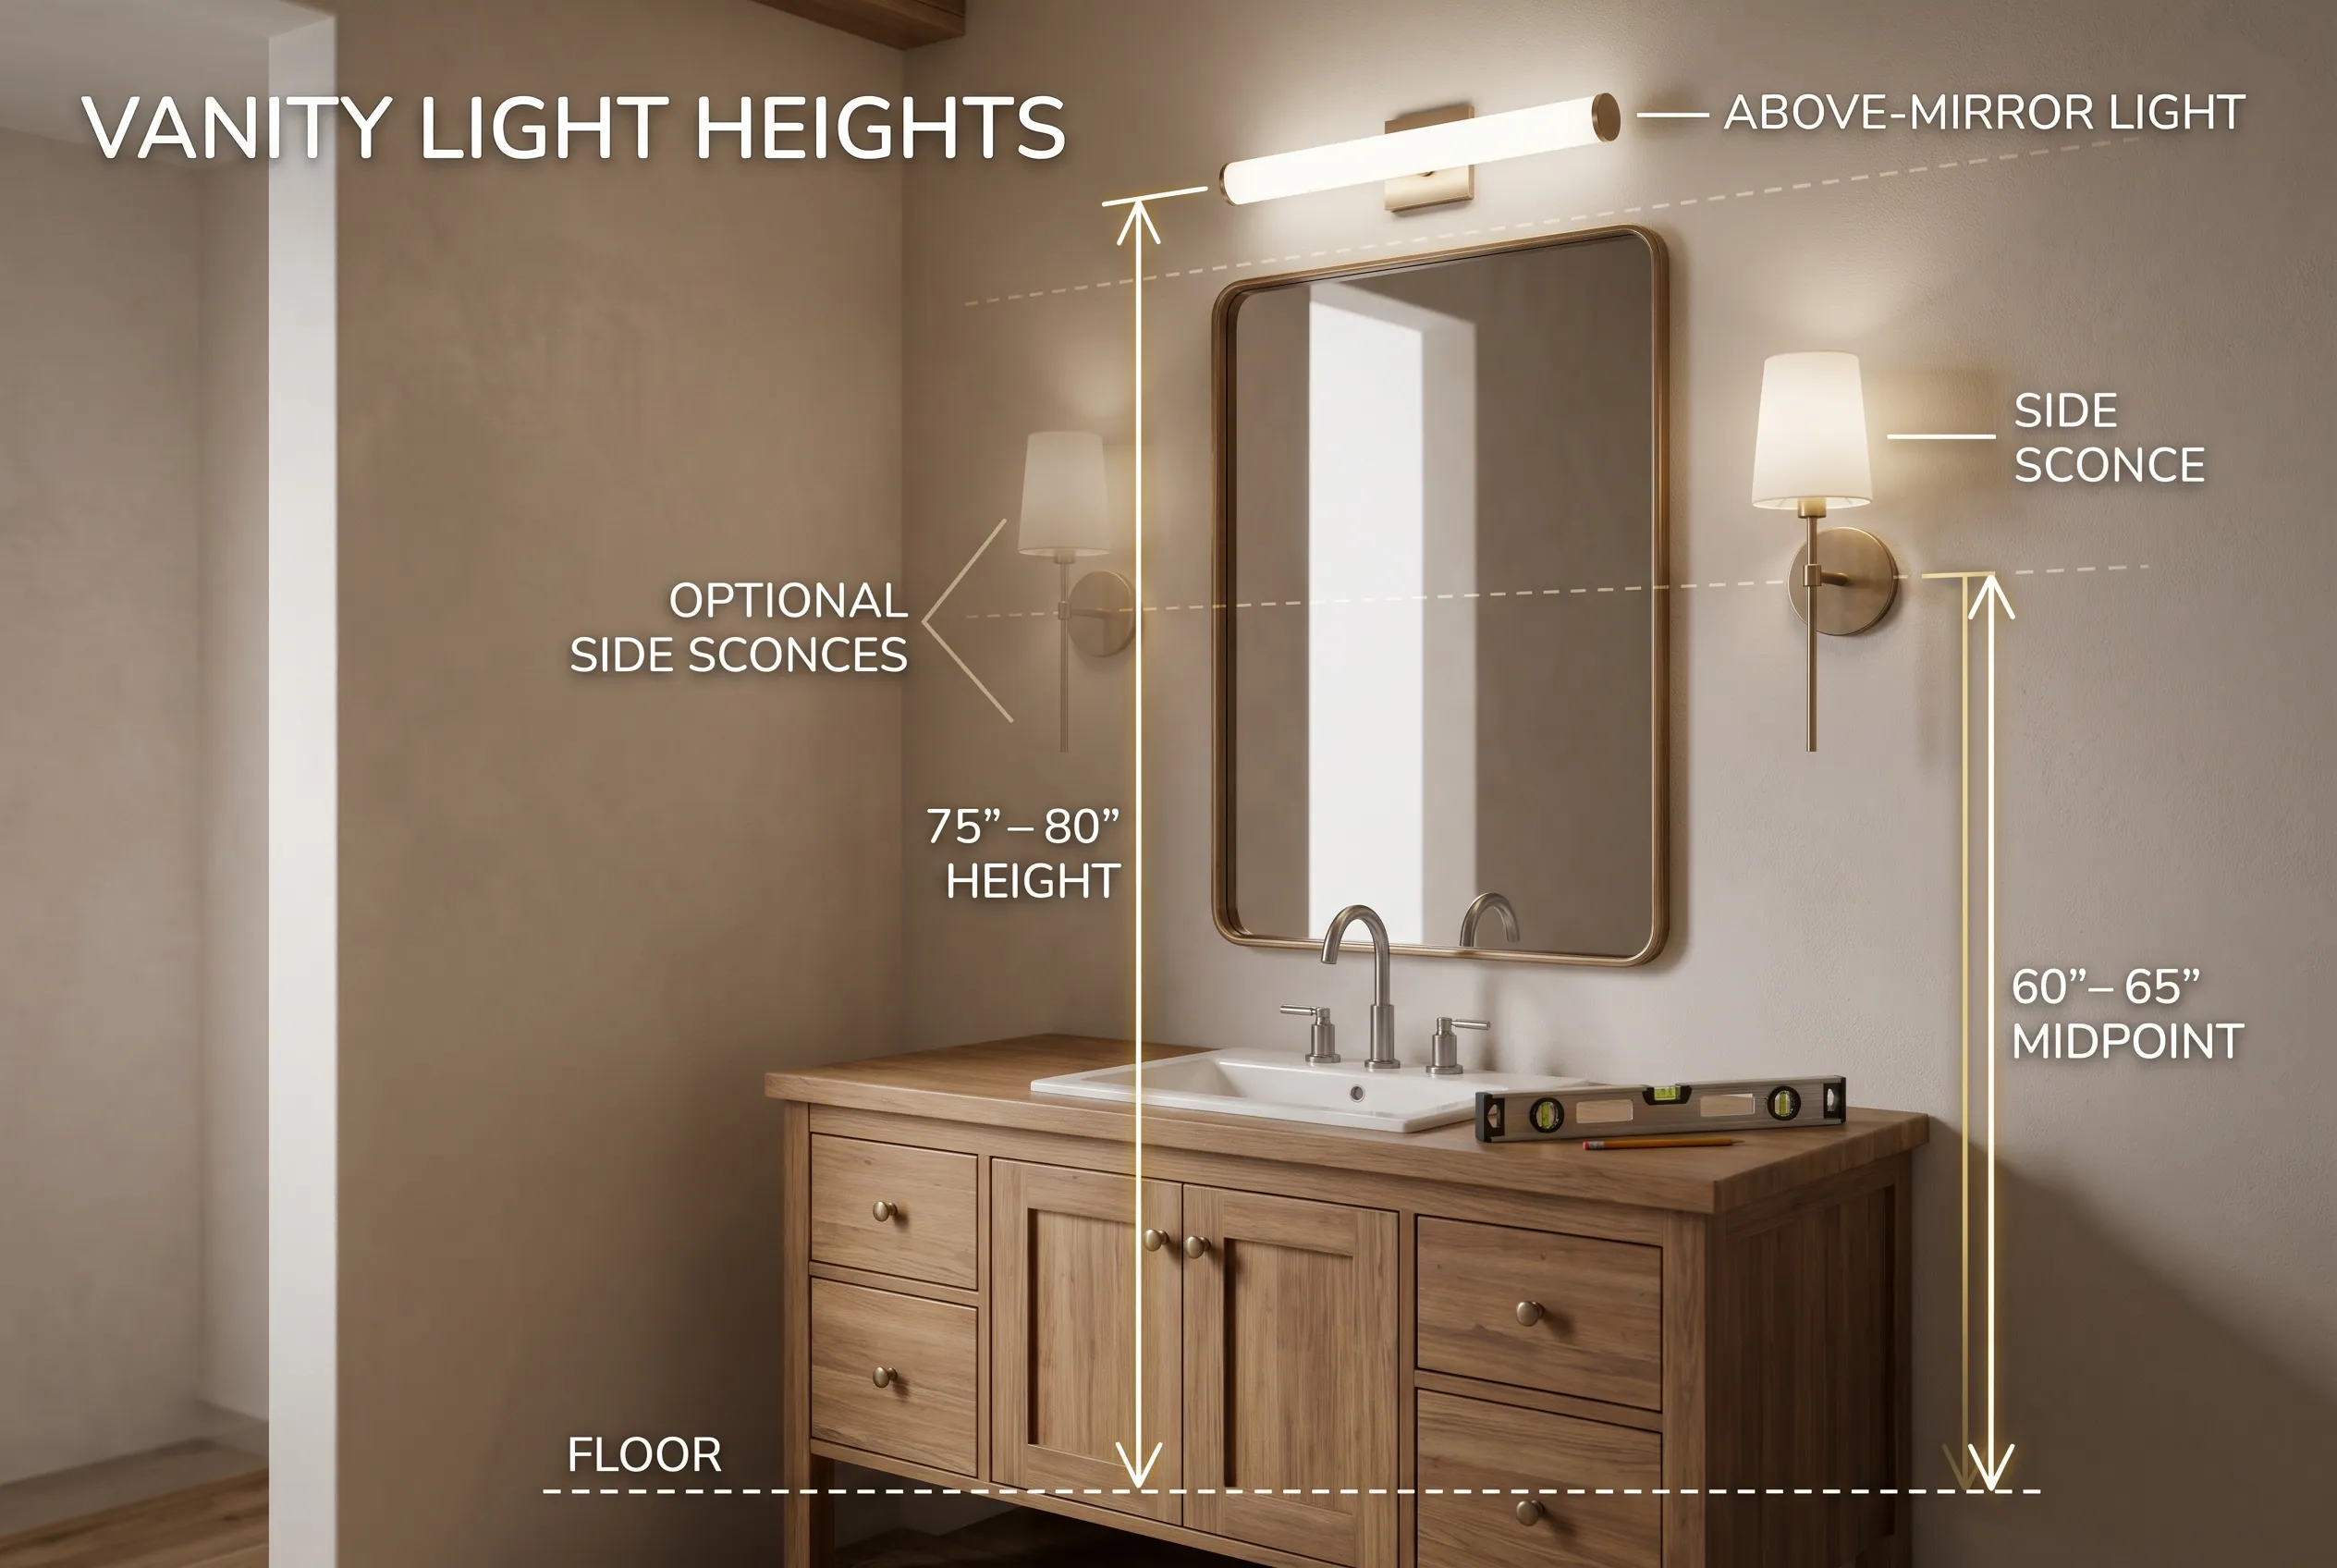
The right height depends on the mirror, fixture, ceiling, and whether you choose one light above the mirror or separate lights on the sides. There is no single measurement that suits every bathroom.
For a fixture above the mirror, start by checking the manufacturer’s placement instructions. The Kohler Lighting Quick Tips Guide suggests a floor-to-fixture-base range of about 75–80 inches for its illustrated above-mirror arrangements. Treat this as design guidance, not a universal code requirement.
Measure the available wall space and compare the fixture’s dimensions with the mirror. The light should look balanced without extending awkwardly beyond the mirror or interfering with cabinets and other fittings.
Side-mounted sconces may work better in some bathrooms because they can light the face from both directions. Kohler’s guide illustrates a midpoint of about 60–65 inches from the floor for side sconces, with their positions arranged symmetrically beside the mirror. The actual placement needs to suit the mirror and people who use the bathroom.
Before drilling or changing an electrical location, mark the intended position and step back to check the alignment. If you are adding a new location, have the electrical layout assessed before opening the wall.
What If There Is No Junction Box or the Setup Is Different?
Not every installation follows the standard replacement steps. The correct approach depends on the fixture design and the existing electrical system.
No Junction Box
A conventional hardwired vanity light generally requires an appropriate electrical enclosure for its connections and a suitable mounting system. If you remove the old light and find loose wires emerging from an opening without a suitable box, do not attach an ordinary fixture and cover the opening.
Some purpose-designed integrated lighting products use a specific mounting and wiring arrangement described in their instructions. That does not mean a standard vanity light can safely skip its required electrical box.
An electrician can identify the right enclosure, mounting support, and wiring arrangement for the installation. The work may also require opening and repairing part of the wall.
Installing Vanity Lights on a Mirror
A regular wall-mounted vanity light should not simply be fastened to mirror glass unless the product and mounting system are specifically designed and approved for that installation.
A lighted mirror is a different product. Its lighting components and mounting system are designed to work together, and its instructions specify how it must be installed and connected.
If you want light directly around or within a mirror, choose a product designed for that purpose. Check its dimensions, electrical requirements, mounting method, and bathroom-location rating before buying it.
New Construction or a New Light Location
Installing a vanity light in a new location usually requires more planning than replacing an existing fixture. The wiring route, electrical box, mounting support, mirror position, and finished wall surface all affect the job.
Plan the fixture location before the wall is closed whenever possible. This makes it easier to coordinate the wiring and mounting system and can reduce the need for later wall repairs.
New wiring and electrical-box installation are good reasons to involve a qualified electrician, particularly if you have no experience with residential electrical work. Check local permit requirements before starting.
Fixtures With Concealed Screws or Drywall Mounting Concerns
Some fixtures use decorative nuts, hidden screws, or a mounting plate that conceals its fasteners. That is a design feature, not an indication that the fixture can be left unsecured.
Follow the supplied mounting sequence so that the fixture remains properly supported. If the wall opening is damaged or the fasteners cannot grip the intended mounting hardware, repair the support before proceeding.
How Much Does It Cost to Install a Vanity Light?
The total cost depends on the fixture you choose and the work your bathroom needs. Replacing an existing light with a compatible fixture is usually less involved than adding wiring, installing a new box, or repairing the wall.
Fixture Price
As one example, a Home Depot listing for an 18-inch, three-light Raceway brushed-nickel vanity fixture displayed a price of $14.97 when checked on October 22, 2026. The listing specified three E26 bulbs, sold separately, and a maximum of 60 watts per bulb for the listed fixture. This is one budget product example, not an average market price. See the product listing for current details.
Fixtures with different finishes, integrated LEDs, larger dimensions, or more elaborate designs may cost considerably more. Check what the package includes before comparing prices.
Installation Labor
Angi’s article, updated September 2, 2026, estimates installation of a general wall-mounted light at 100–250. It also suggests allowing an additional 100–200 when new wiring is needed. These are broad US estimates for wall-mounted lighting, not a guaranteed price for every vanity-light project.
Your quote may differ based on local labor rates, the condition of the existing wiring, fixture complexity, and any repair work.
Other possible costs include:
- Compatible bulbs if they are not included.
- A suitable electrical box or mounting hardware.
- New wiring or relocation of the light.
- Drywall repair and repainting.
- Permits or inspection costs where required.
For a realistic budget, ask the electrician to separate the fixture and materials from labor and any additional electrical or wall work. If the project requires new wiring, get the setup assessed before choosing a fixture solely on price.
Common Mistakes and Final Safety Checks
A few simple checks can prevent avoidable problems during and after installation.
- Relying only on the wall switch: Turn off the correct breaker and verify the conductors are de-energized before touching them.
- Guessing wire connections: Follow the fixture instructions and confirm the wiring arrangement. Stop if the conductors or grounding are unclear.
- Using unsuitable mounting hardware: Check that the box and bracket suit the new fixture. Do not assume the old hardware will support a different model.
- Pinching wires behind the cover: Arrange the wiring so the fixture can sit correctly without crushing the insulation.
- Ignoring bulb or location ratings: Use compatible bulbs and a fixture suitable for its bathroom location.
- Forcing a loose fixture into place: Find and correct the mounting problem rather than tightening random screws or relying on drywall alone.
- Restoring power before assembly is complete: Secure the fixture and fit its required components before turning the circuit back on.
The job is not finished simply because the bulb lights. The fixture should be stable, level, fully assembled, and operating without flickering, unusual heat, or other warning signs.
Frequently Asked Questions
Are vanity lights easy to install?
Replacing an existing light can be manageable when the electrical box, wiring, and mounting hardware are suitable. A new location, missing box, damaged wiring, or uncertain grounding makes the project more complex and may require an electrician.
Do I need an electrician to install a bathroom vanity light?
Not always for a straightforward replacement, but the answer depends on your skill, the fixture, the wiring, and local requirements. Hire a qualified electrician if the wiring is unfamiliar or damaged, the electrical box is missing or unsuitable, or the job requires new wiring you are not equipped to install safely.
Can you install a vanity light without a junction box?
A conventional hardwired fixture generally needs an appropriate electrical enclosure. Do not leave its connections exposed or improvise a mounting method. Some integrated products use a specified alternative system, but you must follow the product’s instructions and applicable electrical requirements.
How high should a vanity light be above the mirror?
Start with the fixture manufacturer’s recommendations and adjust for the mirror, ceiling, and available wall space. Kohler’s guide suggests a floor-to-base range of about 75–80 inches for illustrated above-mirror arrangements. This is design guidance, not a universal requirement.
How much does it cost to install a vanity light?
The cost depends on the fixture and the work required. Angi’s 2026 estimate for general wall-mounted light installation is 100–250, with new wiring potentially adding 100–200. Local quotes may differ, particularly if the project needs a new box or wall repairs.
Choose the Right Next Step
Before buying your new vanity light, check the existing electrical box, wiring, and mounting requirements. If the setup is suitable and you can safely verify the power is off, a straightforward replacement may be within your DIY ability.
If the installation requires new wiring, has no suitable electrical box, or presents any uncertainty about grounding or connections, have a qualified electrician assess it first. A secure, correctly installed fixture matters more than finishing the project without help.
Disclaimer
Homes, electrical setups, and project costs vary, and local requirements may differ. This guide provides general information, not a substitute for fixture-specific instructions or applicable electrical codes. Use a qualified electrician for damaged wiring, missing or unsuitable electrical boxes, uncertain grounding, or new wiring.