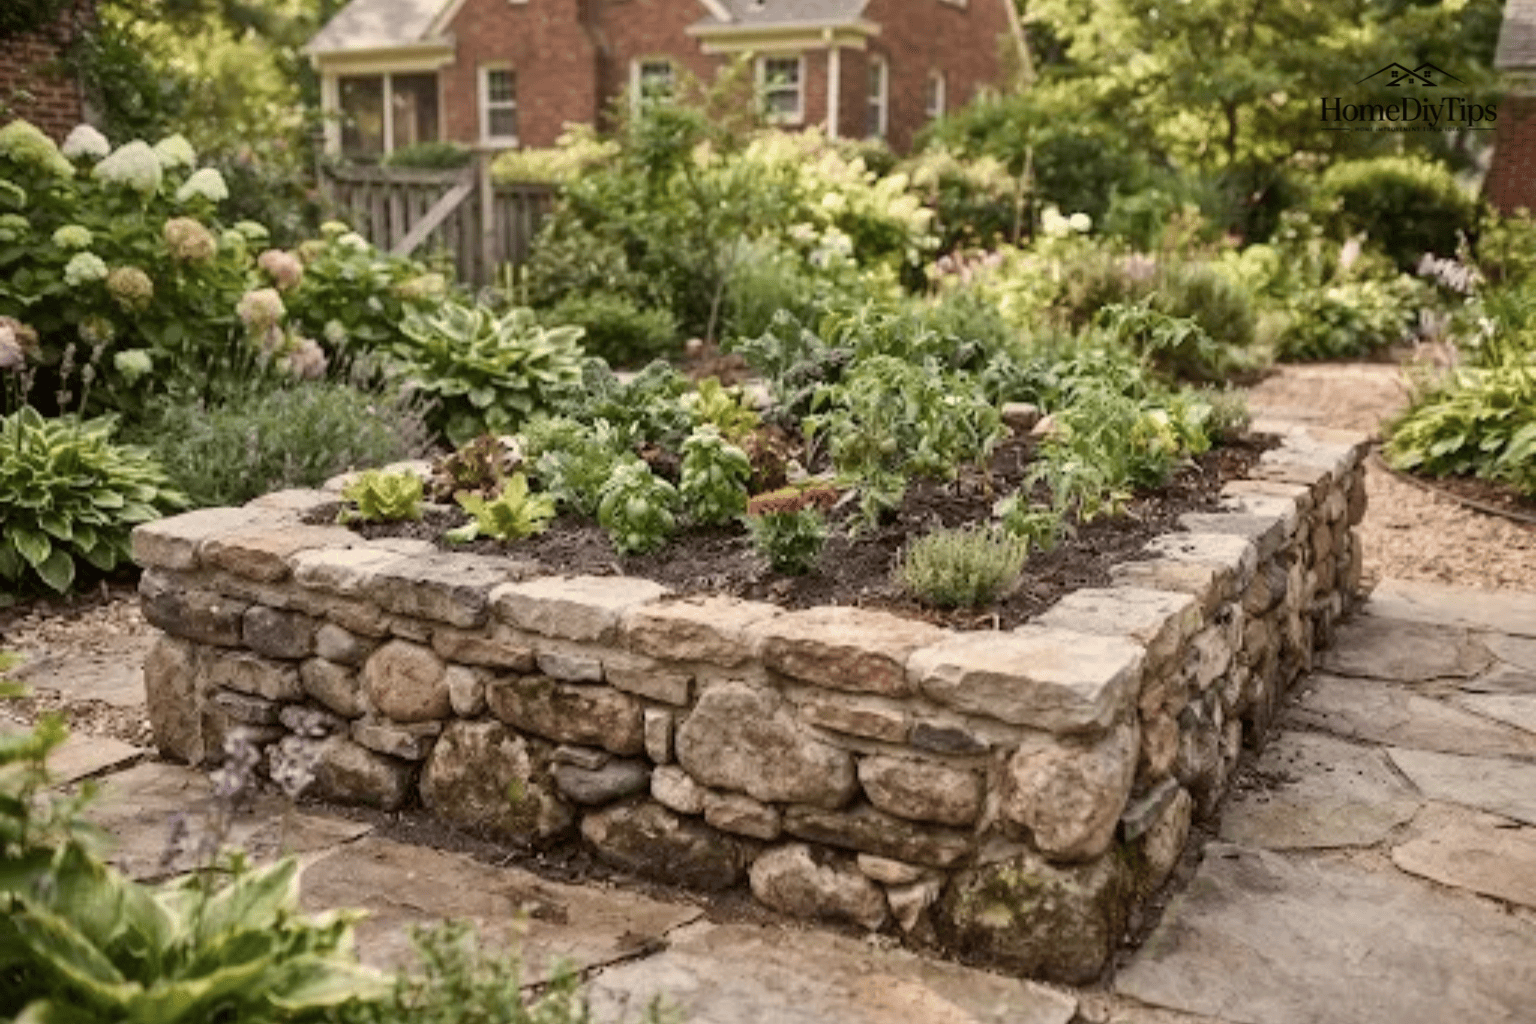
Rock raised garden beds offer a natural look and can last much longer than many wooden garden beds. They work especially well for homeowners who want a permanent garden feature and don’t mind spending more time and money on construction.
However, not every type of rock works equally well. Natural stone, concrete blocks, and artificial rock-look kits have different costs, weights, and installation needs. A low stone bed may be a manageable DIY project, but a tall wall needs more careful planning and support.
Before buying materials, consider your garden space, the plants you want to grow, and how much construction work you can handle. The right choice should look good while keeping the soil, plants, and surrounding area in good condition.
Direct Answer
Rock raised garden beds use natural stone, concrete blocks, or stone-look kits to create durable planting spaces. Choose materials based on stability, weight, drainage, budget, and available space.
Experience
Before buying, compare the product’s outside dimensions with its actual planting space and check its total delivery weight. A low dry-stacked bed may suit a simple DIY project, but taller walls need construction guidance suited to their location and conditions.
Are Rock Raised Garden Beds a Good Choice?
Yes, rock raised garden beds can be an excellent choice when you want a durable structure with a natural appearance. They are particularly useful for permanent vegetable gardens, flower beds, and landscaped outdoor spaces.
Unlike untreated wood, stone doesn’t rot. It also resists insect damage and doesn’t need regular painting or wood treatment. A properly built stone bed can remain useful for many years.
Stone beds are worth considering if:
- You want a permanent garden feature.
- Your landscape already includes natural stone or masonry.
- You have access to affordable local rocks.
- You prefer a structure that needs little routine maintenance.
- You have enough space and a suitable location for heavy materials.
However, stone isn’t the right option for everyone.
Moving large rocks takes effort, and some natural-stone projects require careful fitting or skilled labor. Concrete kits also need transportation and a suitable building surface. If you rent, have limited outdoor space, or plan to move your garden later, a lightweight raised-bed kit may be more practical.
Think about the difference between a decorative border and a true raised bed, too. A single row of stones around a planting area may hold a little soil, but it isn’t the same as a deeper wall designed to retain a large amount of soil.
The University of Missouri Extension’s raised-bed gardening guide identifies stone, concrete blocks, and bricks as possible permanent wall materials. It also explains that permanent walls take more work and have higher initial costs than temporary beds.
Pros and Cons of Rock Raised Garden Beds
Stone has several useful qualities, but you should understand its limitations before starting.
Benefits of stone raised garden beds 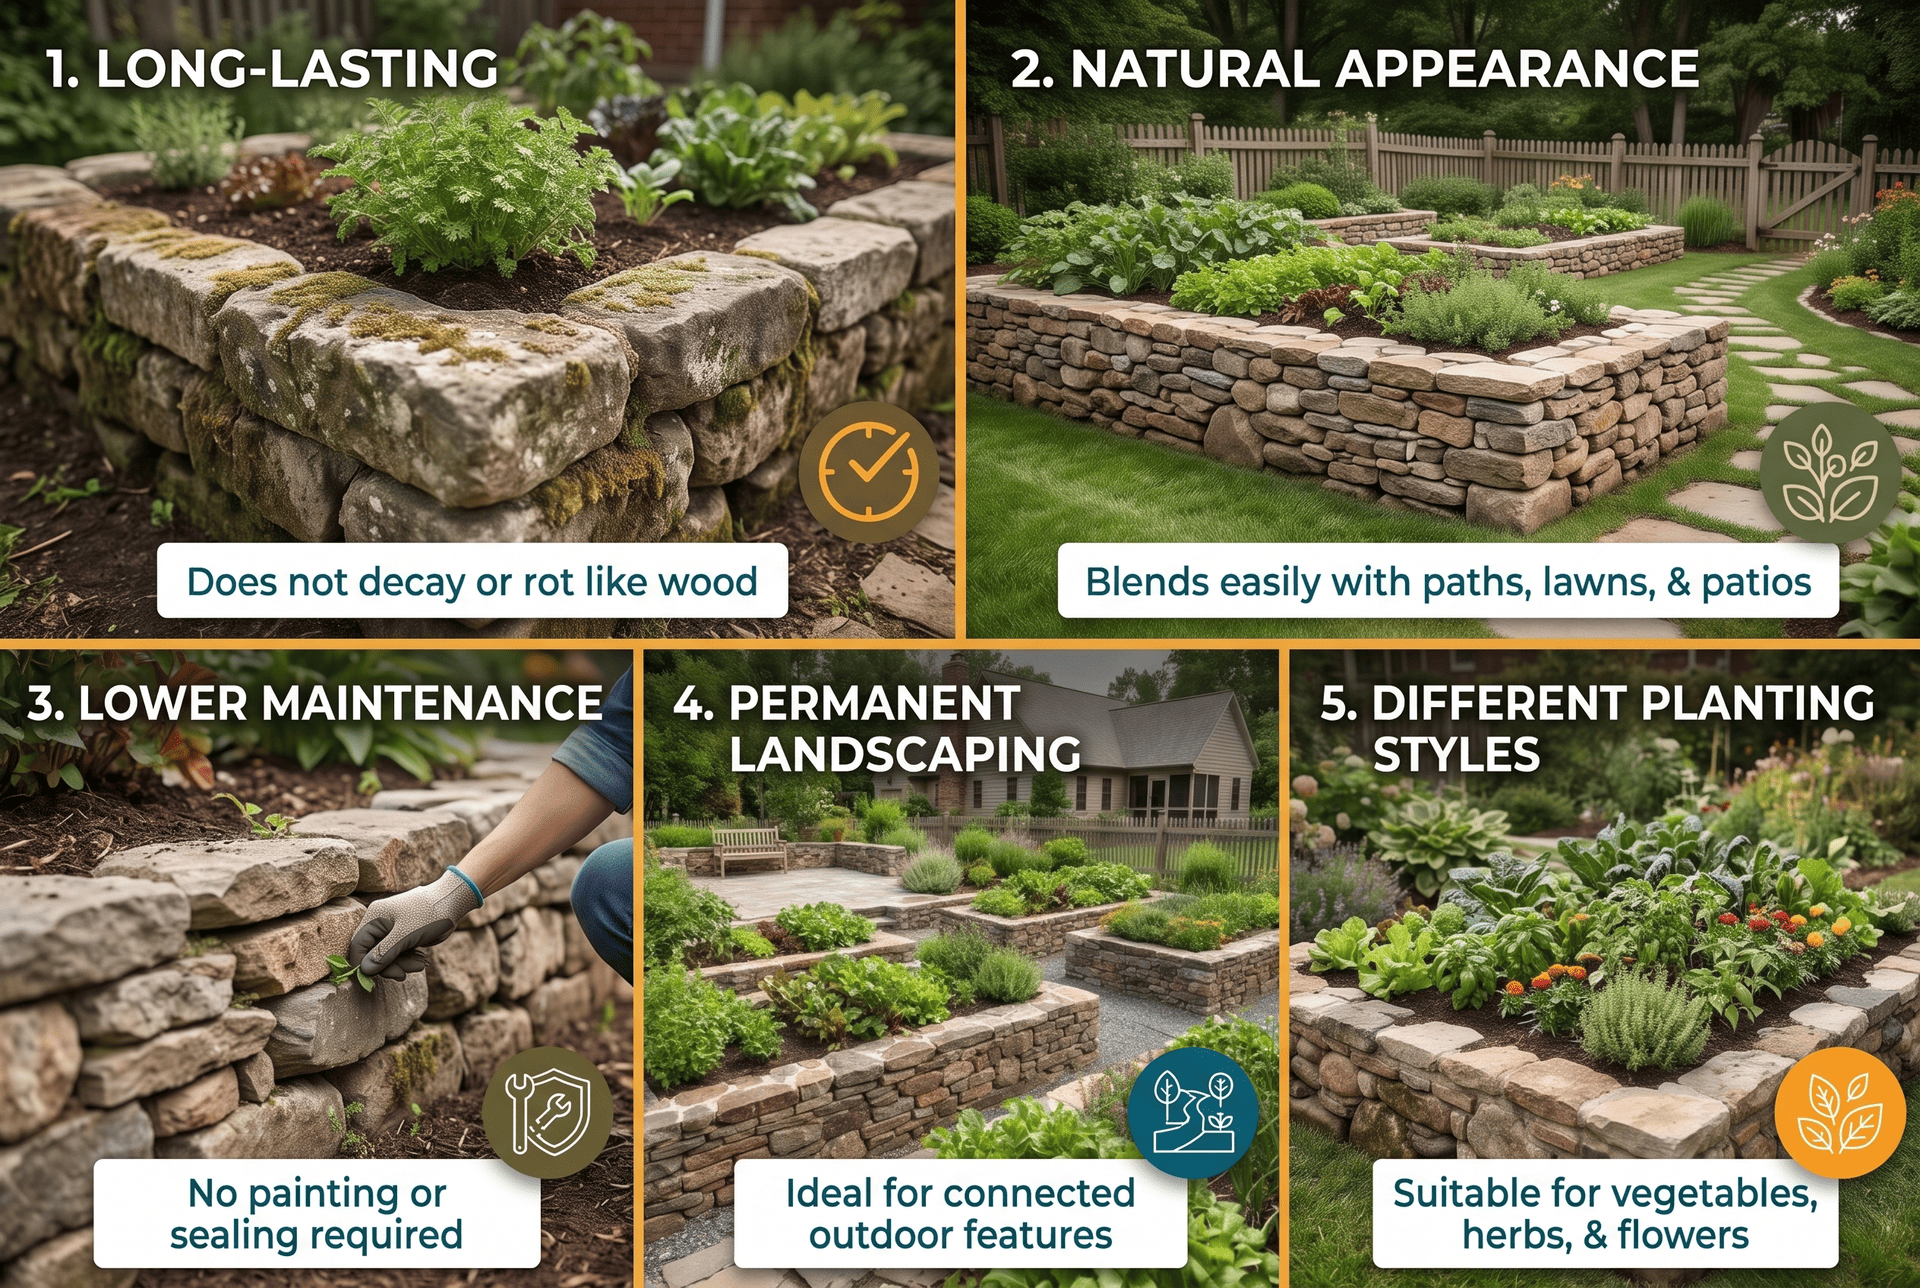
- Long-lasting construction
Stone doesn’t decay like untreated wood. It also stands up well to outdoor exposure when the correct material and construction method are used.
This makes it suitable for gardens that you don’t want to rebuild every few years.
- Natural appearance
Natural stone blends easily with lawns, paths, patios, and other landscape features.
You can use irregular fieldstone for a rustic appearance or neat, rectangular stones for a more organized design. Concrete blocks also come in different textures and color blends.
- Lower routine maintenance
You won’t need to paint or seal a natural stone wall in the same way you might maintain a wooden bed.
You will still need to inspect the wall for movement, loose stones, weeds, and drainage problems. Mortar and other bonding materials may also need repairs over time.
- Useful for permanent landscaping
A stone raised bed can become part of the overall garden design. You can build matching borders, seating areas, pathways, and flower beds around it.
This makes stone especially appealing when you are planning several connected outdoor improvements.
- Suitable for different planting styles
Stone beds can hold vegetables, herbs, flowers, and ornamental plants. You can also create separate planting areas with different soil mixes, provided each area has enough growing depth and suitable drainage.
Drawbacks to consider
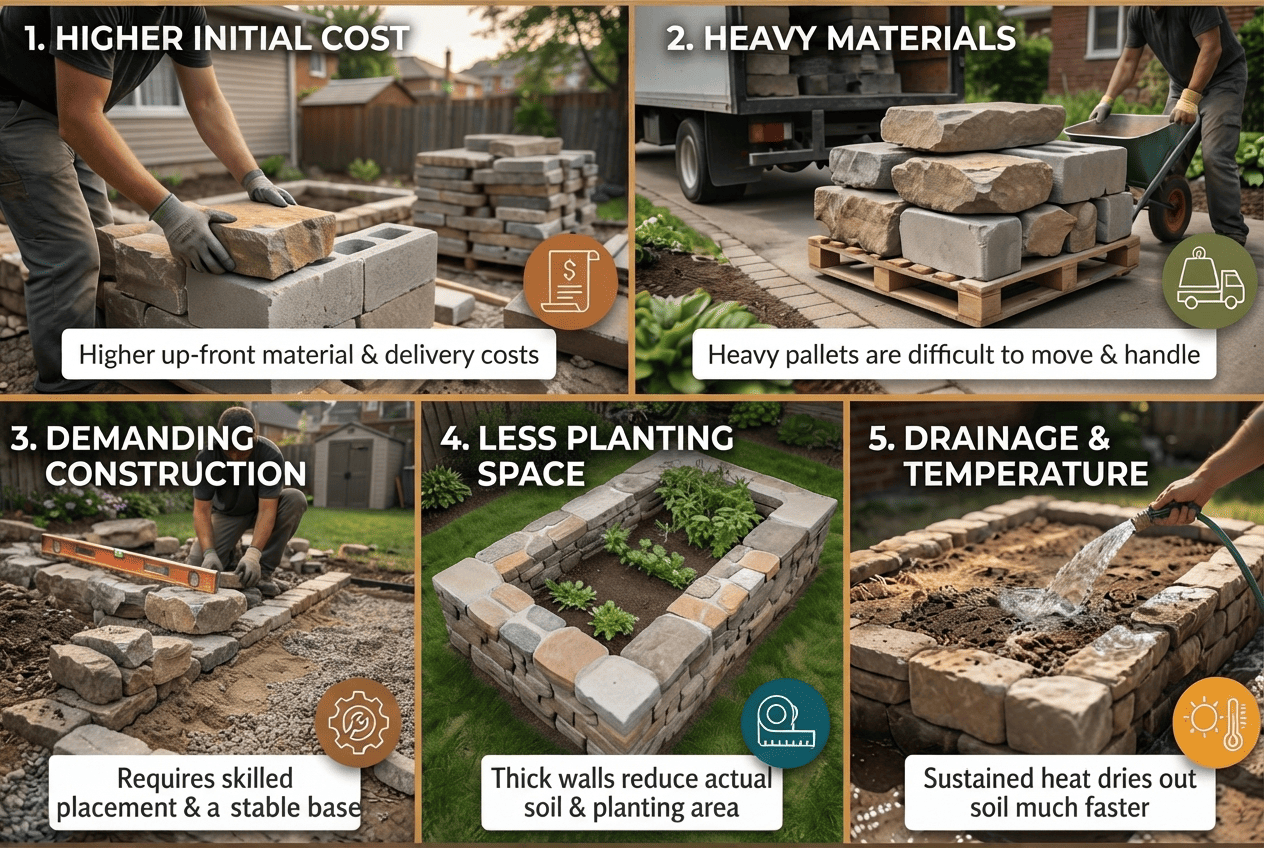
- Higher initial cost
Natural stone and concrete masonry can cost more than basic wooden frames. The final amount depends on the type of stone, bed dimensions, transportation, and installation work.
- Heavy materials
Large stones and concrete blocks are difficult to move. Some products arrive on very heavy pallets, so delivery access and handling need attention.
- More demanding construction
Irregular stones need careful placement. If the wall has poorly fitted joints or an unstable base, it may shift over time.
- Less interior planting space
A thick stone wall takes up more room than a thin wooden frame. This matters in small gardens where every inch of planting area is useful.
- Drainage and temperature concerns
Stone walls do not automatically solve drainage problems. Raised beds can also dry out faster than nearby ground-level soil.
The University of Missouri Extension explains that raised-bed soil warms and dries more quickly than soil at ground level. This can help during cooler seasons but create extra watering needs during hot weather. Read its raised-bed guidance.
Overall, stone is a strong choice for a permanent garden, but the extra cost and construction effort should fit your plans.
Which Rocks and Materials Work Best for Raised Garden Beds?
The material you choose affects the appearance, strength, installation method, and overall price of your garden bed.
There are three main categories: natural stone, manufactured concrete products, and artificial rock-look kits.
Natural stone options
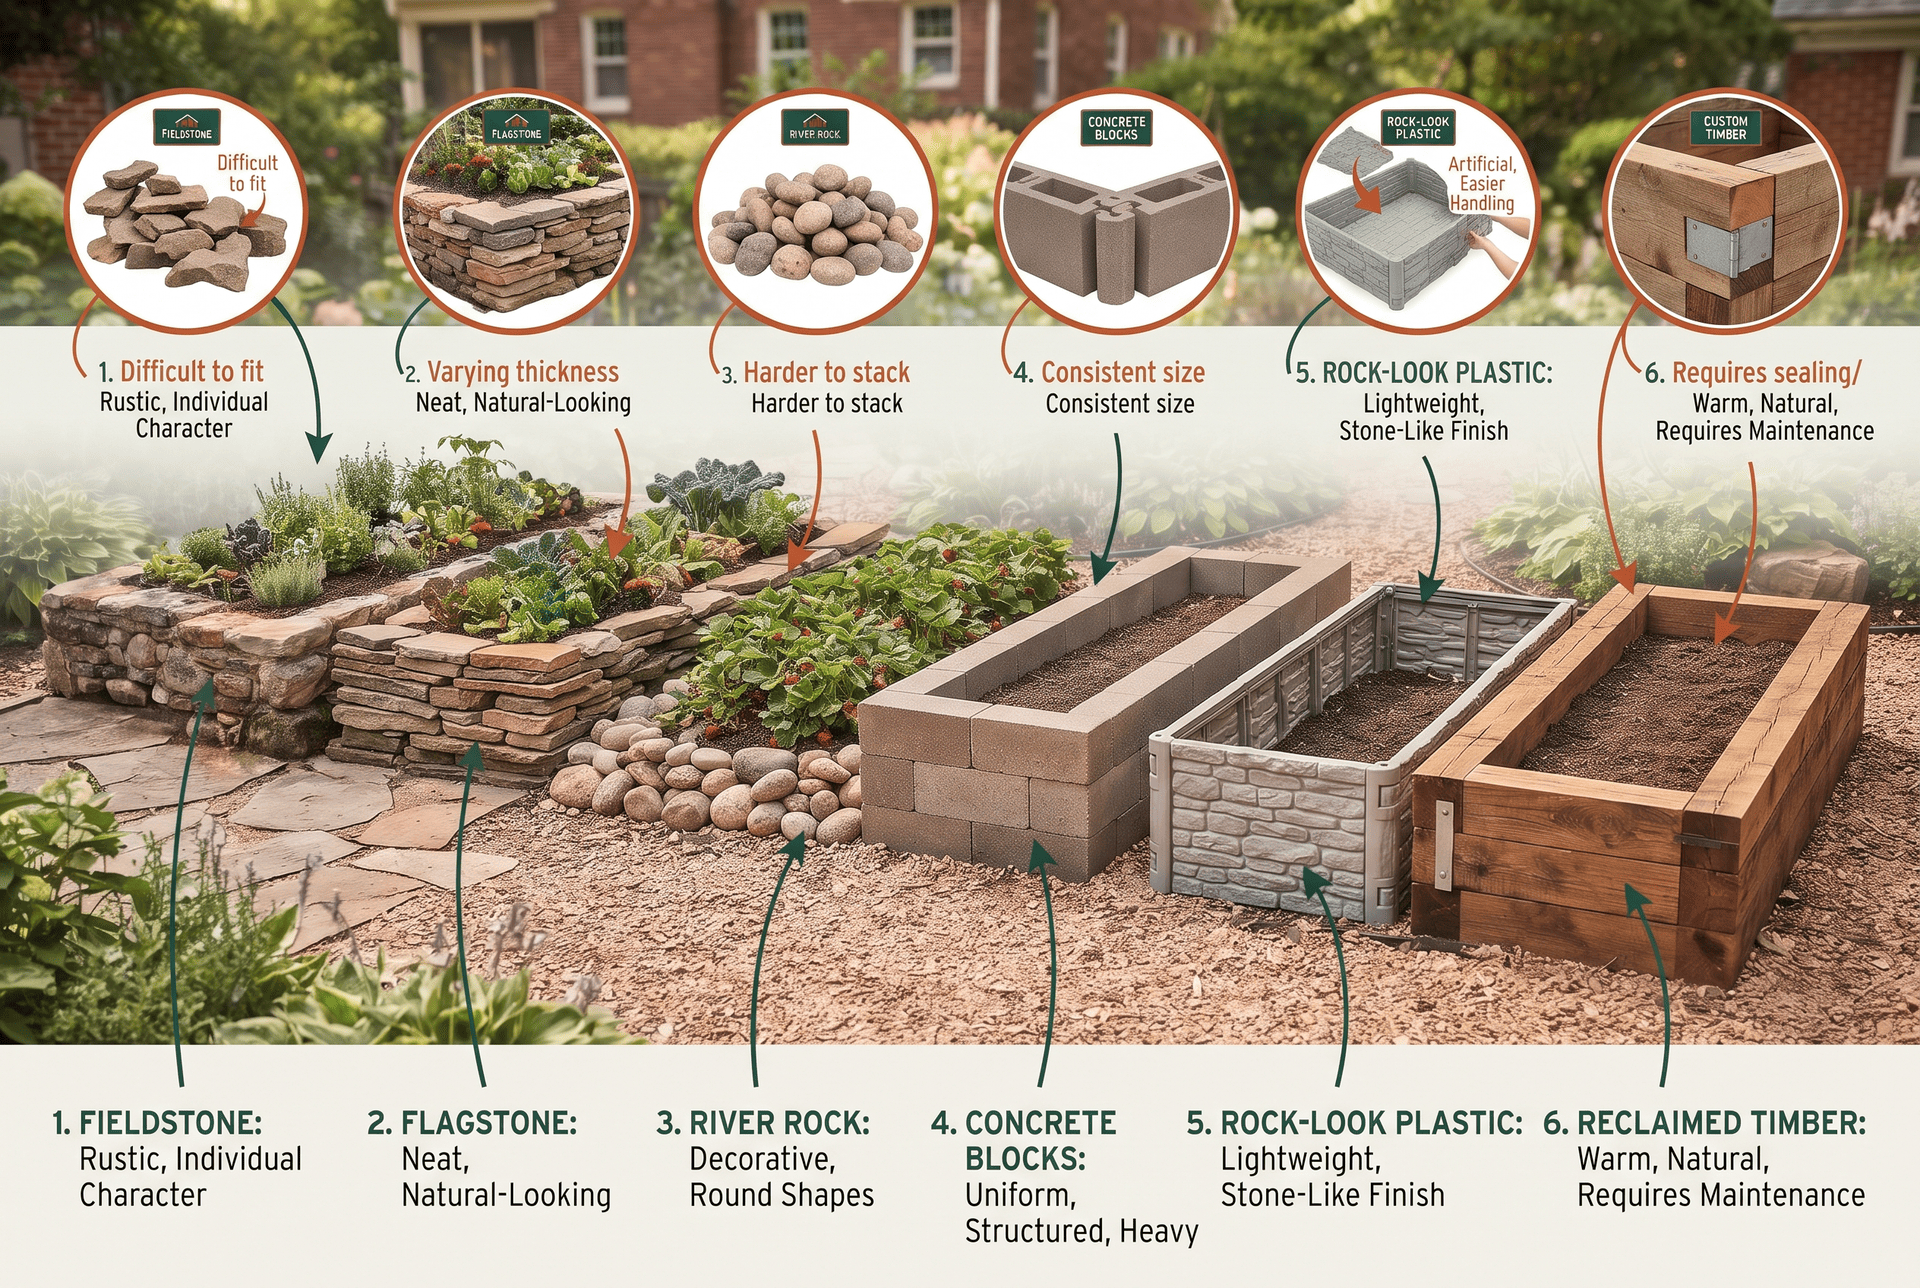
Fieldstone
Fieldstone refers to naturally occurring stones collected from fields or other land areas.
These stones often have irregular shapes, sizes, and colors. They work well in rustic gardens where a slightly uneven appearance suits the landscape.
You need to select stones carefully because irregular pieces can be difficult to fit together. Choose stable shapes and avoid leaving large unsupported gaps.
Flagstone
Flagstone is relatively flat natural stone. Its flatter surfaces can make it easier to arrange in consistent layers.
It is a good option for gardeners who want a neat, natural-looking wall.
However, flagstone varies in thickness and strength. Check the actual stones before using them for a raised structure.
River rock
River rocks have smooth, rounded shapes. They are attractive around ponds, pathways, and decorative planting areas.
Their rounded surfaces make them harder to stack into a stable wall. They are generally better used for decorative edging or within a suitable supported system than as loose, unsupported wall stones.
Limestone and granite
Limestone and granite are two other natural options.
Granite is hard and durable, with colors that range from light gray to pink and darker shades.
Limestone often has softer, more natural-looking colors. However, its mineral composition matters when you are growing plants that need specific soil conditions.
Choose stone based on its actual suitability, not just its color. Local landscape suppliers can help identify the material and its intended use.
Concrete blocks and modular stone kits
Concrete retaining-wall blocks are a practical option when you want a more regular shape.
They are manufactured in consistent sizes, making them easier to arrange than many irregular natural stones.
Some modular products are designed specifically for raised garden beds. They may include corner units, straight pieces, and matching caps.
For example, the Mutual Materials StackStone kit uses interlocking concrete units to create a rectangular bed.
Concrete kits are useful when you prefer a defined design and want to avoid sorting and fitting individual natural stones.
Artificial rock-look raised beds
Some raised-bed products look like stacked stone but are made from plastic or other manufactured materials.
The RTS Home Accents Rock Lock kit is one example. Its manufacturer identifies the material as UV-stabilized polyethylene plastic.
This type of product is much lighter than a comparable concrete or natural-stone structure.
It may suit gardeners who want a stone-like appearance without carrying heavy blocks. However, remember that its material, feel, and construction are different from actual stone.
Quick material comparison
|
Material |
Appearance | Main advantage |
Main limitation |
|
Fieldstone |
Rustic and natural | Individual character |
Difficult to fit |
|
Flagstone |
Flat and organized | Easier layering |
Varying thickness |
|
River rock |
Smooth and rounded | Decorative appearance |
Harder to stack |
|
Concrete blocks |
Uniform and structured | Consistent sizes |
Heavy |
|
Rock-look plastic |
Stone-like finish | Easier handling |
Not actual stone |
For a permanent natural garden wall, consider suitable fieldstone or flagstone. For a more predictable DIY layout, a purpose-made concrete kit may be easier to plan.
Rock Raised Garden Bed Ideas for Different Outdoor Spaces
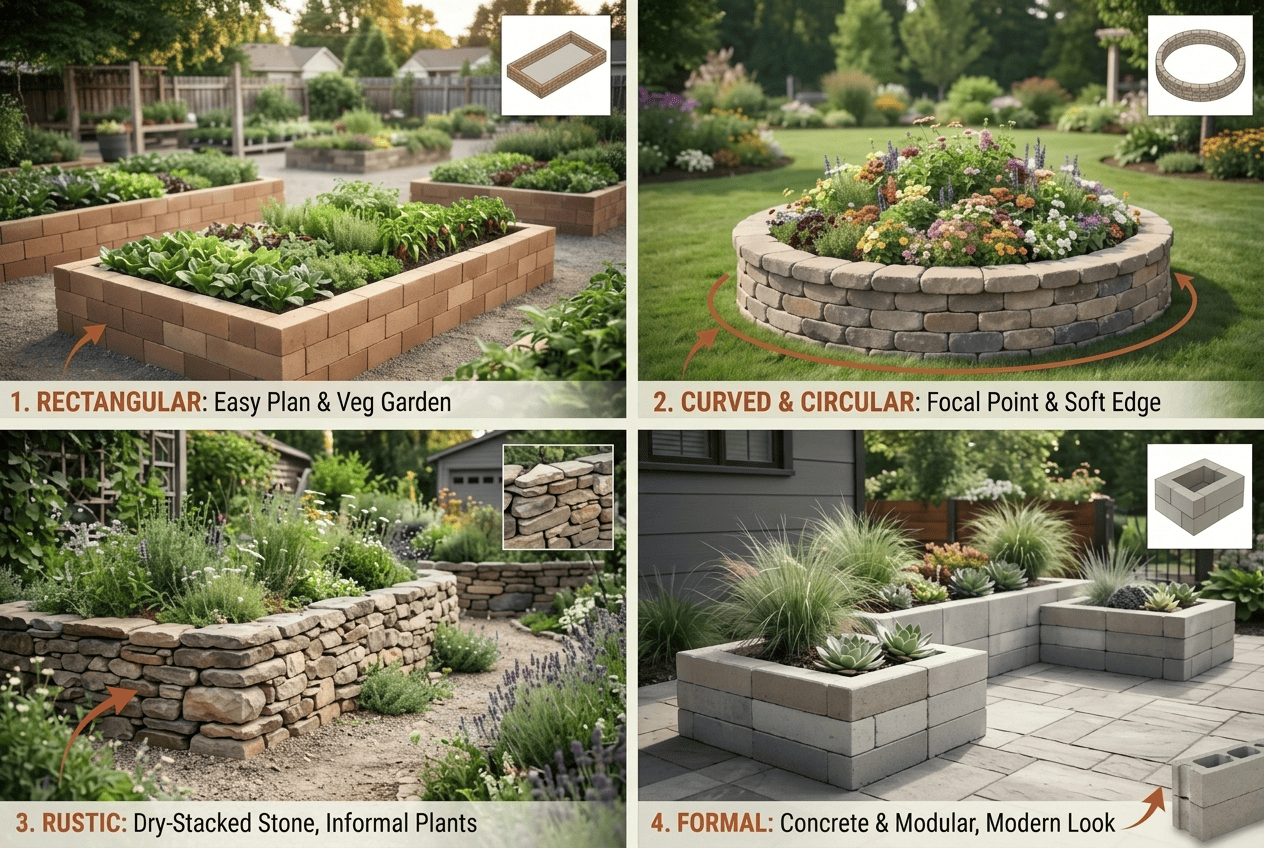
Stone beds don’t need to look like simple rectangular boxes. You can use different shapes and materials to suit the size and style of your outdoor space.
1. Rectangular and square stone beds
Rectangular beds are among the easiest designs to plan.
They work well for vegetable gardens because you can divide the growing area into sections for herbs, leafy vegetables, and other crops.
A rectangular concrete-block bed is also a practical choice when you want consistent dimensions.
For a small backyard, one or two compact beds may be easier to maintain than a single very large structure.
2. Curved and circular raised beds
Curved stone beds can soften the appearance of a garden with straight pathways and hard edges.
Circular beds also make attractive focal points in open lawns or larger landscapes.
However, curved walls need suitable stones or a system designed for that shape. Don’t force large rectangular blocks into a tight curve.
For a round vegetable bed, also consider whether you can reach the center comfortably.
3. Rustic dry-stacked stone beds
Dry-stacked stone beds use stones fitted together without mortar.
Their natural gaps and uneven surfaces suit cottage gardens, country-style landscapes, and informal planting areas.
They can be attractive around herbs, flowers, and mixed ornamental plants.
Use stones with shapes that fit together securely. Avoid treating loose piles of rocks as a stable wall.
4. Formal concrete and modular beds
Concrete systems work well in modern gardens and organized outdoor spaces.
You can repeat the same bed shape and material to create a consistent look. Matching blocks may also be used for nearby borders and pathways.
This style is useful when you want the garden structure to look neat rather than completely natural.
For patios and smaller outdoor areas, a lightweight rock-look kit may offer a similar visual effect with less handling effort.
How to Plan the Location, Size, and Shape
A good design begins with the space available. Before buying rocks, decide where the bed will go and how you will reach the plants.
Choose a suitable location
Start by considering sunlight. Vegetables and many flowering plants need several hours of direct sunlight each day, although the exact amount depends on the plant.
Also check:
- Whether nearby trees create too much shade.
- Whether water collects in the proposed location.
- Whether you have space for walking paths.
- Whether the bed will interfere with gates, doors, or outdoor furniture.
- Whether the ground can support the finished structure.
Avoid building directly over underground utility lines without checking their locations first.
Choose comfortable dimensions
Width matters because you should be able to reach the center without stepping into the bed.
The University of Missouri Extension suggests:
- About 4 feet wide when you can reach the bed from both sides.
- About 3 feet wide when access is available from only one side.
These are useful starting points, not fixed rules.
The length can vary according to your garden. Several shorter beds may be easier to manage than one very long structure.
For soil depth, Missouri Extension notes that many plants need a rooting zone of at least 6–12 inches. Some plants need more depth, so choose according to what you plan to grow. See the university’s measurements and design advice.
Check the bed’s total weight
This is especially important when building on a patio, balcony, deck, or rooftop.
The weight includes more than the stone walls. Filled soil and water add substantial weight.
Do not build a heavy stone raised bed on a balcony or rooftop until the building’s load capacity has been checked. Ask the property manager or a qualified building professional about the safe load before bringing materials onto the surface.
If you’re a renter, check your lease and obtain permission before making permanent changes.
How to Build a Low Rock Raised Garden Bed
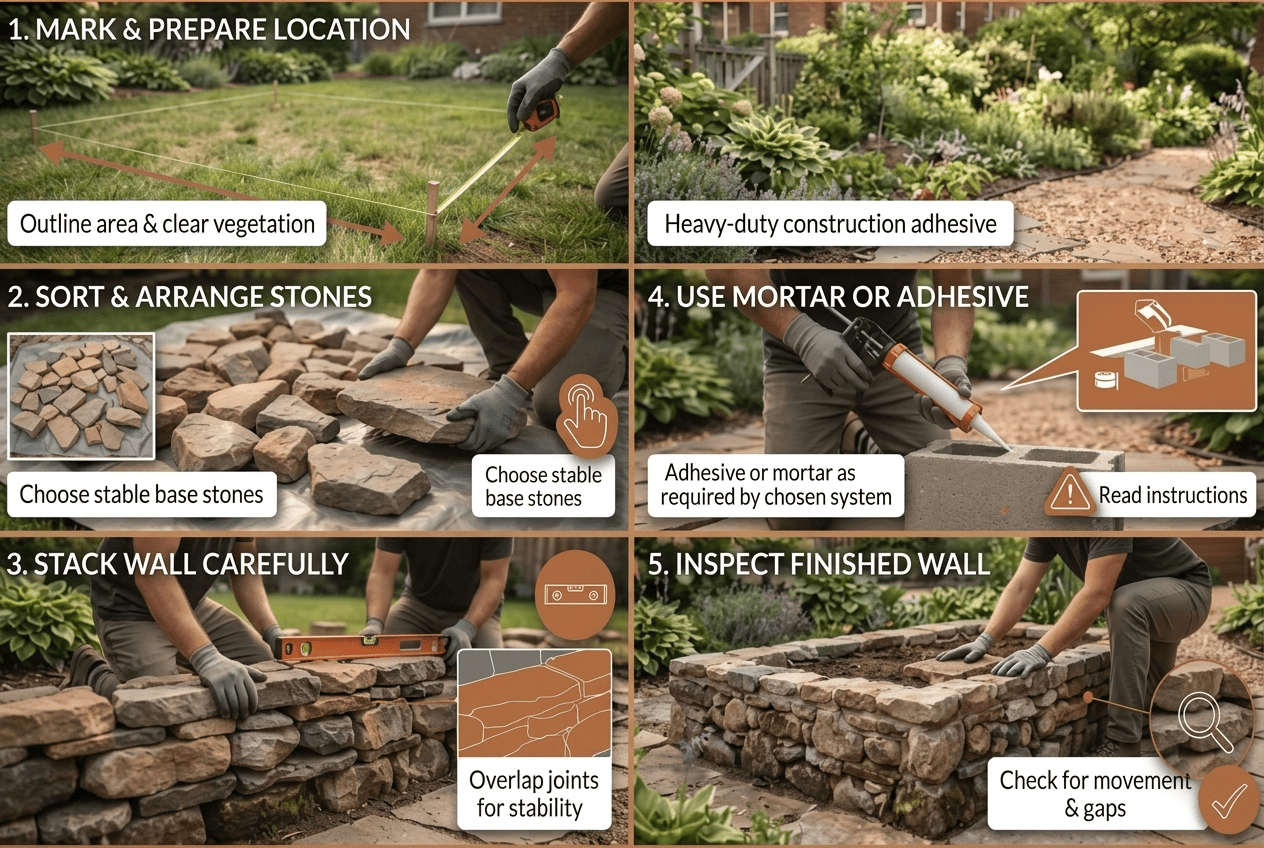
A low stone raised bed can be a manageable DIY project when the ground is suitable and the stones are not too heavy.
You will need:
- Suitable natural stones or concrete blocks.
- A tape measure.
- String and marking stakes.
- A shovel and rake.
- A spirit level.
- Work gloves.
- A suitable base material if required by your design.
- Construction adhesive or mortar only when specified for your chosen building system.
For a basic low bed, follow these steps.
Step 1: Mark and prepare the location
Measure the planned bed and mark its outline with string and stakes.
Remove grass, weeds, roots, and loose debris from the building area.
Check the surface with a level. A stable, reasonably level base helps prevent uneven settling.
Remove soft or loose material where necessary. Some stone projects use a compacted crushed-stone base for leveling and support. The correct base depends on the ground, wall design, and product instructions.
Don’t guess the foundation depth for a tall or load-bearing wall.
Step 2: Sort and arrange your stones
Place your largest and most stable stones in the first layer.
Try different pieces together before deciding where each one belongs.
For natural stone, aim for a stable fit instead of creating a perfectly smooth appearance. Smaller stones may help fill suitable gaps, but they should not be used to disguise an unstable arrangement.
If the stones are very heavy, don’t try to lift them alone. Use suitable lifting equipment or get help from someone experienced in handling heavy materials.
Step 3: Stack the wall carefully
For a dry-stacked wall, place each new stone so it bridges joints in the layer below.
This is called overlapping the joints. It helps the rows fit together rather than creating continuous vertical gaps.
Check the stones as you work.
They should sit securely without rocking or sliding. If a piece moves easily, reposition it instead of assuming the soil will hold it in place after filling.
The University of Missouri Extension explains that stones or concrete blocks in beds under 2 feet may be stacked without mortar or footings when carefully positioned. It recommends offsetting joints and fitting irregular stones to improve stability.
However, this is general gardening guidance, not a universal construction rule. Other masonry guidance can require footings and mortar at much lower heights. Follow your product instructions and local requirements. The RHS raised-bed guide provides a more conservative masonry example.
Step 4: Decide whether the wall needs mortar or adhesive
Dry-stacking is not suitable for every stone type or wall design.
Mortar is a binding mixture used to join masonry materials. It may be needed when a project requires a more rigid wall.
Some concrete kits use construction adhesive instead. For example, Pavestone’s RumbleStone kit uses mortarless construction with heavy-duty construction adhesive.
Mortarless does not always mean that the pieces simply sit loose on top of one another.
Read the exact installation instructions before assembling a kit. Don’t replace the recommended adhesive or mortar with a different product unless the manufacturer allows it.
Step 5: Check the finished wall
Before adding soil, inspect all sides.
Look for:
- Stones that move when touched.
- Sections that lean unexpectedly.
- Large gaps between layers.
- Uneven corners.
- Loose or unsupported top stones.
Correct minor fitting problems now. They can be harder to reach once the bed is filled.
Important: These steps are for a basic low garden bed, not a tall retaining wall. A structure retaining a large amount of soil, especially on sloping ground, needs proper structural planning. Seek qualified help rather than relying on simple stacking instructions.
Soil, Filling, and Drainage for Stone Raised Garden Beds
Once the wall is stable, the next job is preparing a suitable growing area.
Choose suitable soil
You don’t need expensive specialty soil for every raised bed.
Good-quality topsoil mixed with organic matter can work well for many garden plants. Compost and other suitable organic materials help improve soil structure and nutrient content.
The University of Missouri Extension soil guidance also recommends preparing the existing ground where possible so roots can grow beyond the raised portion.
Avoid creating several sharply separated soil layers. Different materials can restrict water movement and root growth when they form distinct barriers.
Choose the soil depth according to the plants you’re growing.
Should you put rocks at the bottom of a raised garden bed?
Usually, no. Adding a thick gravel or rock layer underneath the planting soil does not automatically improve drainage.
Water may remain in the soil above the gravel instead of moving freely through it. This is sometimes called a perched water table.
The University of Maryland Extension explains this problem in a 2026 response about planter beds on impermeable patios. It recommends providing suitable drainage rather than filling the bottom with gravel. Read the Maryland Extension explanation.
What if the bed sits on concrete?
A raised bed on a patio needs special attention because water cannot drain naturally into the ground below.
Plan a suitable drainage route before filling the bed. Depending on the design, this may involve drainage openings or gaps in the lower wall courses.
The RHS also explains that masonry beds on hard surfaces need planned drainage gaps.
Do not block these openings with compacted soil or material that prevents water from escaping.
After filling the bed, water it and observe what happens. Water should not remain trapped around the roots.
Should you use rocks around the bed?
You can use decorative rocks around the outside of a raised bed, but consider the plants and climate.
Virginia Tech Extension warns that light-colored rock mulch can reflect heat onto plants, while dark-colored rock can raise soil temperatures. Rock mulch can also collect leaves and other debris that are difficult to remove.
For many vegetable beds, straw, shredded leaves, or another suitable organic mulch may be more useful because they help conserve moisture and add organic matter over time.
See Virginia Tech’s guide to mulch before choosing a permanent rock covering.
How Much Do Rock Raised Garden Beds Cost?
The cost depends on whether you collect suitable stones, buy individual materials, purchase a complete kit, or hire someone to build the bed.
Natural stone projects are difficult to price without knowing the dimensions, local stone supply, and installation needs.
Here are three product examples checked on November 18, 2026.
|
Product |
Approximate price |
Main details |
|
Pavestone RumbleStone |
$350.92 |
98 × 49 × 10.5 inches; concrete |
|
Mutual Materials StackStone |
$474 |
83 × 39 × 12 inches; concrete; 1,550-pound pallet |
|
RTS Rock Lock |
$587.49 |
48-inch round, 20 inches high; polyethylene plastic |
Sources: The Home Depot, Mutual Materials, and RTS Home Accents.
These are examples of different products, not direct price comparisons. Their sizes, materials, and included components differ.
The RTS kit is particularly important to identify correctly. Although it looks like natural stone, it is made from UV-stabilized polyethylene plastic.
Also remember that the listed prices may not include every project expense.
Your total budget may need to cover:
- Delivery or transportation.
- Base preparation.
- Additional stones or blocks.
- Construction adhesive or mortar.
- Soil and compost.
- Tools and equipment.
- Professional installation, if required.
For a broader cost reference, HomeGuide estimates that a 5 × 12-foot custom natural-stone raised bed can cost approximately 1,800–4,000 installed. This is a general project estimate covering materials and installation labor, not a quote for every location. See the HomeGuide cost breakdown.
One useful way to save money is to compare local landscape-supply yards before buying a complete kit. Ask about stone sold by the ton or pallet, delivery fees, and whether the supplier can provide material suitable for a low garden wall.
Common Mistakes and How to Maintain Stone Raised Garden Beds
Stone beds don’t need the same regular care as wooden frames, but they still need occasional checks.
Common mistakes to avoid
Building on uneven ground
A sloping or soft surface can cause uneven settling. Prepare the location before stacking stones.
Using unsuitable stones
Rounded stones can be difficult to fit into stable layers. Choose shapes that work with your intended building method.
Ignoring overlapping joints
Continuous vertical gaps can weaken a dry-stacked arrangement. Offset the joints as you build.
Building too high without support
A tall wall holds back more soil and creates greater pressure. Don’t use basic low-wall instructions for a substantial retaining structure.
Forgetting interior space
Thick stone walls reduce the growing area. Measure the inside dimensions before buying materials.
Assuming stone always improves drainage
Stone walls and gravel do not replace a suitable soil mix and planned water outlet.
Choosing the wrong rock mulch
Some loose decorative rocks can increase heat around plants or make weeding more difficult.
Simple maintenance routine
Inspect your bed occasionally, especially after heavy rain or seasonal ground movement.
Check for stones that have shifted, gaps that have grown, or sections that appear to lean.
Remove leaves and debris from drainage gaps so water can escape. Pull weeds before their roots become established between the stones.
Also check soil moisture regularly. Raised beds can dry faster than surrounding ground, so plants may need more water during hot or windy weather.
If a section of wall starts moving, don’t simply push soil against it and hope it stays in place. Find out why it shifted before making repairs.
Frequently Asked Questions About Rock Raised Garden Beds
Do rock raised garden beds need mortar?
Not always. Some low dry-stacked beds can be built without mortar when the stones fit together securely. However, other walls and masonry systems require mortar, adhesive, footings, or additional support. Follow the construction guidance for your exact design.
Can you use river rocks to build a raised garden bed?
River rocks can create attractive garden borders, but their rounded shapes make stable stacking difficult. They are often better suited to decorative edging or a supported design. For a simple dry-stacked wall, flatter stones are generally easier to fit together.
Can you build a stone raised garden bed on a concrete patio?
Yes, but you must plan for drainage and weight. Excess water needs a way to escape, and the patio must be suitable for the combined weight of the stones, soil, and water. For balconies or rooftops, have the load capacity checked before construction.
Can limestone rocks affect the soil in a raised garden bed?
Limestone can affect soil acidity, but the actual effect depends on the material, soil, and amount of contact. Limestone used in garden mulch can be unsuitable around some acid-loving plants. Don’t add lime or other soil amendments without checking the soil first. The University of Wisconsin Extension explains how soil testing guides lime use.
Choosing the Right Rock Raised Garden Bed for Your Garden
Rock raised garden beds are a worthwhile choice when you want a durable outdoor feature that fits your landscape. Natural stone gives you an authentic appearance, concrete blocks offer a more regular design, and artificial rock-look kits make handling easier.
Before buying anything, measure the planting space, check the material and total weight, and plan how water will drain. For a low DIY bed, careful stone placement and a stable base are essential. For a taller retaining structure, get suitable professional guidance.
A good raised garden bed should do more than look attractive. It should provide a stable growing space that you can comfortably plant, water, and maintain for years.
Disclaimer
Garden conditions, soil types, budgets, and construction needs vary between properties. For tall retaining walls, unstable ground, or heavy installations on balconies and rooftops, consult a qualified professional before starting work.