Wallpaper can make a plain ceiling feel more stylish, add depth to a small room, or create a striking feature in a bedroom, dining room, or living space. The key is choosing a suitable product and preparing the ceiling properly before you begin.
To wallpaper a ceiling, clean and repair the surface, plan your strip layout, mark a straight starting line, apply the correct adhesive or follow the peel-and-stick instructions, and carefully position and smooth each strip. The ceiling must be dry, sound, and suitable for the chosen wallpaper, and the product must be approved for overhead use. Working with a helper is usually easier and safer than handling long strips alone.
Ceiling wallpaper takes more planning than wall wallpaper because gravity makes positioning harder. However, with the right tools, a clear plan, and careful work, many homeowners can manage the project themselves.
Direct Answer
To wallpaper a ceiling, prepare a clean, dry surface, choose wallpaper approved for overhead use, mark a straight guide line, and carefully apply and smooth each strip using the manufacturer’s instructions.
Experience
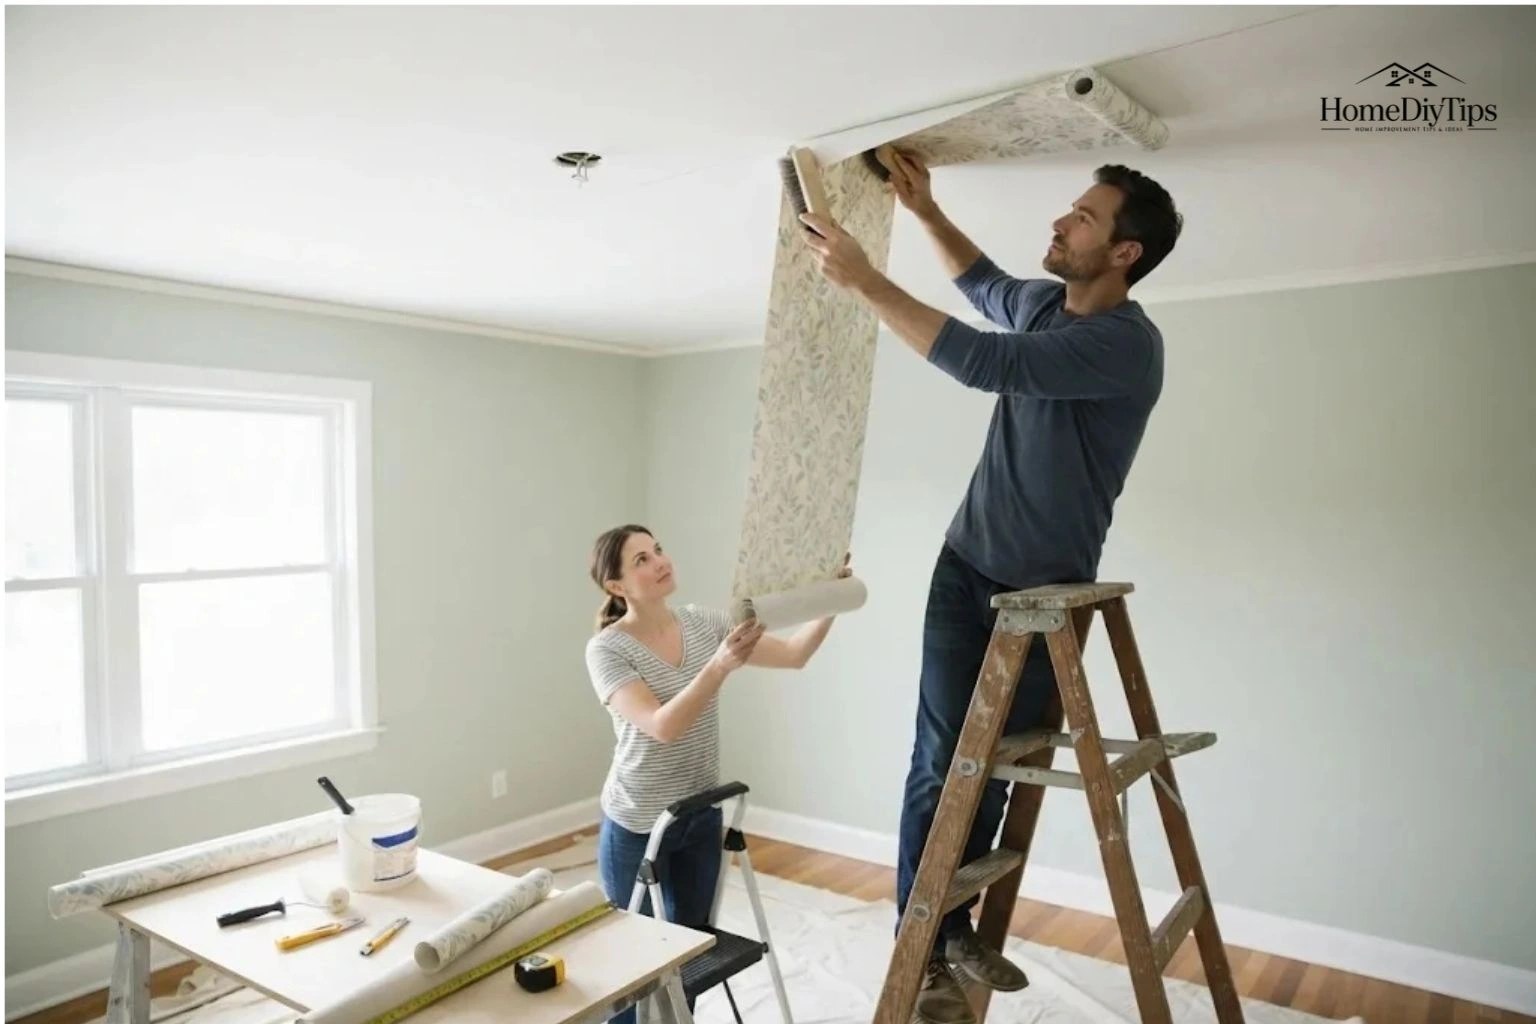
A straight starting line can make a big difference because even a small alignment error may become more noticeable with each strip. If possible, ask someone to help support the wallpaper overhead, and never stretch or overreach to position it.
How Do You Wallpaper a Ceiling?
The basic process is straightforward, but each step matters. Rushing the preparation or trying to support too much paper at once can lead to wrinkles, crooked strips, and loose seams.
Here is the process at a glance:
- Check the ceiling for moisture, loose paint, cracks, or other damage.
- Choose wallpaper and adhesive suitable for the ceiling surface and overhead installation.
- Measure the ceiling and plan the strip layout, allowing for pattern repeats.
- Prepare the surface according to the wallpaper and primer instructions.
- Mark a straight guide line for the first strip.
- Cut and prepare the wallpaper using the method specified by its manufacturer.
- Position each strip carefully, smooth it, and align the seams.
- Trim the edges, clean away adhesive as directed, and inspect the finished surface.
Before starting, think about access. You will need a stable platform that lets you work comfortably without stretching or leaning too far. A helper can hold the folded or rolled paper while you align it and smooth it into place.
If the ceiling has active leaks, extensive damage, or paint that may contain lead in an older home, resolve those concerns before proceeding. Wallpaper should never be used to hide a surface problem.
Is Your Ceiling Suitable for Wallpaper?
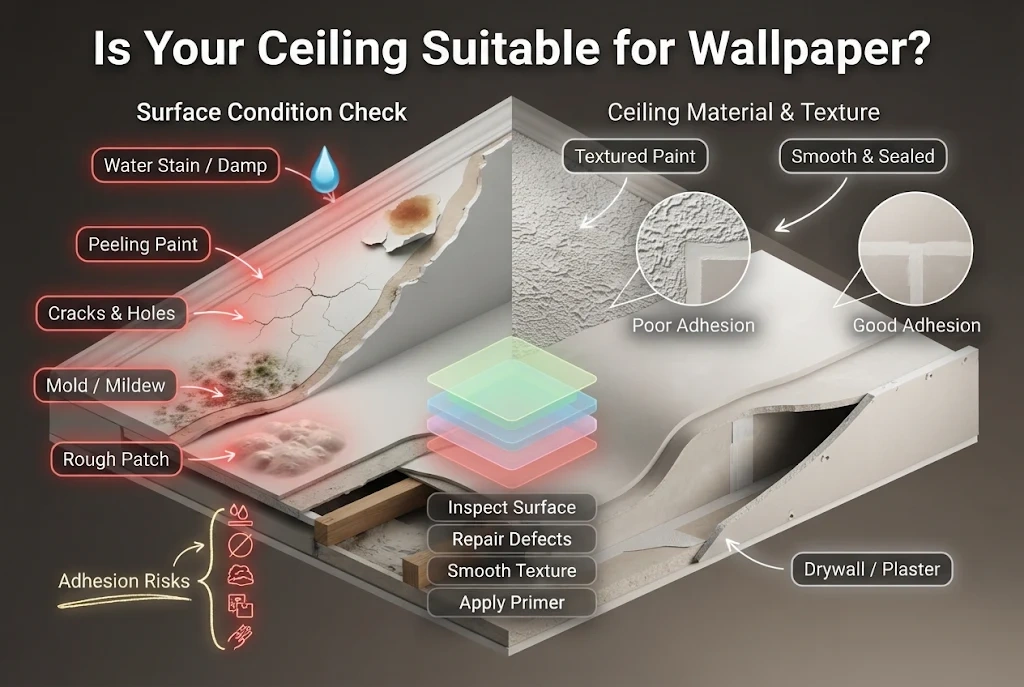
A good installation begins with a ceiling that can hold the wallpaper securely. Even an expensive design may fail if the surface underneath is damp, dusty, loose, or poorly prepared.
Check the surface condition
Look across the ceiling in good light. Check for:
- Water stains or signs of an active leak
- Peeling or flaking paint
- Cracks, holes, or loose plaster
- Grease, dust, or other residue
- Mold or persistent dampness
- Uneven patches that could show through the paper
Do not cover active moisture or mold with wallpaper. Find and address the cause first. If damage is extensive or the ceiling material appears unstable, seek appropriate professional advice.
Small, stable holes and minor surface defects may be repairable with a suitable filler. Once repairs are complete, allow them to dry and prepare the surface according to the product instructions.
Consider the ceiling material
Painted drywall, plaster, and other ceiling surfaces may need different preparation. A surface that accepts ordinary wall wallpaper is not automatically suitable for every ceiling product.
Check the wallpaper manufacturer’s guidance for the surface type, required primer, and adhesive. Some products need a smooth, sealed surface. Others may require a specific primer or may not be recommended for certain finishes.
If the existing ceiling has textured paint, a heavy texture, or a rough finish, the texture may interfere with adhesion or show through thinner wallpaper. Do not assume wallpaper will hide it. You may need to smooth the ceiling first, using an appropriate method.
For a rental property, ask the landlord for permission before making changes that could affect the finish or complicate future removal.
Which Wallpaper Is Best for a Ceiling?
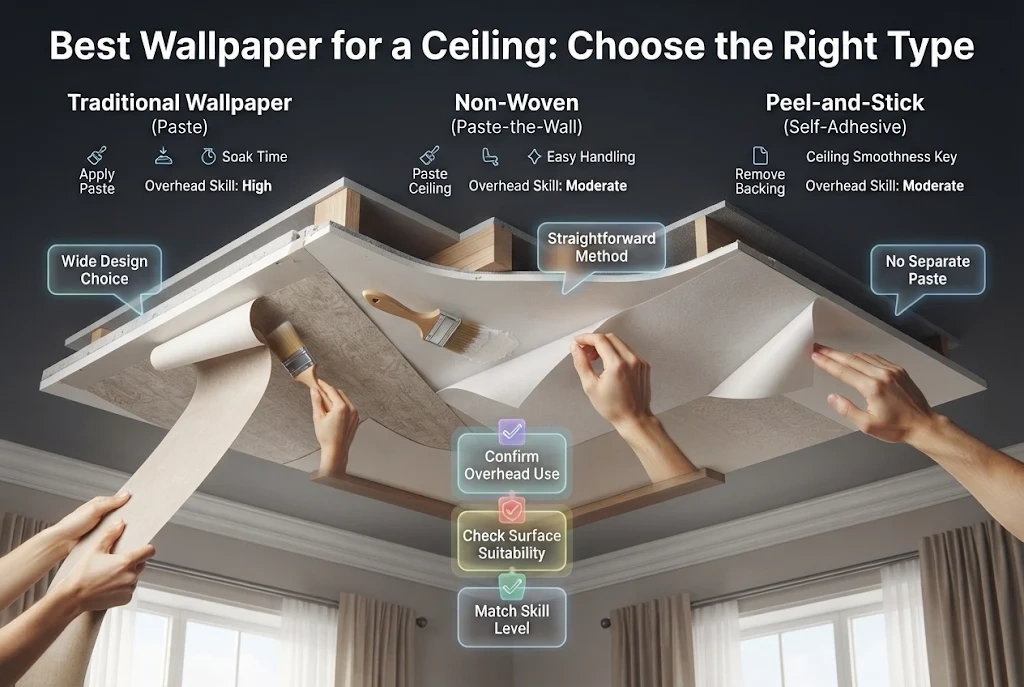
The best wallpaper depends on the ceiling surface, the room, the design you want, and how comfortable you are with the installation method. Most importantly, check that the product is suitable for overhead use before buying it.
| Wallpaper type | Potential advantages | What to check |
| Traditional wallpaper | Available in many patterns and finishes; can suit larger design projects | The correct paste, soaking or booking time, surface preparation, and overhead suitability |
| Non-woven wallpaper | Some products are designed for easier handling and may use a paste-the-wall method | Whether the exact product and adhesive are approved for ceilings |
| Peel-and-stick wallpaper | No separate paste may be needed, and some products are removable | Overhead adhesion approval, ceiling smoothness, temperature conditions, and removal instructions |
Traditional wallpaper
Traditional wallpaper usually requires a separate adhesive. Depending on the product, paste may be applied to the wallpaper or the ceiling.
This option can provide a wide choice of designs, but handling a pasted strip overhead may be difficult for beginners. Follow the manufacturer’s instructions for adhesive, preparation, and any required soaking or booking time.
Non-woven wallpaper
Non-woven wallpaper is made from a blend of fibers and is often designed for straightforward handling. Some products allow paste to be applied directly to the wall or ceiling, which may simplify the process.
However, installation methods vary. Do not assume every non-woven wallpaper uses the same adhesive or application technique.
Peel-and-stick wallpaper
Peel-and-stick wallpaper has an adhesive backing, so you generally remove the backing paper and press the material onto the prepared surface.
It may seem easier because there is no separate paste to mix. However, overhead use can be demanding: the strip may stick before you have aligned it, and repositioning may be limited. A product designed only for walls may not stay attached to a ceiling.
Choose a product whose manufacturer explicitly permits ceiling installation. Follow the surface, temperature, and application requirements closely.
Which color or pattern works best?
Your design choice depends on the effect you want.
- Light colors: Can help a room feel open and airy, especially when paired with light walls.
- Small patterns: May suit a modest bedroom or a room where you want texture without a busy appearance.
- Large patterns: Can make a ceiling a focal point, but require careful pattern matching and may create more material waste.
- Metallic or reflective designs: Can add visual interest, but the ceiling’s surface must be smooth enough to avoid highlighting imperfections.
- Nature-inspired prints: Clouds, leaves, stars, and subtle botanical designs can create a themed ceiling without changing the furniture.
For a bedroom, consider how the pattern will look from the bed and how it works with the wall color, curtains, lighting, and bedding. If you are unsure, compare samples in the room at different times of day before purchasing the full quantity.
Tools and Materials You Will Need
Gather the supplies before climbing onto your work platform. Stopping halfway through to find a tool can make overhead work more difficult.
Depending on the wallpaper and ceiling, you may need:
- Wallpaper suitable for ceiling installation
- The recommended adhesive or paste, if required
- Compatible primer or sealer
- Measuring tape
- Pencil and straightedge
- Level or laser level
- Sharp utility knife and spare blades
- Wallpaper smoother or smoothing brush appropriate for the material
- Clean cloth or sponge, if permitted by the product instructions
- Cutting surface
- Stable ladder or work platform
- Drop cloths and suitable room protection
- Safety glasses and any other protection required for the task
Use the tools recommended for your wallpaper. A smoother that works well for one material may damage another, and some finishes can be marked by excessive rubbing.
Protect the floor and furniture before starting. Keep blades and tools organized, and make sure the work area is clear so you can move safely.
How to Measure and Plan Your Ceiling Wallpaper
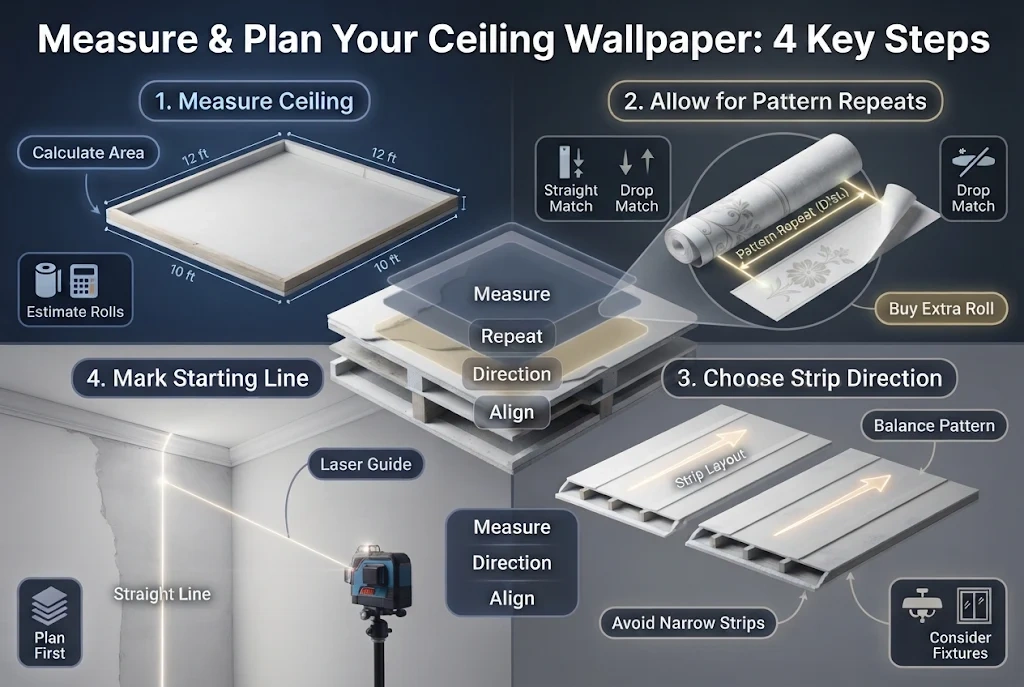
Accurate measurements help you buy enough wallpaper and avoid awkward joins near the edges. Patterned wallpaper needs extra planning because the design may have to line up from strip to strip.
1. Measure the ceiling
For a rectangular ceiling, measure its length and width. Multiply those measurements to estimate the area.
For example, a ceiling measuring 12 feet by 10 feet has an area of 120 square feet.
This is only the starting point. The number of rolls you need depends on the usable coverage per roll, the strip layout, the pattern repeat, and cutting waste. Do not rely on area alone when ordering patterned wallpaper.
For an irregular ceiling, measure each section separately and add the areas together. Check the roll label for its dimensions and coverage information.
2. Allow for pattern repeats
A pattern repeat is the distance before the printed design begins again. Large or matching patterns can require more paper because each strip may need to start at a different point in the design.
Check whether the wallpaper has a straight match, a drop match, or another matching requirement. The roll label or product instructions should explain the pattern.
When estimating quantities, follow the manufacturer’s guidance and consider buying an extra roll from the same batch if your budget allows. This can help if you make a cutting mistake or need a future repair.
3. Choose the strip direction
Decide how the strips will run before cutting the wallpaper. Ceiling shape, the pattern, available roll width, lighting, and the placement of fixtures can all affect the layout.
Think about where the seams will fall and whether the pattern will look balanced from the main viewpoint in the room. Try to avoid ending up with an awkwardly narrow strip along a prominent edge if the layout can be adjusted.
4. Mark a straight starting line
Walls and corners are not always perfectly square. If you follow the wall blindly, the first strip may begin at an angle and make later strips look increasingly crooked.
Measure from a suitable reference point and mark a straight line using a level or laser level. Plan the first strip around this line rather than assuming the wall edge is straight.
A few extra minutes spent planning can prevent a visible alignment problem across the entire ceiling.
How to Wallpaper a Ceiling Step by Step
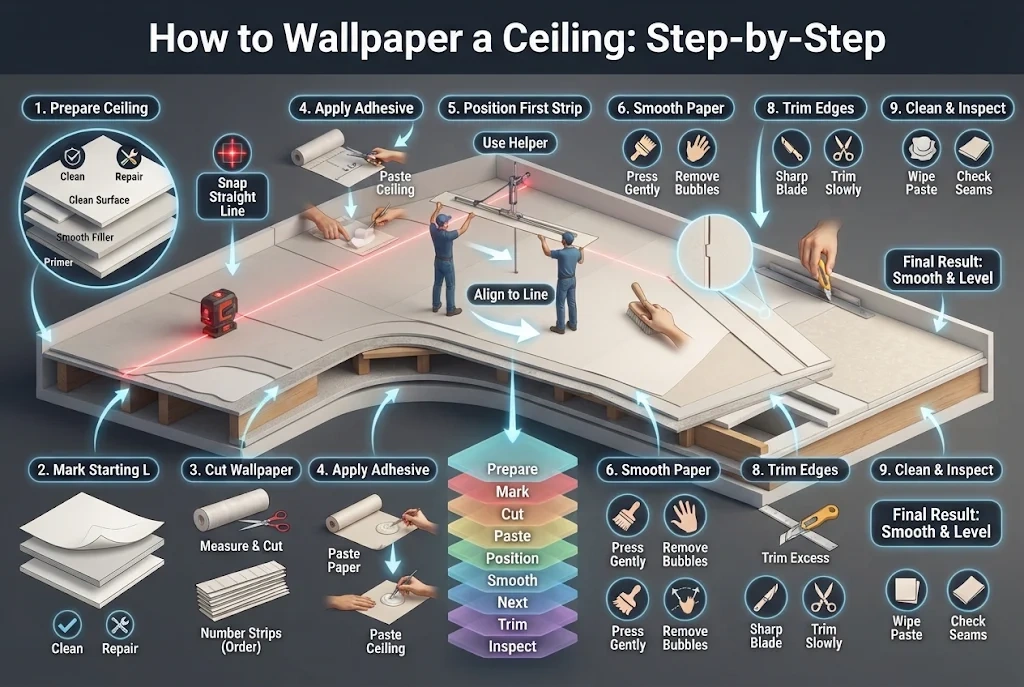
Once the materials and layout are ready, work methodically. The exact application method depends on the wallpaper, so use these steps alongside the product’s instructions rather than as a replacement for them.
Step 1: Prepare the room and ceiling
Move furniture out of the way where possible, or cover it securely. Protect the floor and any nearby surfaces from paste, dust, and trimming waste.
Clean the ceiling using a method suitable for its finish. Repair minor defects with appropriate materials, and let repairs dry fully. Sand or smooth repaired areas if required, then remove dust.
Apply a compatible primer or sealer if the wallpaper instructions call for one. Let the surface dry for the recommended time before installing the paper.
Check before moving on: The ceiling should be clean, dry, stable, and prepared for the specific adhesive or wallpaper system.
Step 2: Mark the starting line
Use your layout measurements to determine where the first strip should go. Mark a straight line that allows the wallpaper to be aligned without depending on an uneven wall.
Recheck the line before applying adhesive. Once a large strip is in place, correcting a poor starting angle can become difficult.
Step 3: Cut the wallpaper
Measure the strip length and cut the wallpaper according to the manufacturer’s directions. Allow for the trimming margin recommended for your product and ceiling layout.
For patterned wallpaper, match the design before cutting each additional strip. Labeling the strips lightly on the back, where appropriate, can help keep them in order.
Do not cut every strip in advance if doing so could create confusion with the pattern or leave the paper exposed to damage. Prepare only as much as you can handle safely.
Step 4: Apply the adhesive or prepare the backing
For traditional wallpaper, use the recommended adhesive and apply it to the specified surface. Some products require paste on the paper; others require paste on the ceiling. Follow the instructions for application amount and timing.
If the paper must be booked or soaked, observe the required time. Booking means folding pasted wallpaper back on itself as instructed so the paste can activate without drying out.
For peel-and-stick wallpaper, follow the manufacturer’s procedure for removing the backing and positioning the strip. Avoid exposing the entire adhesive backing too early if that makes the material difficult to control.
Step 5: Position the first strip
This is often the most challenging part of the project.
If possible, ask someone to help support the strip while you align it with the guide line. Keep the paper supported and avoid letting a long section hang freely under its own weight.
Position the strip gradually, checking its alignment as you go. Do not pull or stretch the wallpaper to make it reach a point. Stretching can cause the design to distort or the seams to separate later.
If the strip becomes badly misaligned, correct it according to the product’s repositioning instructions before continuing. Do not force it into place.
Step 6: Smooth the wallpaper
Use a suitable wallpaper smoother or brush to press the material onto the ceiling. Work carefully from the center toward the edges, following the instructions for the product.
The aim is to remove trapped air and create even contact without stretching the paper or damaging the surface. Use gentle, controlled movements rather than pressing aggressively.
If you see a bubble, check whether it can be smoothed out while the material is still workable. For peel-and-stick products, lift and reposition only if the manufacturer says this is safe for the material and surface.
Step 7: Install the next strip
Align the next strip with the previous one, matching the pattern where necessary. Bring the edges together neatly without overlapping them unless the product instructions specifically call for an overlap.
Inspect the seam before moving on. If the design is off or the edges are separating, address the problem while the wallpaper can still be adjusted.
Continue one strip at a time. It is better to pause and correct a small alignment issue than to repeat it across the ceiling.
Step 8: Trim the edges
Use a sharp utility knife and an appropriate straightedge to trim excess wallpaper at the edges. Work slowly and keep your hands clear of the blade.
Replace dull blades when necessary. A dull blade can tear the paper or leave a ragged edge.
Avoid cutting into the ceiling surface or damaging nearby trim. If you are not comfortable trimming overhead, get help rather than working from an unstable position.
Step 9: Clean and inspect
Remove excess adhesive using the method and cleaning materials recommended by the wallpaper manufacturer. Some finishes can be damaged by excessive water or rubbing, so do not assume a wet sponge is suitable for every product.
Check the seams, edges, and pattern alignment. Allow the wallpaper to dry or settle for the period specified in its instructions before judging the final result.
A small change in appearance while drying may occur with some materials, but persistent lifting, open seams, or large bubbles need attention. Do not repeatedly press or wet the same area without checking the product guidance.
How to Wallpaper a Ceiling by Yourself
You can wallpaper a ceiling alone in some situations, but it is usually harder than working with a helper. The paper needs to be supported while you align it, and you may need both hands to manage a long strip.
If you are working alone, make the job easier by reducing the amount of paper you need to control at one time, where the product and layout allow it. Prepare your tools, cut the strips carefully, and organize them within easy reach before climbing up.
Use a stable work platform that suits the height and layout of the room. Keep your body balanced, and move the platform when needed instead of leaning or reaching too far. Never try to hold a long strip in place while stretching to reach tools or the opposite edge.
Peel-and-stick wallpaper may seem easier to manage without paste, but it can grab the surface before you have finished aligning it. Only choose it for overhead use if the manufacturer approves that application.
For a large ceiling, a heavy or delicate wallpaper, or a pattern that needs careful matching, a helper is strongly recommended. If you cannot work without overreaching or losing control of the paper, pause and get assistance.
Common Ceiling Wallpaper Problems and How to Fix Them
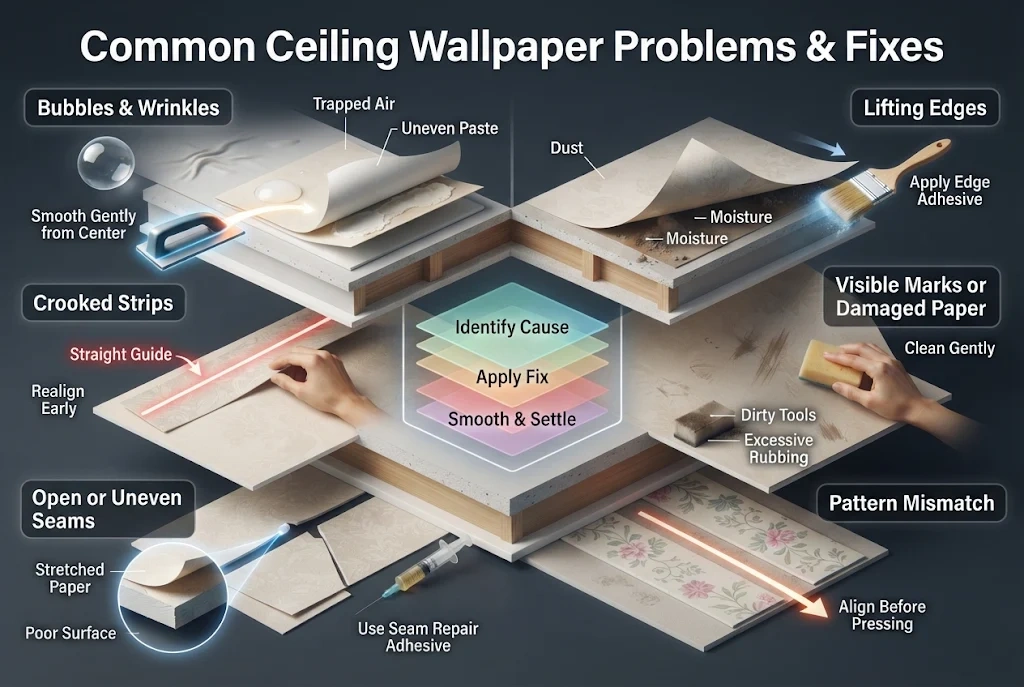
A few common problems can affect the finished appearance. The best response depends on the wallpaper and adhesive, so start with the least disruptive correction permitted by the product instructions.
Bubbles or wrinkles
Bubbles can result from trapped air, uneven application, surface defects, or installation problems. While the wallpaper is still workable, try smoothing gently from the center toward the nearest edge.
Do not puncture or cut a bubble automatically. Some repair methods can damage the surface or make the defect more visible. If a bubble remains after drying, check the manufacturer’s repair guidance.
Crooked strips
Crooked strips often begin with a poor guide line or an uneven wall edge. Use a level or laser level when planning the first strip, and check alignment before moving to the next one.
If the first strip is badly off line, continuing may make the problem more obvious. Correct it early if the wallpaper can be repositioned safely.
Open or uneven seams
Seams may separate if the paper was stretched, the adhesive was unsuitable, or the surface was not prepared correctly. Follow the product’s seam-repair guidance rather than adding random amounts of paste.
Avoid forcing edges together if that distorts the pattern. If the wallpaper has dried and the seam remains open, check whether the manufacturer recommends a compatible seam adhesive or another repair method.
Lifting edges
Lifting may point to dust, poor surface preparation, moisture, or an adhesive that is not suitable for the application. Check the cause before trying to stick the edge down again.
If the ceiling is damp or the wallpaper continues to lift, address the underlying issue rather than covering it with more adhesive.
Visible marks or damaged paper
Excessive rubbing, dirty tools, or unsuitable cleaning methods can leave marks. Use clean tools and follow the manufacturer’s cleaning guidance. For delicate or textured finishes, test any permitted cleaning method in an inconspicuous area first.
Pattern mismatch
Pattern errors usually become more noticeable as additional strips are installed. Check the design alignment before pressing each strip fully into place. For future projects, plan the pattern repeat and cutting order before applying adhesive.
How Much Does It Cost to Wallpaper a Ceiling?
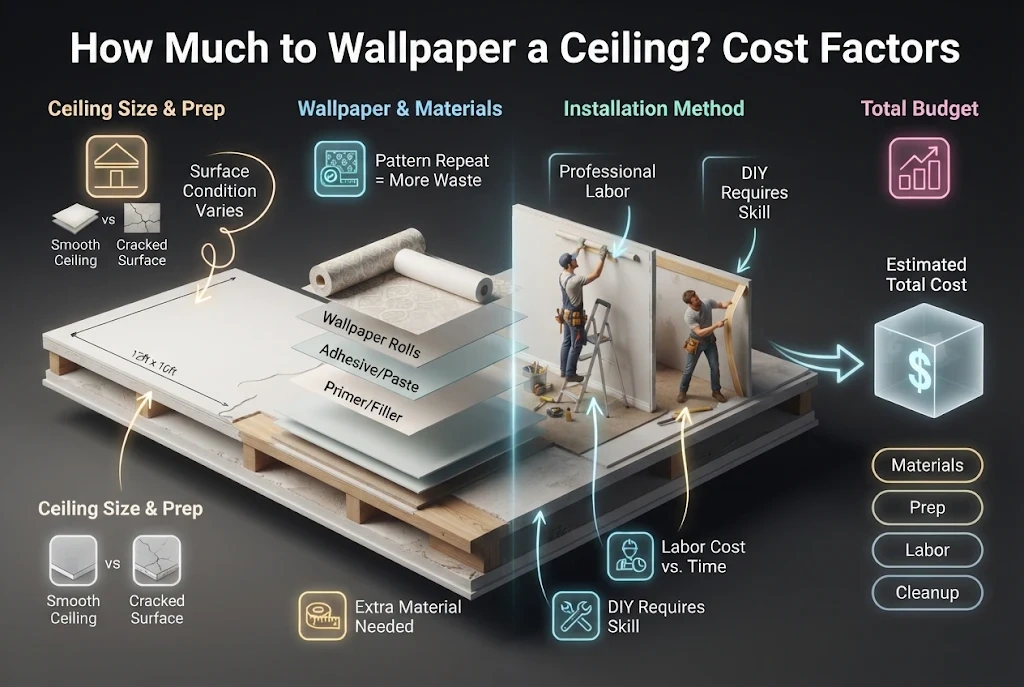
The cost depends on the ceiling’s size, wallpaper type, pattern, surface condition, and whether you install it yourself or hire a professional. Ceiling work may also take more labor than a simple wall installation because of overhead positioning and access.
Your budget may include:
- Wallpaper rolls and extra material for pattern matching
- Adhesive or paste, if required
- Primer, filler, and surface-preparation supplies
- Tools and room protection
- Removal of existing wallpaper, if needed
- Professional labor, if you hire an installer
A simple, smooth ceiling may require less preparation than one with cracks, heavy texture, peeling paint, or previous wallpaper. A large pattern can also increase waste because the design needs to line up across strips.
For a useful estimate, measure the ceiling, calculate the material required using the roll’s actual coverage and pattern-repeat instructions, and list the preparation supplies you need. Then request a quote that clearly states whether surface repair, old-wallpaper removal, materials, and cleanup are included.
Published wallpaper installation cost guides, such as Angi’s wallpaper installation cost guide, can provide general background, but a wall-installation estimate should not automatically be treated as a reliable ceiling quote. Ask local installers about your actual ceiling, product, and room conditions before setting a firm budget.
How Do You Remove Wallpaper From a Ceiling?
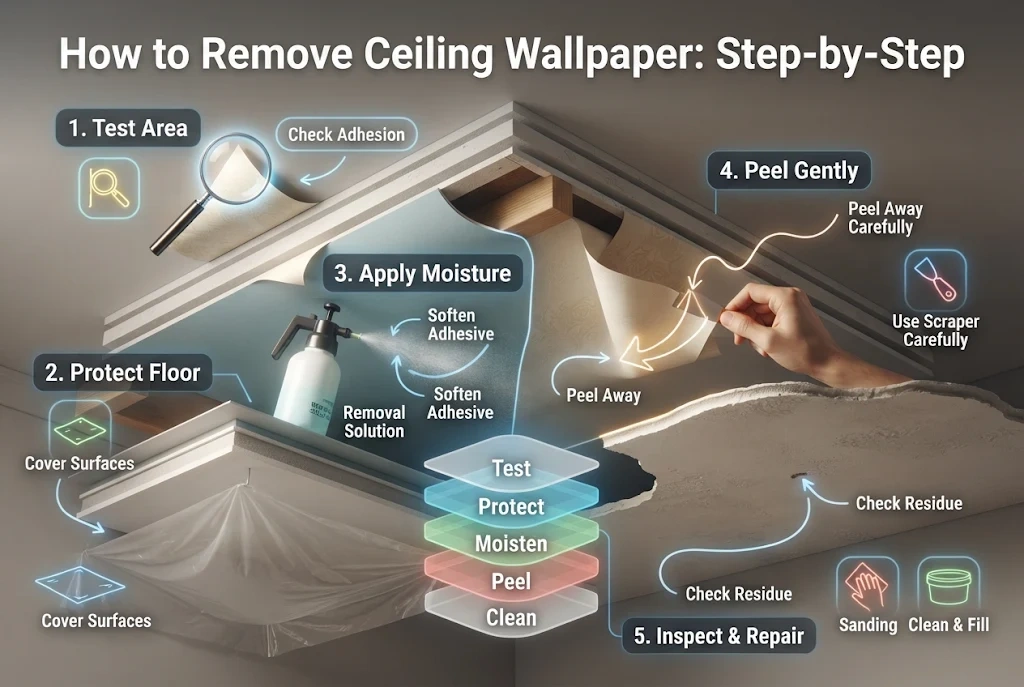
Wallpaper removal depends on the material, adhesive, and surface underneath. Start with a small, inconspicuous test area to see how the paper releases and whether the ceiling finish is affected.
Protect the floor and furniture. Follow the wallpaper manufacturer’s removal instructions, and use only a method suitable for the ceiling material. Some papers may peel away; others may require a compatible removal product or careful use of moisture.
Avoid soaking drywall or damaged plaster, since excessive moisture can harm the surface. Do not scrape aggressively or use tools that could gouge the ceiling.
After removal, inspect the ceiling for adhesive residue, loose paint, and damage. Clean and repair it as needed before repainting or applying new wallpaper.
If you rent, confirm your landlord’s requirements before removing wallpaper. If the ceiling finish may contain lead paint in an older home, seek appropriate guidance before sanding or scraping it.
Frequently Asked Questions
Is wallpapering a ceiling a good idea?
It can be a good way to add color, pattern, or visual interest to a room. It works best when the ceiling is sound and dry, the design suits the room, and the wallpaper is suitable for overhead installation. Consider access, future removal, and the amount of preparation needed before deciding.
Can you use peel-and-stick wallpaper on a ceiling?
Yes, but only when the specific product is approved for ceiling use. The surface generally needs to be smooth, clean, and prepared as directed. Because overhead adhesion can be more demanding, do not assume a peel-and-stick wallpaper designed for walls will stay attached to a ceiling.
How hard is it to wallpaper a ceiling alone?
It can be challenging because gravity makes the paper harder to support and align. A helper makes positioning easier, particularly with long strips or patterns that need careful matching. If working alone, use a stable platform, prepare your materials in advance, and never overreach to hold the paper in place.
How long does it take to wallpaper a ceiling?
The time varies with ceiling size, surface repairs, wallpaper type, pattern matching, and whether you have help. Preparation and drying may add time beyond the actual installation. Check the product instructions for adhesive timing and drying requirements, and allow extra time if this is your first project.
Can you wallpaper a ceiling and walls?
Yes. Wallpapering both surfaces can create a coordinated look, but the patterns and colors should work together rather than compete. Plan the ceiling and wall layouts as one design, calculate the material for each surface separately, and confirm that each wallpaper product is suitable for its intended application.
Final Advice for a Successful Ceiling Wallpaper Project
A successful ceiling wallpaper project begins with the right surface, not the prettiest pattern. Check for moisture and damage, choose wallpaper approved for overhead use, and follow the product’s preparation and adhesive instructions.
Measure carefully, establish a straight starting line, and take your time with each strip. If possible, work with a helper and use safe, stable access rather than trying to manage everything at once.
If the ceiling needs major repairs or you cannot install the wallpaper safely, getting professional help may be the better choice. With realistic planning and the right materials, you can decide whether ceiling wallpaper is a suitable DIY project for your home.
Disclaimer
Every home, ceiling surface, budget, and wallpaper product is different. Always follow the manufacturer’s installation and safety instructions, and seek qualified help for electrical work, serious ceiling damage, or unresolved moisture problems.