Wallpaper can make a room feel fresh and inviting, but corners are often the hardest part of the job. The paper may wrinkle, the pattern may shift, or the edges may lift after installation. Even a small mistake can make an otherwise neat wall look unfinished.
The best way to wallpaper corners is to use separate pieces of wallpaper with a controlled overlap rather than wrapping one complete strip around an inside corner. This method helps you manage uneven walls, keep the next strip straight, and reduce visible wrinkles. Outside corners need a slightly different approach because the wallpaper must wrap around an exposed edge.
The right technique also depends on the wallpaper material. Traditional wallpaper, thick vinyl, patterned designs, and peel-and-stick products do not always need the same treatment. Here is how to handle each situation without making the process harder than necessary.
Short Definition
To wallpaper corners neatly, wrap a small section of wallpaper onto the adjoining wall, then install the next piece using a fresh vertical line. This helps prevent wrinkles, gaps, and uneven seams.Experience
Always measure an inside or outside corner at the top, middle, and bottom because older walls may not be perfectly straight. Avoid stretching the wallpaper to remove wrinkles, as this can cause gaps or pattern problems later.
Tools and Materials You Need Before Starting
Having the right tools nearby makes wallpapering much easier. You will not need an expensive collection of equipment, but a few basic items can help you avoid uneven cuts and messy seams.
Here is what you should prepare:
| Tool or material | What it does |
| Measuring tape | Measures wall sections and corner distances. |
| Pencil | Marks cutting and alignment points. |
| Spirit level | Helps create a straight vertical line. |
| Wallpaper smoother | Pushes out air and smooths the paper. |
| Sharp utility knife | Trims excess wallpaper. |
| Scissors | Cuts larger wallpaper sections. |
| Wallpaper paste | Attaches traditional wallpaper where required. |
| Paste brush or roller | Applies adhesive evenly. |
| Seam roller | Helps press suitable wallpaper seams flat. |
| Clean sponge or cloth | Removes excess adhesive. |
A sharp blade is particularly important. A dull blade can tear the wallpaper instead of cutting it cleanly. Keep spare blades nearby, especially when working with thick or textured material.
Practical tip: Keep a small piece of scrap wallpaper beside you. You can use it to check how the material bends around a corner before working on the visible section.
How to Prepare Walls Before Wallpapering
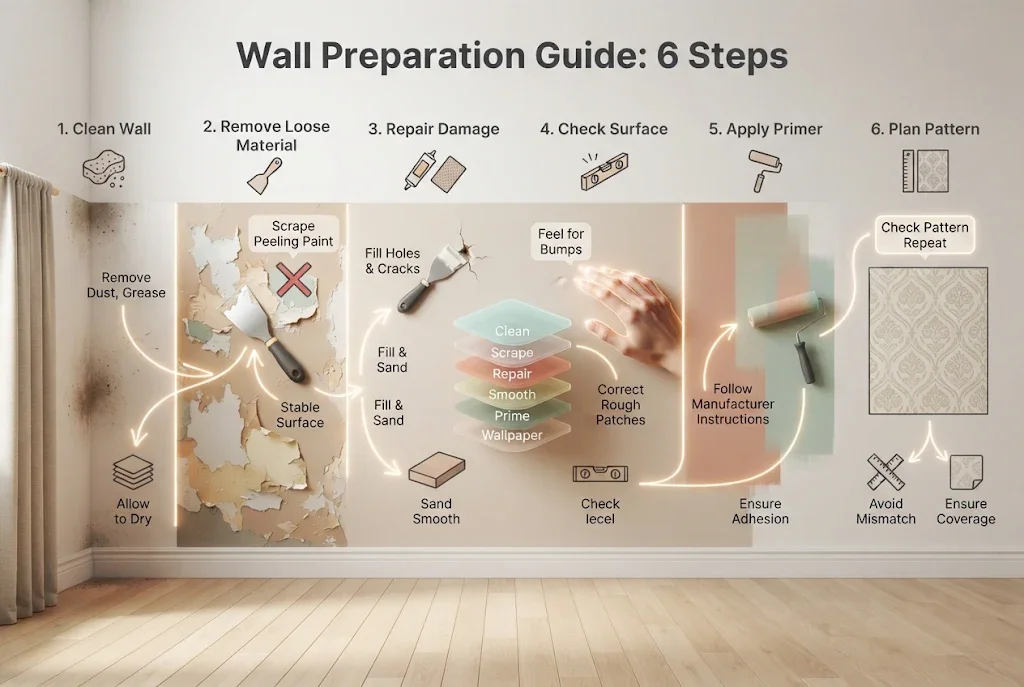
Good preparation helps wallpaper stay in place. Even expensive wallpaper can look poor when applied over dusty, damp, or damaged walls.
Start by examining both sides of the corner. Look for loose paint, old adhesive, holes, cracks, and raised areas.
Follow these steps before installation.
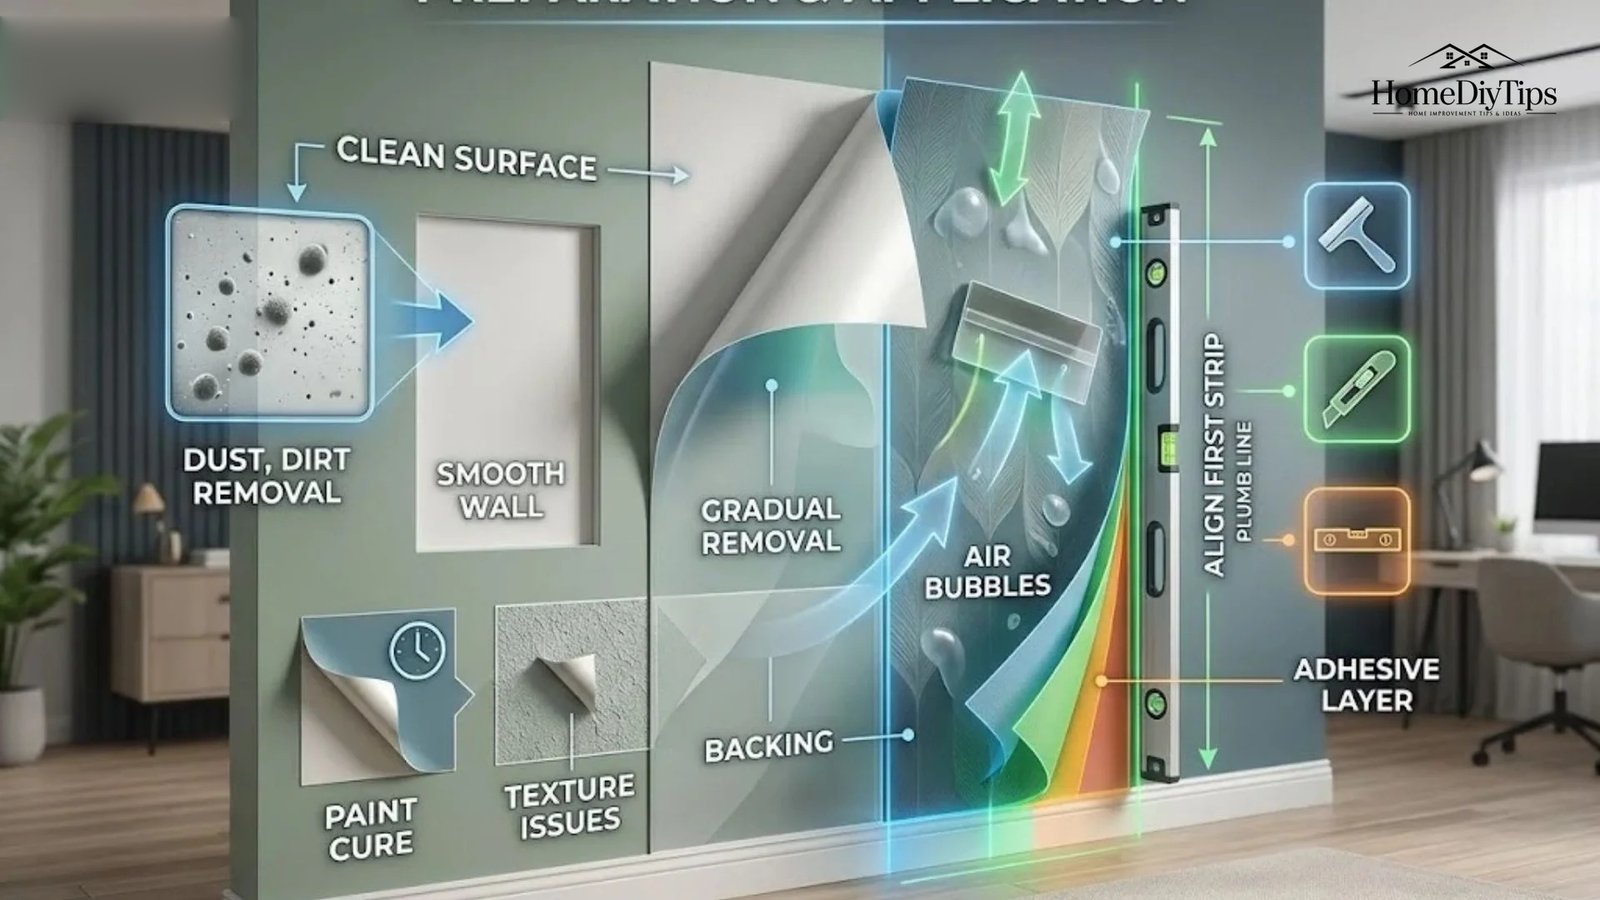
- Clean the wall: Remove dust, grease, and dirt using a suitable cleaning method. Allow the surface to dry completely.
- Remove loose material: Scrape away peeling paint and loose wallpaper. Do not apply new wallpaper over unstable material.
- Repair damaged areas: Fill small holes and cracks with an appropriate wall filler. Allow it to dry, then sand the repaired area smooth.
- Check the surface: Run your hand across the corner. If you notice bumps or rough patches, correct them before hanging the wallpaper.
- Apply suitable primer: Some wallpaper products need a prepared or primed surface. Follow the manufacturer’s instructions, especially when using peel-and-stick wallpaper.
- Plan the pattern: Check the wallpaper’s pattern repeat and match type before cutting. This helps you avoid running out of material or placing a noticeable mismatch at eye level.
If the wall has moisture damage, solve the moisture problem first. Wallpaper will not reliably cover a damp surface, and trapped moisture can cause adhesion problems.
Freshly painted walls also need enough time to cure. Paint may feel dry on the surface while remaining unsuitable for wallpaper application underneath. Follow the paint and wallpaper manufacturers’ instructions rather than relying only on touch.
How to Wallpaper Inside Corners Step by Step
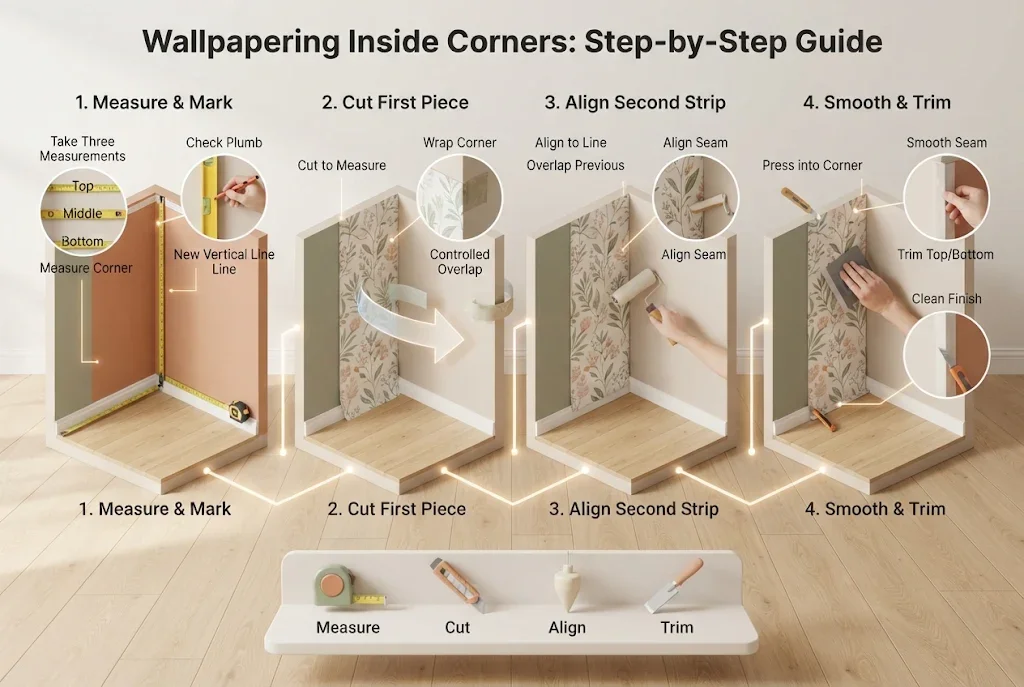
An inside corner is where two walls meet and form an inward angle. You will find these corners between adjoining walls, inside closets, and around room entrances.
The most reliable general approach is to wrap a small part of the first piece around the corner, then start the next piece using a fresh vertical line.
This is important because inside corners are rarely perfectly straight. If you wrap a full wallpaper strip around the corner, the material may shift, stretch, or develop wrinkles.
Step 1: Measure the Corner at Three Points
Measure the distance from the edge of your last wallpaper strip to the inside corner.
Take three measurements:
- Near the ceiling.
- Around the middle of the wall.
- Near the floor.
These measurements may differ slightly if the corner is uneven.
Use the widest measurement when deciding how much wallpaper to cut. This helps prevent a gap where the wall moves away from the corner.
For example, imagine your measurements are 18, 19, and 20 inches. Use the 20-inch measurement as your starting point, then add an allowance appropriate for your wallpaper and installation method.
Do not assume that every wallpaper needs the same overlap. Check the product instructions before cutting.
Step 2: Cut the First Wallpaper Piece
Measure the required distance along the wallpaper and cut the strip vertically.
Leave enough material to extend slightly onto the adjoining wall. This creates an overlap for the next piece.
The amount depends on the wallpaper’s thickness and the manufacturer’s instructions.
Thick wallpaper may need a different joining method from thin non-woven wallpaper. Some peel-and-stick products also have specific seam and overlap requirements.
Keep the remaining wallpaper offcut if it is large enough to use for the next section.
Step 3: Apply the Wallpaper
For traditional wallpaper, apply paste according to the manufacturer’s instructions.
Some products need paste on the wallpaper, while others require paste directly on the wall. Paste-the-wall and pre-pasted products have different installation steps.
Position the first piece carefully and smooth it toward the corner.
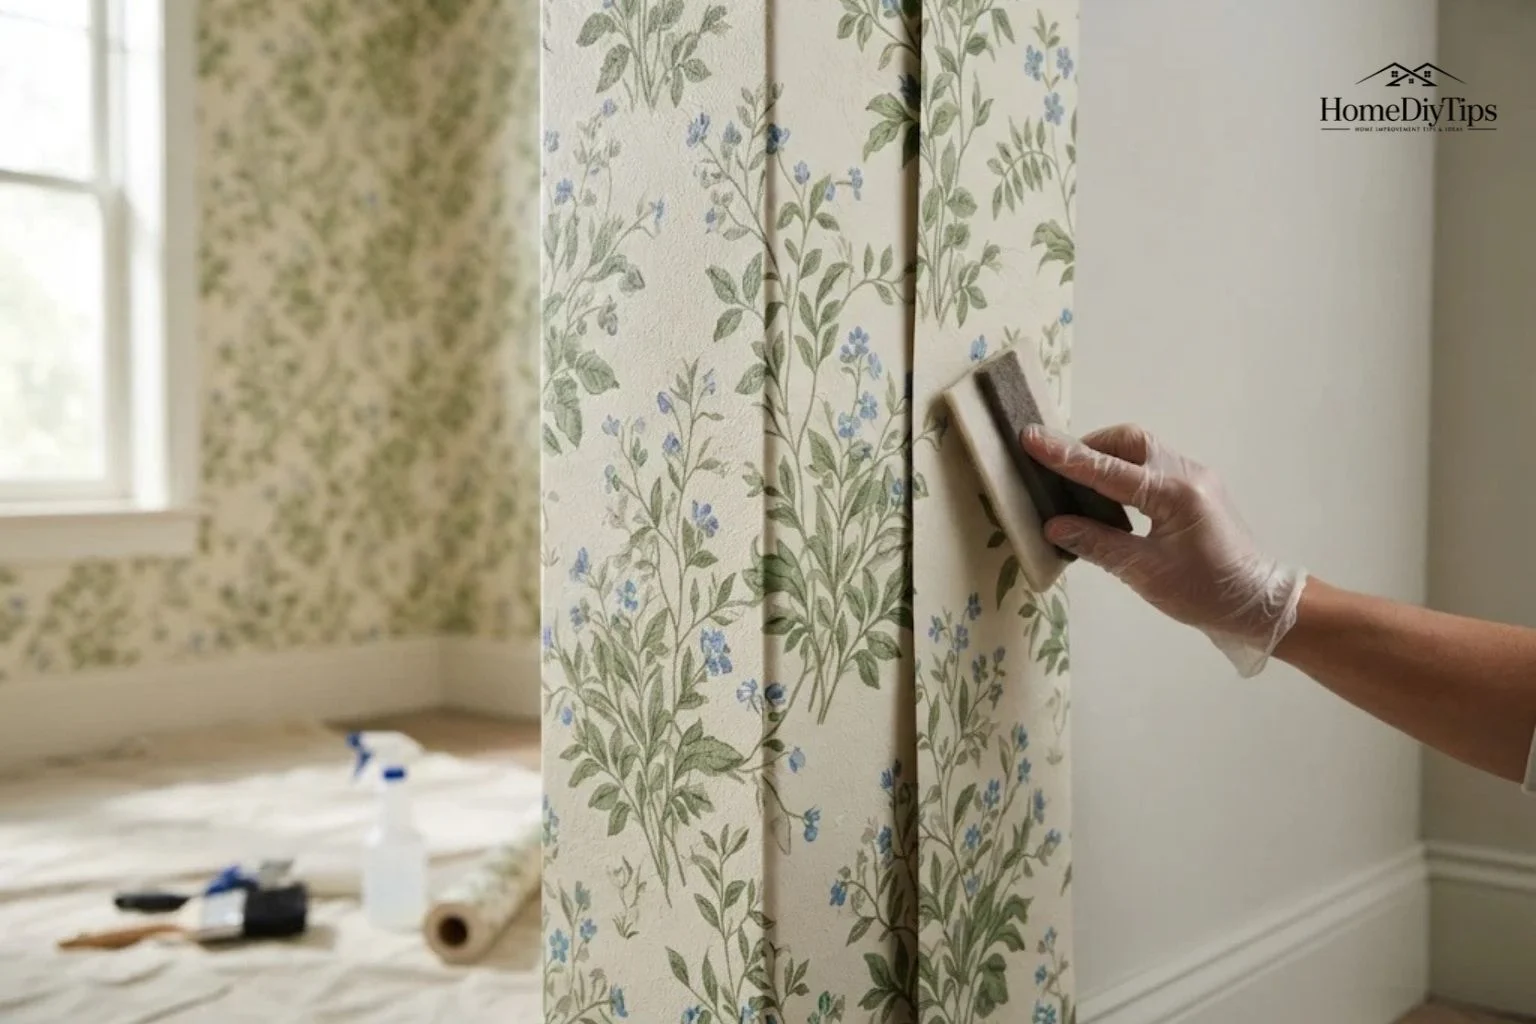
Use a wallpaper smoother to remove trapped air. Work gently rather than pulling or stretching the paper.
When you reach the corner, press the wallpaper into the angle and wrap the extra material onto the adjoining wall.
Pay particular attention to the crease. It should sit against the wall without forming a large fold or bubble.
Step 4: Make Small Relief Cuts if Needed
Sometimes the wallpaper gathers near the ceiling or baseboard.
This can happen when the corner is uneven or the material does not bend easily.
Make small diagonal relief cuts in the excess material where needed. These cuts allow the paper to lie flatter without creating a large wrinkle.
Be careful not to cut into the visible finished section.
If the wallpaper sits smoothly without gathering, you may not need relief cuts at all.
Step 5: Draw a New Vertical Line
This is one of the most important steps.
Do not assume the corner itself is straight enough to guide the next wallpaper strip.
Use a spirit level or plumb line to draw a new vertical line on the adjoining wall. Position it according to the width of the next wallpaper piece and the overlap you need.
A plumb line is a vertical reference line that follows a true upright direction.
This line gives you a straight starting point even when the corner is slightly crooked.
Step 6: Hang the Second Piece
Position the next wallpaper piece against the new vertical line.
Allow its inner edge to overlap the first piece as required by the wallpaper instructions.
Smooth the material from the straight edge toward the corner.
Check the overlap carefully. It should cover the wrapped edge without creating an unnecessarily thick ridge.
If the wallpaper has a pattern, check the design before pressing the entire strip firmly into place.
Step 7: Check the Finished Corner
Stand back and inspect the corner from different angles.
Look for:
- Visible gaps between wallpaper pieces.
- Raised edges.
- Trapped air bubbles.
- Wrinkles near the ceiling or floor.
- Pattern misalignment.
- Excess adhesive on the surface.
Remove excess paste with a clean sponge or cloth if the product instructions allow it.
The finished corner should look smooth, with no loose edges or obvious gaps.
How to Wallpaper Outside Corners
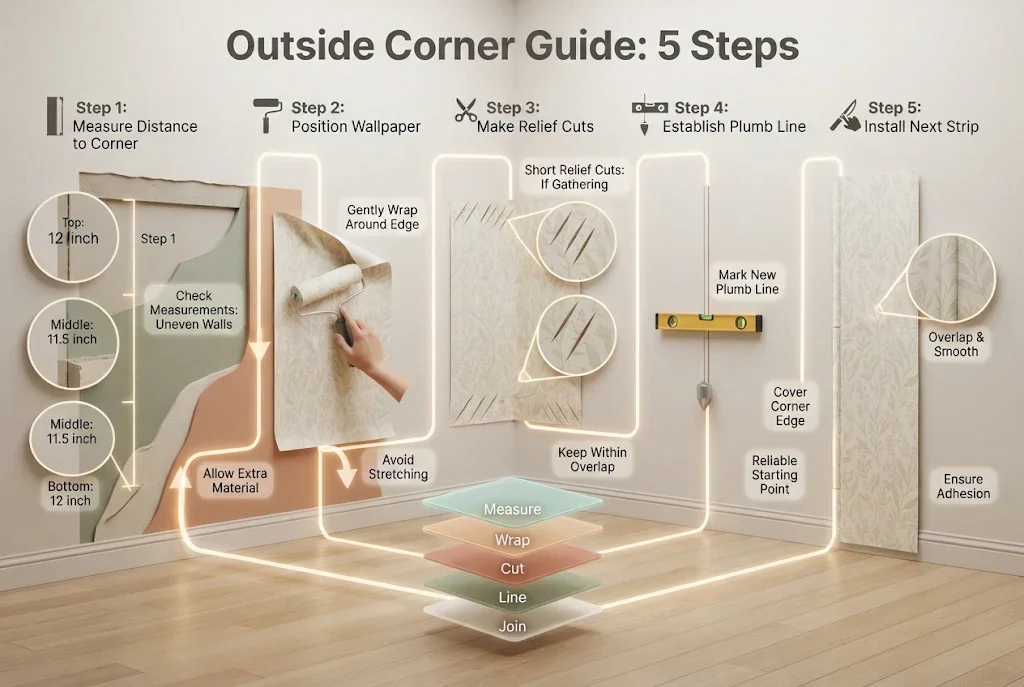
An outside corner is an outward-facing edge where two walls meet. Examples include boxed columns, chimney breasts, projecting walls, and some wall sections around windows.
Outside corners can be more challenging because the wallpaper must bend around an exposed edge. The paper can also lift if it does not have enough support or adhesive.
A controlled wrap and a properly aligned next strip help create a neat finish.
Step 1: Measure the Distance to the Outside Corner
Measure from the edge of the last wallpaper strip to the outside corner.
Check the distance at the top, middle, and bottom.
As with inside corners, an uneven wall may produce different measurements.
Allow enough material to extend around the corner and onto the next wall. Follow the wallpaper manufacturer’s guidance for the required allowance.
Do not cut the wallpaper exactly at the visible edge. That can leave an exposed seam that may lift.
Step 2: Position the Wallpaper
Apply the appropriate adhesive and hang the wallpaper.
Smooth it toward the outside corner using a wallpaper smoother.
Gently guide the material around the edge.
Avoid pulling the wallpaper tightly. Stretching it may create gaps later when the material relaxes.
If you are using stiff wallpaper, check whether the product allows scoring or another method to help it bend. Do not cut through the visible surface.
Step 3: Make Relief Cuts if Necessary
If the wallpaper gathers around an uneven outside corner, small relief cuts may help.
Make short cuts in the excess material so the paper can settle against the wall.
Keep these cuts within the area that the next piece will cover, where the installation method permits it.
For decorative wallpaper, take extra care. Poorly placed cuts can become visible after the installation is complete.
Step 4: Establish a New Plumb Line
Use a spirit level to mark a straight vertical line on the adjoining wall.
This gives the next wallpaper piece a reliable starting point.
Do not use the outside edge itself as your only alignment guide. A slightly uneven corner can make the next strip lean.
Step 5: Install the Next Strip
Position the next piece along the new vertical line.
Follow the product’s seam instructions to join it with the wrapped section.
Smooth the paper carefully and check that the exposed corner remains covered.
If the overlap creates a thick ridge, a suitable double-cut seam may be an option for certain traditional wallpapers.
However, double-cutting is not appropriate for every wallpaper. It involves cutting through two overlapping layers, so it needs careful handling and a suitable material.
How to Wallpaper Corners With Peel-and-Stick Wallpaper
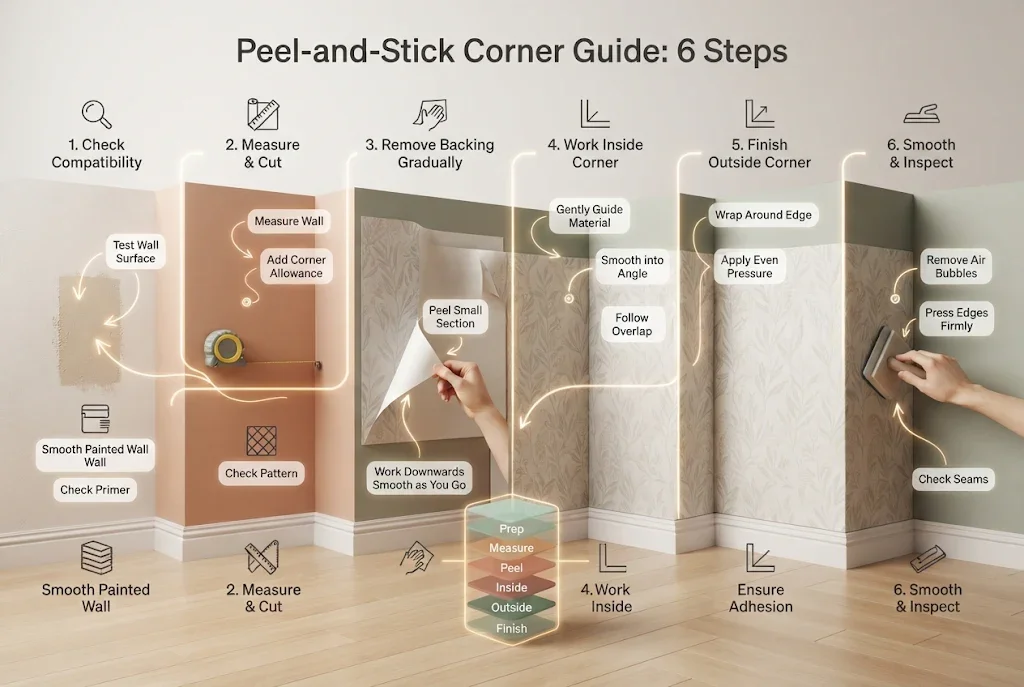
Peel-and-stick wallpaper has an adhesive backing. You do not normally need separate wallpaper paste, which can make installation easier for small DIY projects.
However, self-adhesive wallpaper still needs careful handling around corners.
The biggest challenge is controlling the adhesive while positioning the material. Once a large area sticks to the wall, making adjustments can become difficult.
Step 1: Check Wall Compatibility
Read the manufacturer’s instructions before starting.
Some peel-and-stick wallpapers are designed for smooth painted walls. Others may have different surface requirements.
Check whether your wall needs primer or a specific preparation period after painting.
Also consider whether you rent your home. Removable wallpaper does not guarantee damage-free removal from every painted surface.
Test a small sample in an inconspicuous area when the manufacturer recommends it.
Step 2: Measure and Cut the Wallpaper
Measure the wall section and corner carefully.
Leave the required allowance for the corner treatment.
Check the pattern before cutting. If the design has a repeat, make sure the next piece will line up correctly.
Step 3: Remove the Backing Gradually
Avoid removing the entire backing paper at once.
Peel back a small section and position the wallpaper at the starting point.
Smooth the exposed adhesive section before removing more backing.
This gives you greater control and reduces the chance of sticking the paper in the wrong place.
Step 4: Work Around the Inside Corner
Guide the wallpaper toward the corner without pulling it tightly.
Smooth the material into the angle and follow the product’s instructions for any overlap.
If wrinkles appear, stop and check whether the product allows repositioning.
Some products permit limited lifting and adjustment. Others become harder to reposition once pressed firmly.
Do not repeatedly stretch the wallpaper to remove wrinkles.
Step 5: Finish the Outside Corner
For an outside corner, guide the material around the edge slowly.
Make sure the surface is clean and that the wallpaper is properly supported.
Some manufacturers recommend warming the material slightly to improve flexibility. Only do this if the specific product instructions allow it.
Do not use high heat. Excessive heat may damage the wallpaper or its adhesive.
Step 6: Smooth and Inspect
Use a suitable smoother to remove trapped air.
Check the edges and seams for lifting.
Press the material according to the manufacturer’s instructions.
How to Match Wallpaper Patterns Around Corners
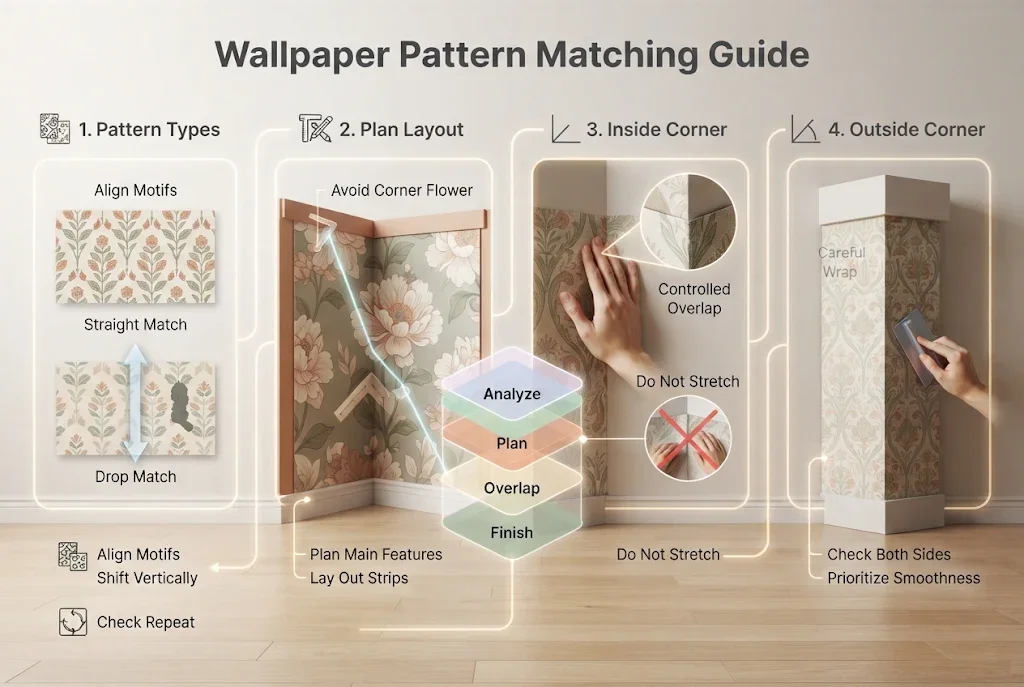
Pattern matching is an important part of wallpaper installation. A corner can make a beautiful design look uneven when the pattern suddenly shifts.
Before cutting your wallpaper, identify the type of pattern match.
Straight match: The design repeats at the same height across adjoining strips.
Drop match: The design shifts vertically between strips. You may need to move the next piece up or down to align the pattern.
A pattern repeat tells you how much wallpaper is needed before the design starts again.
Plan the Pattern Before Hanging
Lay out the wallpaper pieces before applying adhesive.
Look at the main shapes, lines, flowers, or other design features.
Decide where the most noticeable parts of the pattern should appear.
For example, if you are installing a large floral design, you may want to avoid placing a major flower directly on the corner edge.
Check the Pattern at the Overlap
Inside corners can create a small visual break because the two walls do not always meet at a perfect angle.
Do not stretch the wallpaper to force the design to match.
Stretching can cause the seams to open later.
Instead, prioritize a straight installation and follow the pattern-matching instructions.
Handle Outside Corners Carefully
Outside corners are more visible because people can see the design from different directions.
Before pressing the wallpaper firmly, check how the pattern looks on both sides.
A small pattern shift may be less noticeable than a wrinkled or stretched piece.
For patterned wallpaper, good planning usually saves more material than trying to correct a poor match after installation.
How to Wallpaper Rounded and Uneven Corners
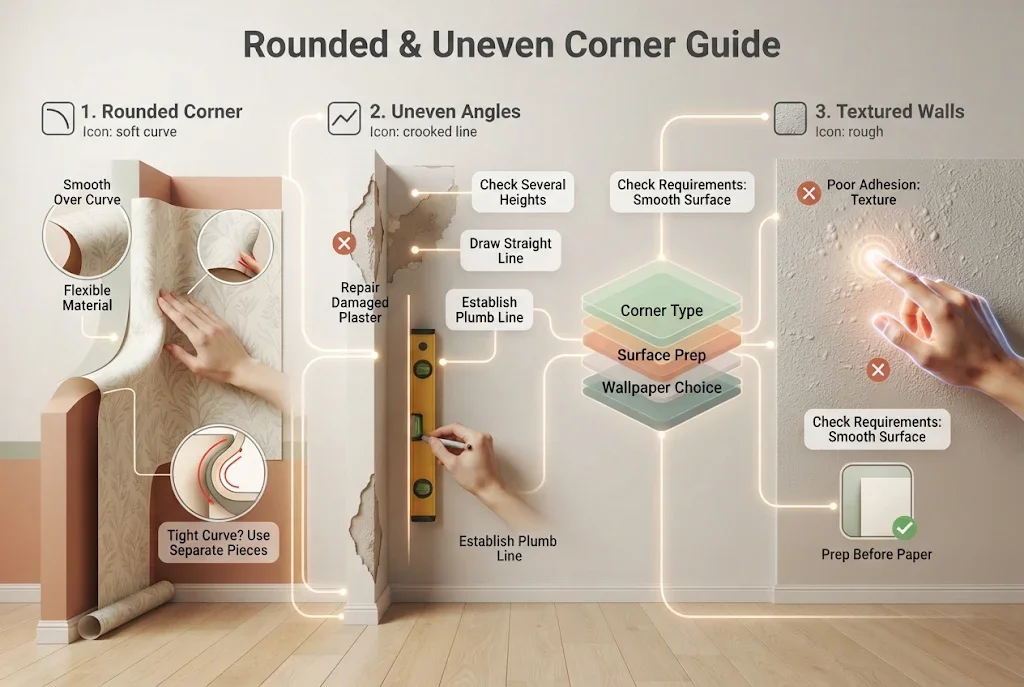
Not every home has sharp, square corners.
Some walls have rounded edges, old plaster, or uneven angles. These surfaces require more care because wallpaper may not sit flat when forced around the shape.
Wallpapering a Rounded Corner
First, examine how gradual the curve is.
A gently rounded corner may allow the wallpaper to follow the surface if the material is flexible and the manufacturer permits it.
Work slowly and smooth the material in small sections.
If the curve is tight, the wallpaper may wrinkle or pull away. In that situation, a suitable overlap or separate-piece approach may produce a cleaner result.
Dealing With Uneven Corners
Measure at several heights rather than assuming the corner is straight.
Use a fresh plumb line to guide the adjoining strip.
If the surface has large bumps or damaged plaster, repair it before installing wallpaper.
Trying to hide serious surface problems under wallpaper usually creates a poor finish.
What About Textured Walls?
Texture can make wallpaper adhesion less reliable.
Some wallpaper products are designed for smooth surfaces only.
Check the manufacturer’s surface requirements before installation. Do not assume that thicker wallpaper will automatically cover every wall defect.
How to Finish Wallpaper Around Doors and Edges
Door frames and exposed wallpaper edges need careful trimming.
Wallpapering Around a Door
When you reach a door frame, position the wallpaper so there is enough material to cover the area around the frame.
Press the wallpaper gently toward the frame.
Use a suitable straightedge to guide your utility knife along the edge.
Trim slowly and avoid cutting into the door frame or damaging the wall.
For detailed work, a sharp blade is more useful than trying to tear or pull away excess wallpaper.
How to Cover Exposed Wallpaper Edges
Exposed edges can lift if they do not have enough adhesive or if the surface is poorly prepared.
To create a clean finish:
- Check that the wallpaper edge is positioned correctly.
- Use suitable seam adhesive if the manufacturer recommends it.
- Press the edge gently into place.
- Remove excess adhesive using the recommended cleaning method.
- Check the edge again after the product’s recommended setting time.
Avoid applying random glue or household adhesives. They may stain the wallpaper or damage its surface.
Common Wallpapering Mistakes and How to Avoid Them
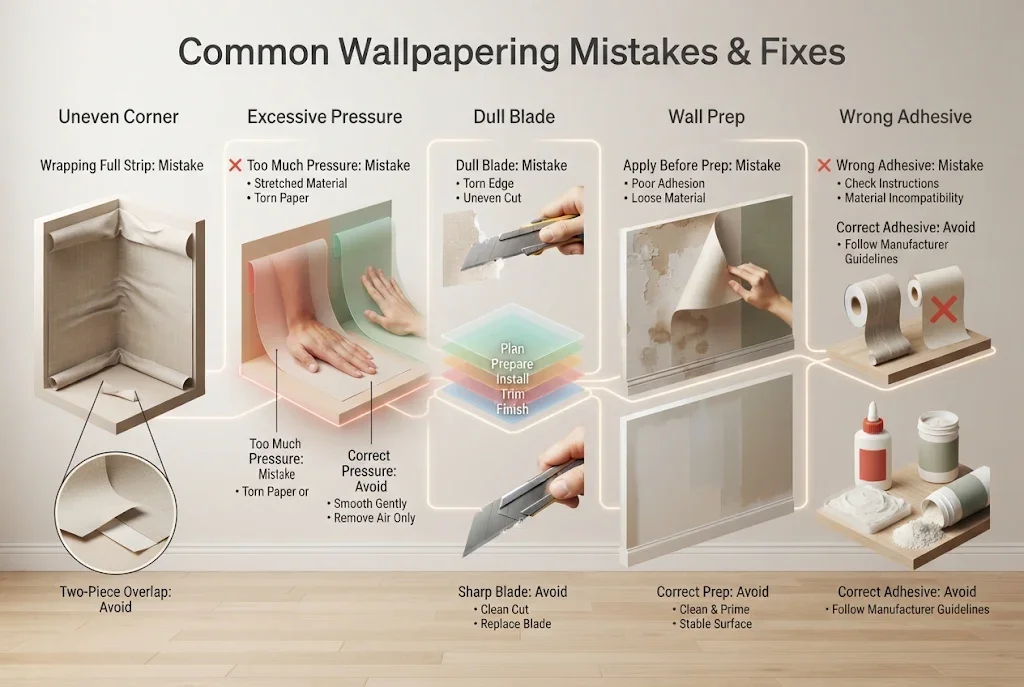
Even careful beginners can make small mistakes. Most problems become easier to fix when you notice them early.
| Common mistake | Why it happens | How to avoid it |
| Wrapping a full strip around an inside corner | The corner is not perfectly straight | Use the two-piece overlap method |
| Measuring only once | Wall angles may change along their height | Measure at three points |
| Ignoring the plumb line | The adjoining wall may not be vertical | Use a spirit level |
| Cutting too much material | The overlap allowance was too small | Follow product-specific measurements |
| Stretching wallpaper | Trying to force a pattern or remove wrinkles | Smooth gently without pulling |
| Using the wrong adhesive | The wallpaper needs a different installation method | Follow manufacturer instructions |
| Rushing pattern alignment | The next strip was pressed too quickly | Check the design before final smoothing |
| Ignoring loose edges | The corner was not checked after installation | Inspect seams and edges carefully |
Mistake 1: Trying to Hide an Uneven Corner
Wallpaper cannot correct a badly shaped wall.
If the corner has a large bump or damaged plaster, prepare the surface first.
A smooth wall gives the wallpaper a better chance of staying flat.
Mistake 2: Using Too Much Pressure
Pressing too hard can stretch or damage some wallpaper materials.
Use a smoother that suits the product and work from the center toward the edges.
The goal is to remove air without changing the wallpaper’s shape.
Mistake 3: Cutting With a Dull Blade
A dull knife may tear the wallpaper, especially around door frames and baseboards.
Replace the blade when it starts dragging or producing rough edges.
Always cut carefully and away from your fingers.
Mistake 4: Applying Wallpaper Before the Wall Is Ready
Dust, loose paint, moisture, and unsuitable surfaces can affect adhesion.
Take time to prepare the wall rather than trying to solve problems after installation.
Mistake 5: Using One Method for Every Wallpaper Type
Traditional wallpaper and peel-and-stick wallpaper have different adhesive systems.
Thick vinyl may also need different seam treatment from lightweight wallpaper.
Check the product instructions before choosing an overlap or trimming method.
Frequently Asked Questions About Wallpapering Corners
1. What Is the Best Way to Wallpaper a Corner?
For most inside corners, use a two-piece method. Wrap a small section of the first strip onto the adjoining wall, then install the next piece using a fresh vertical line. This helps prevent wrinkles and keeps the next strip straight.
2. Should I Start Wallpapering in a Corner?
You can start near a corner, but do not assume the corner itself is perfectly vertical. Choose a suitable starting position and use a plumb line to establish a straight edge. Also consider the wallpaper pattern and where the final seams will appear.
3. Can You Wrap Wallpaper Around an Outside Corner?
Yes. You can wrap wallpaper around an outside corner when the material and product instructions allow it. Leave enough material to cover the edge, smooth it carefully, and align the next piece using a vertical reference line.
4. How Do You Stop Wallpaper Edges From Lifting?
Start with a clean, dry, properly prepared wall. Use the recommended adhesive and press the edges according to the manufacturer’s instructions. If an edge lifts later, use a suitable seam adhesive where permitted rather than applying an unsuitable household glue.
5. Can You Use Peel-and-Stick Wallpaper on Uneven Corners?
It depends on the product and the amount of unevenness. Small variations may be manageable with careful application, but deep bumps and rough surfaces can cause poor adhesion. Prepare the wall first and check the manufacturer’s surface requirements.
Final Tips for Neat Wallpaper Corners
A neat wallpaper corner starts with accurate measuring and good wall preparation. Use separate pieces for inside corners, handle outside edges carefully, and create a fresh vertical line before installing the next strip.
Most importantly, choose a method that suits your wallpaper rather than forcing every material into the same technique. Work slowly, check the pattern before pressing the paper firmly, and inspect each edge before moving to the next wall.
A little extra care at the corners can make the entire room look more polished.
Disclaimer
This article provides general DIY guidance for wallpaper installation. Wallpaper materials, adhesives, and wall conditions vary, so always follow the manufacturer’s instructions and seek help from a qualified professional when a surface requires specialist repair or preparation.