
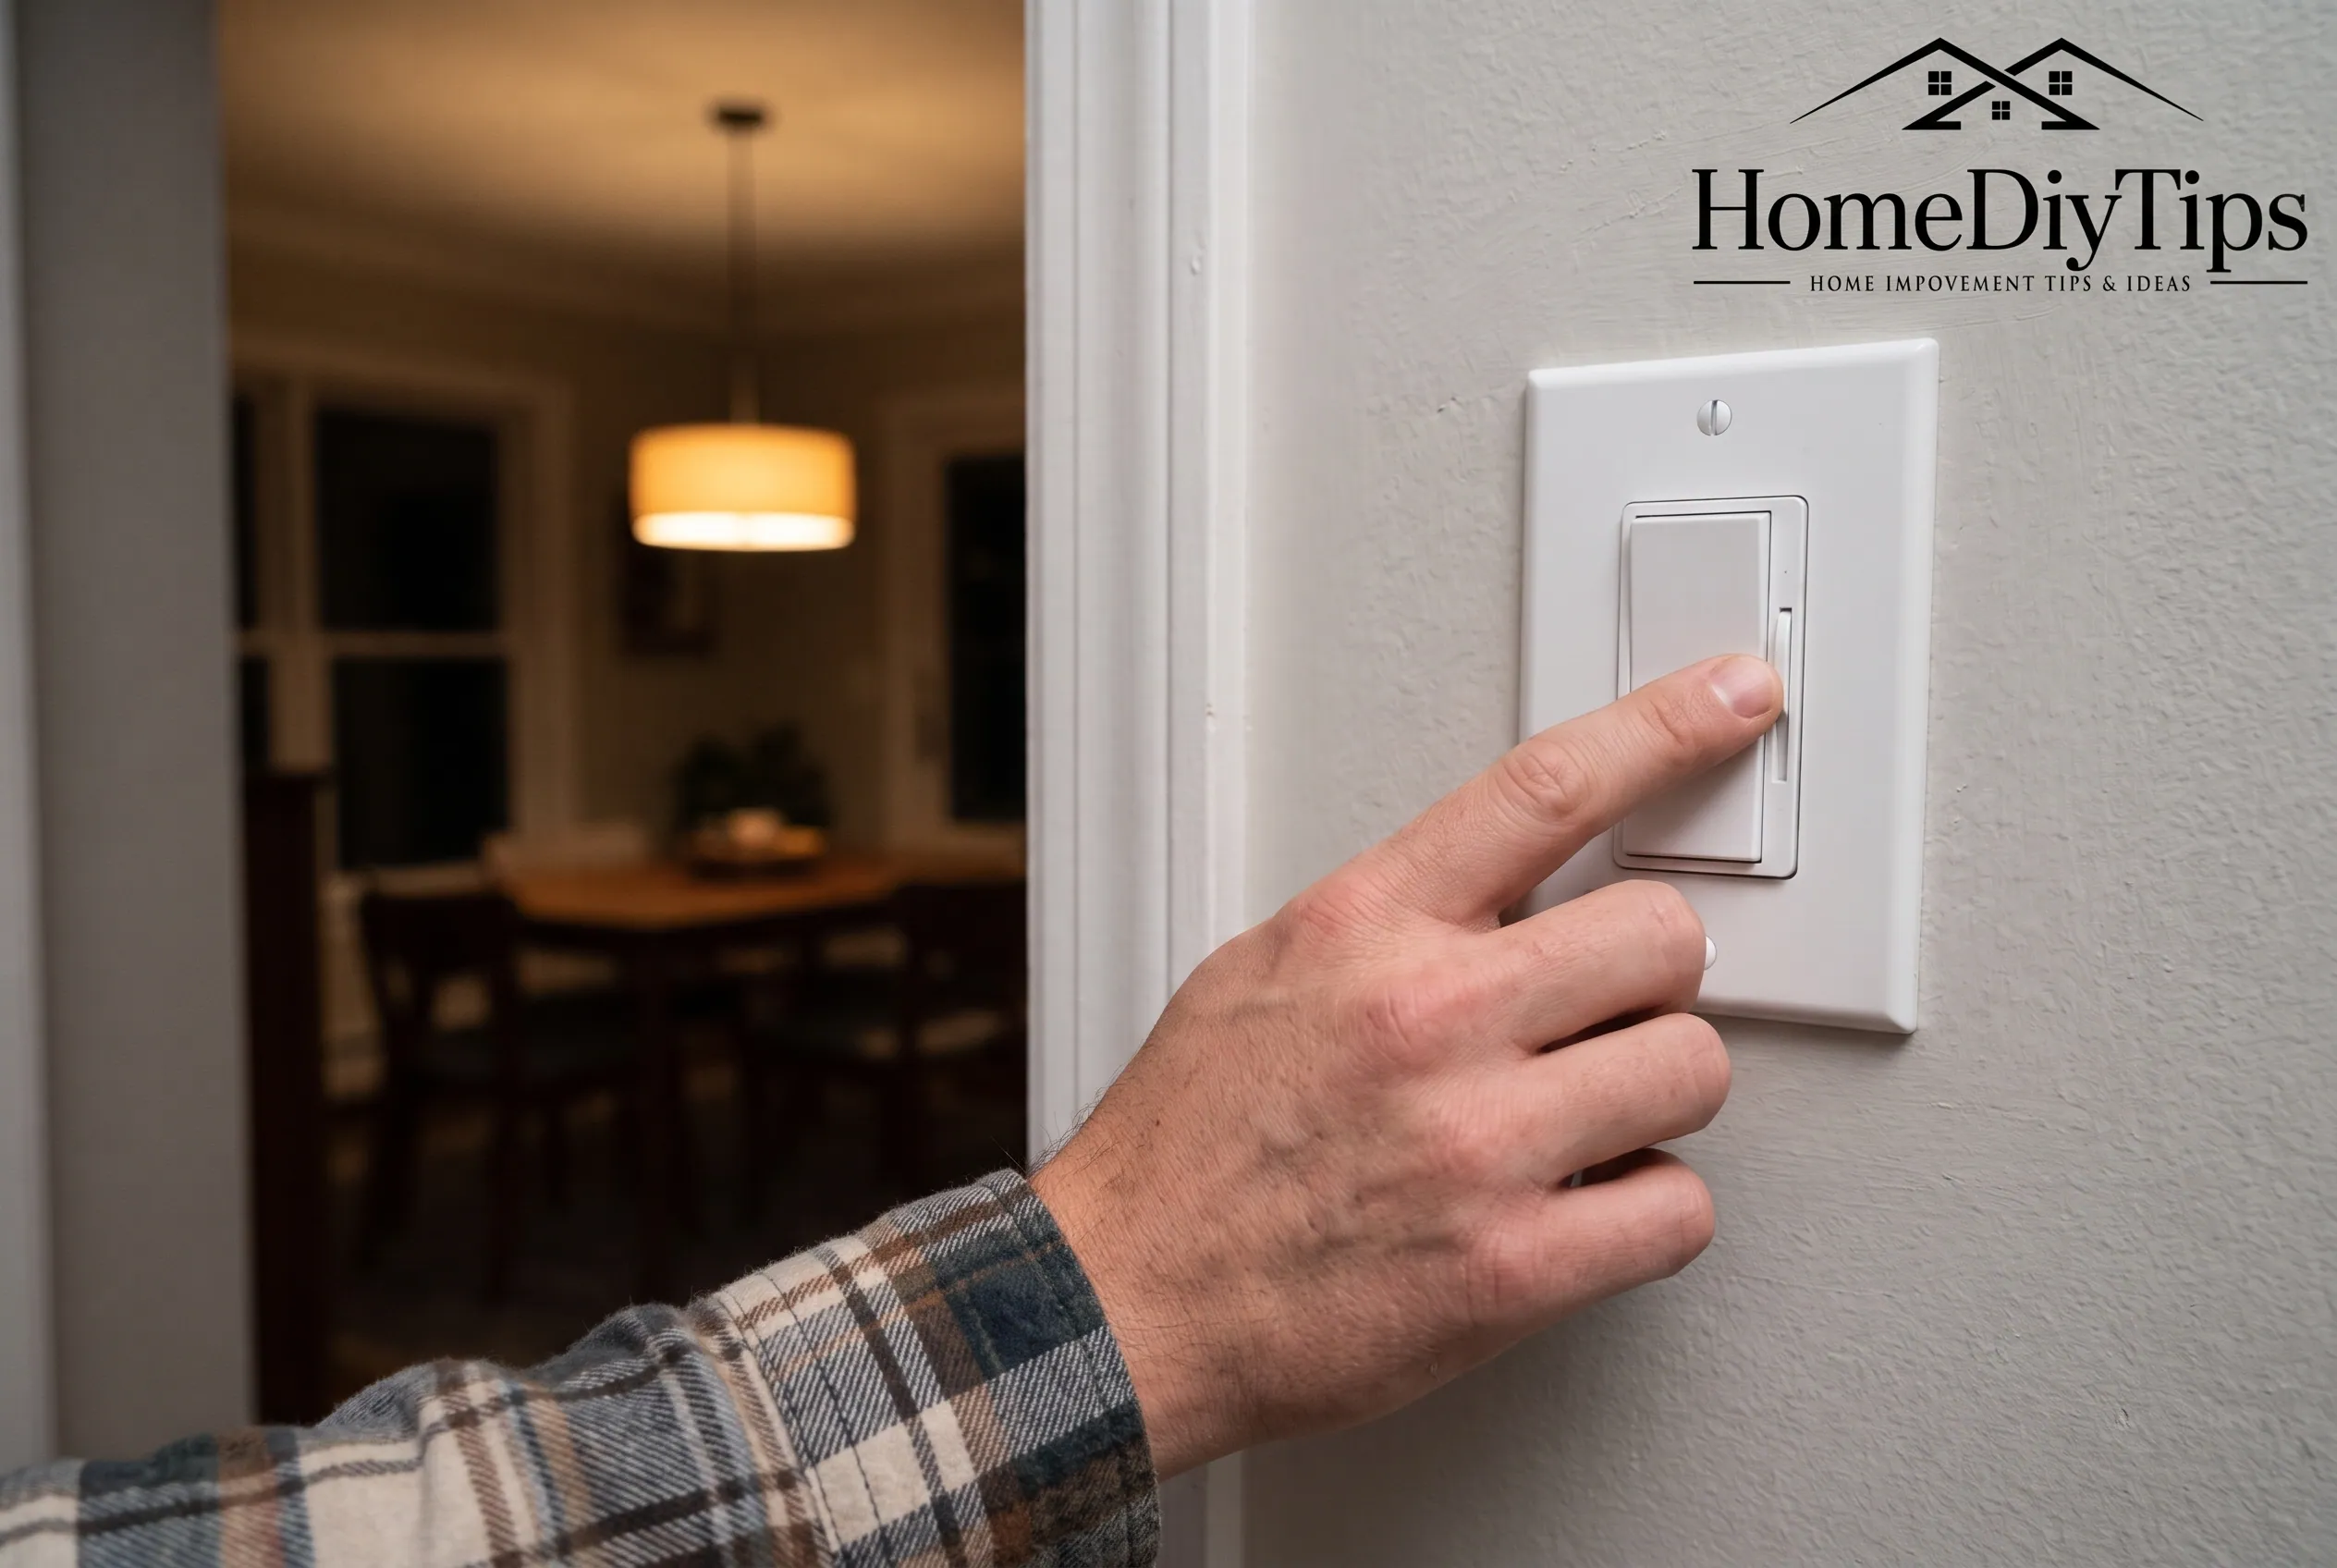
A dimmer switch lets you change how bright a light is without turning it completely off. You can use one to create softer lighting in a living room, reduce glare in a bedroom, or adjust the brightness over a dining table.
But how do dimmer switches work? Most modern household dimmers control the electrical power delivered to a compatible light. Many use a method called phase-cut dimming, which changes the part of the electrical waveform that reaches the bulb. The bulb and dimmer must be compatible, especially when you use LED lights.
Understanding this process helps you choose the right switch, avoid common problems, and decide when an existing dimmer needs replacing. It also explains why turning down a light does not always produce the same result with every bulb.
Short Definition
A dimmer switch adjusts a compatible light’s brightness by controlling the electrical power it receives. Many modern wall dimmers change part of the AC waveform, so LED bulbs must support the dimmer’s method.
Practical Insight Box
A bulb labeled “dimmable” may still flicker or buzz when paired with an incompatible dimmer. Check the exact bulb and switch models against the manufacturer’s compatibility information before buying replacements, because not every lighting problem comes from compatibility alone.
How Do Dimmer Switches Work?
A dimmer switch changes a light’s brightness by controlling how much electrical power reaches it. Instead of simply allowing full power or no power, a dimmer adjusts the electrical signal so a compatible bulb produces less light.
The method depends on the type of dimmer and light source. Traditional electronic wall dimmers often control part of the alternating-current waveform. Other systems, including some low-voltage LED systems, use different methods.
In a typical U.S. home, electricity supplied to wall lighting uses alternating current (AC). The current repeatedly changes direction, producing a waveform that rises and falls. Standard household AC operates at 60 hertz (Hz), meaning 60 complete cycles each second.
A modern electronic dimmer can use this repeating pattern to regulate power. When you turn the knob, move the slider, or tap the control, the dimmer changes how the electrical signal reaches the light.
- At a high setting: The light receives more usable electrical power and produces more light.
- At a low setting: The dimmer reduces the power delivered to the compatible light, so the light produces less output.
- At the off setting: The switch interrupts power to the light, subject to the design of the particular control.
This process happens rapidly. Your eyes generally perceive the changing light output as a steady brightness level rather than seeing each electrical switching event.
However, the dimmer does not always reduce the supply voltage in the same simple way that turning down a water tap reduces water flow. A conventional phase-cut dimmer changes the shape of the electrical waveform. The resulting voltage, current, and power depend on the dimmer design and the connected load.
That distinction becomes especially important when you replace incandescent bulbs with LEDs.
What Happens Inside a Modern Dimmer Switch?
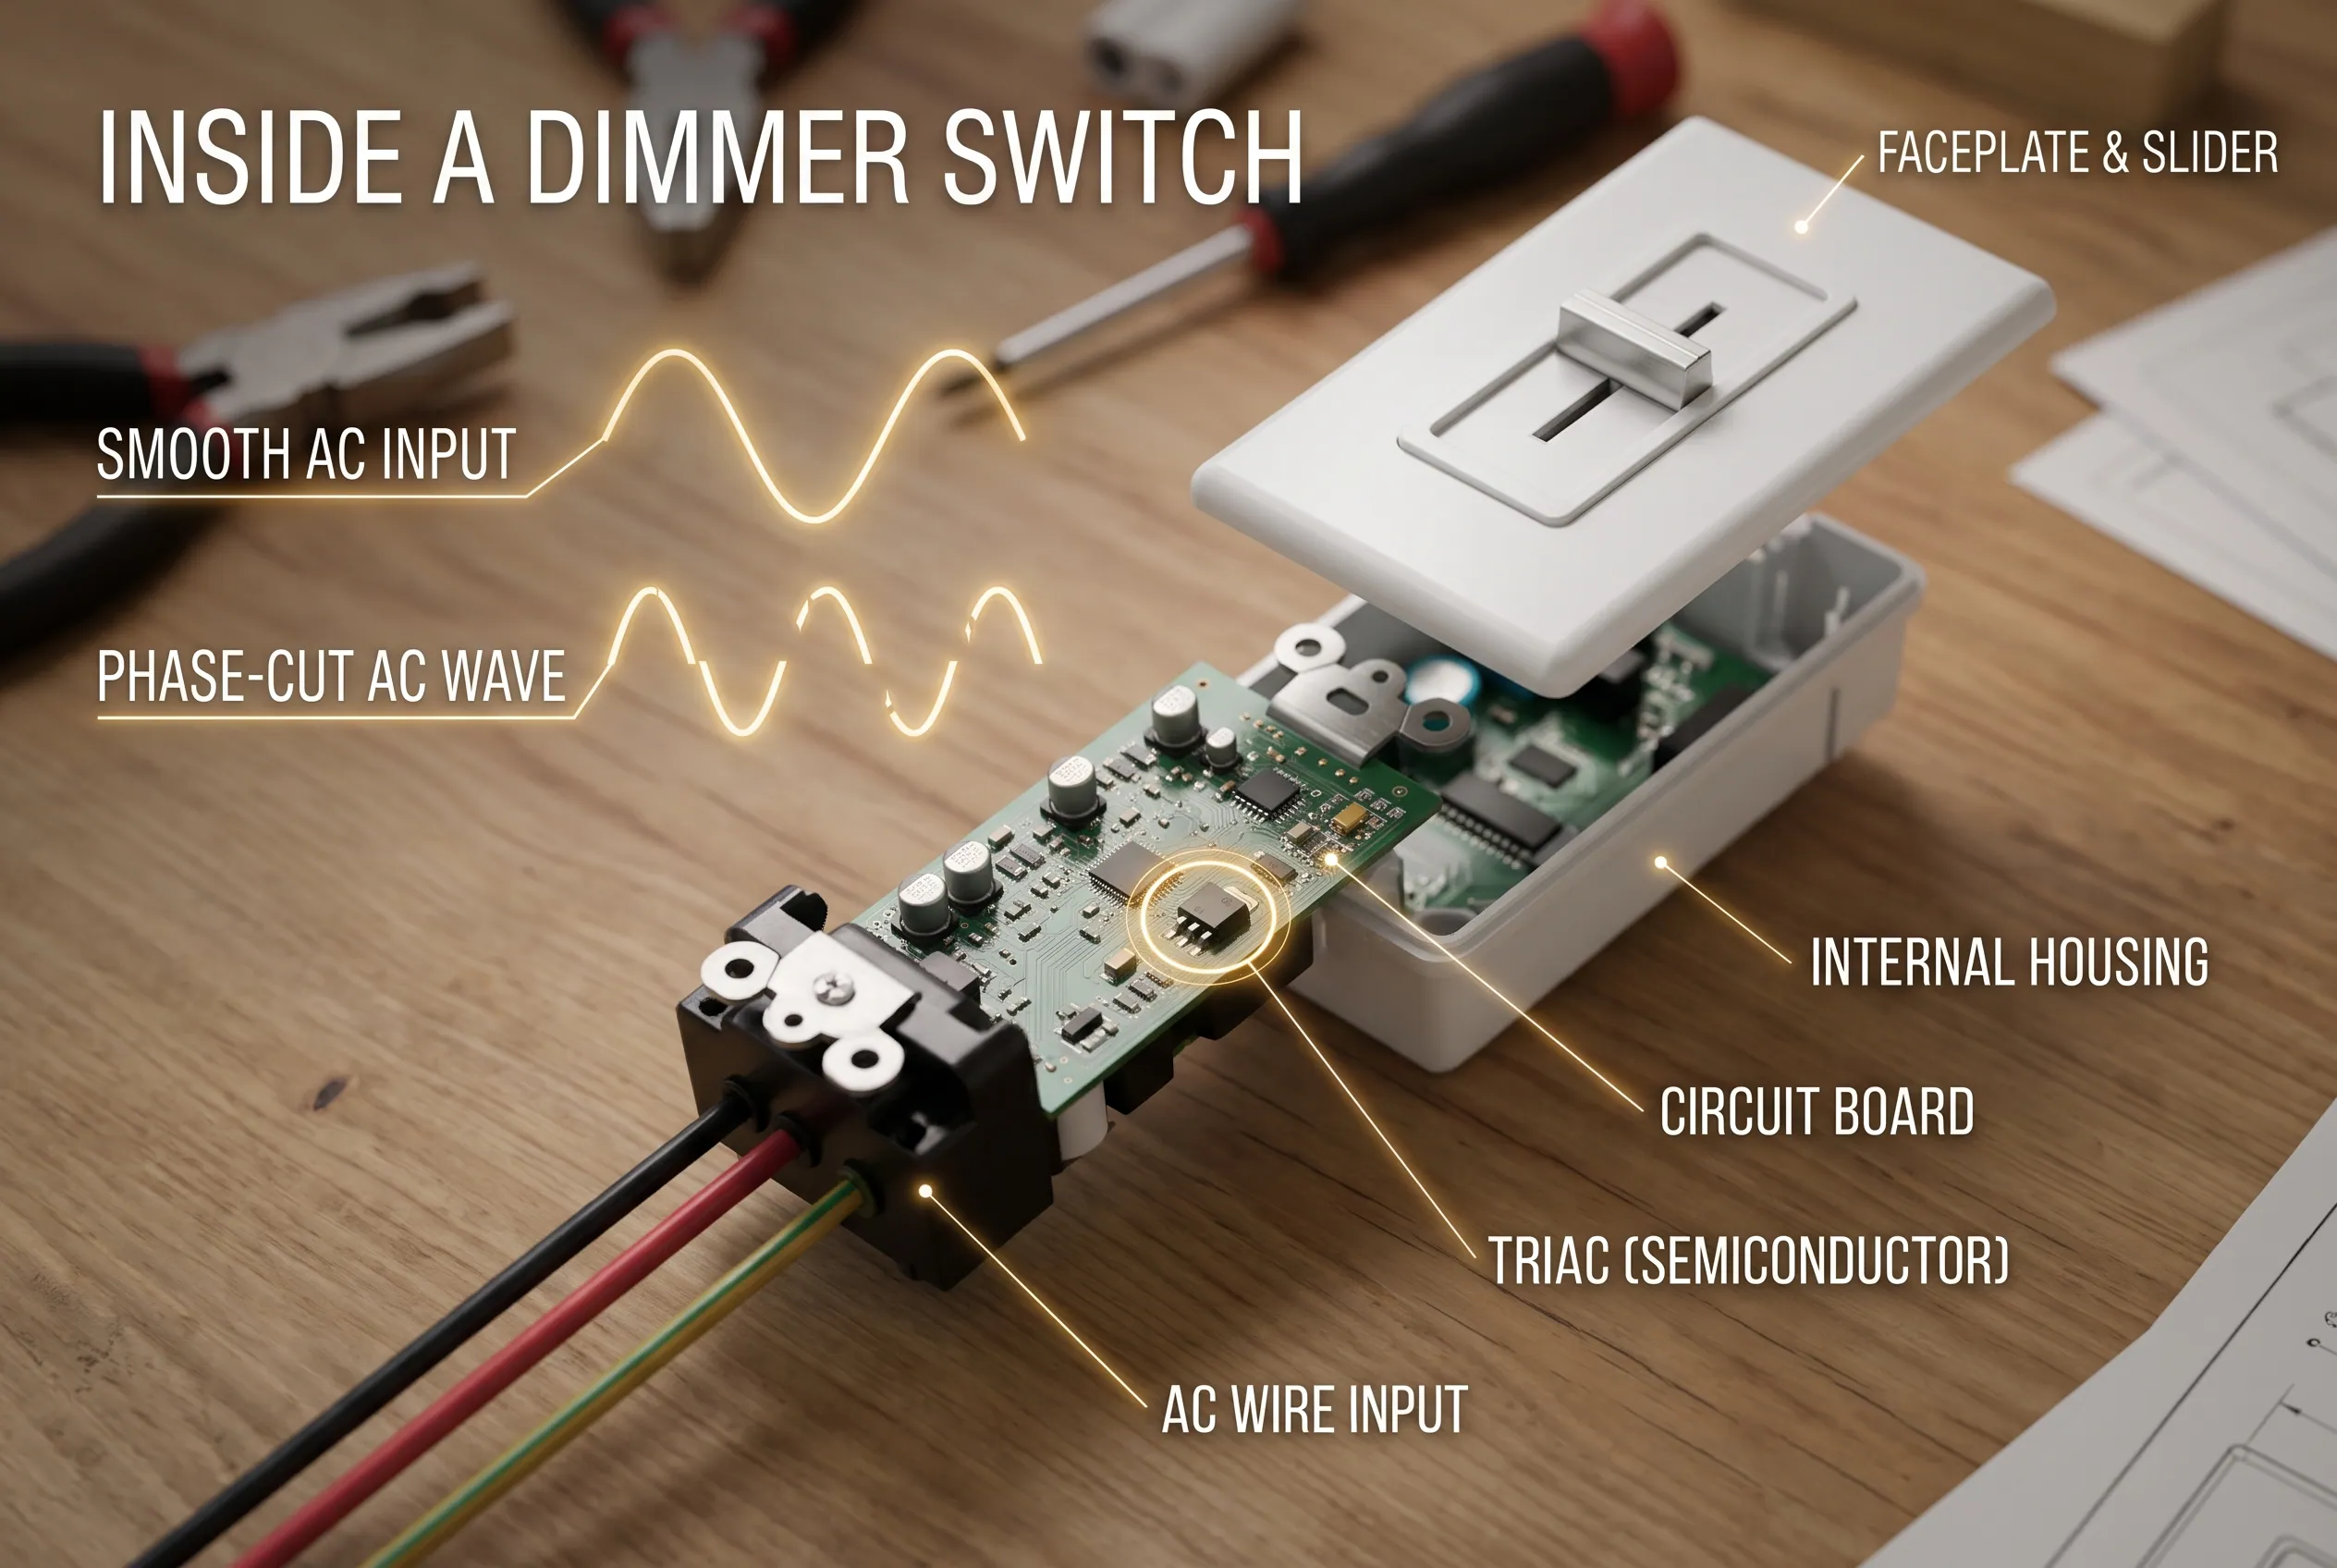
Many electronic wall dimmers use a technique known as phase-cut dimming. A semiconductor component, often a TRIAC in a leading-edge design, controls when electricity can flow during each part of the AC cycle.
A TRIAC is an electronic component that can switch alternating current on and off under the right conditions. It allows a dimmer to control the electrical waveform without wasting as much energy as an older resistive dimmer.
How phase-cut dimming changes the AC waveform
Picture the AC waveform as a smooth, repeating wave. A phase-cut dimmer changes which portion of that wave reaches the connected light.
In a common leading-edge dimmer, the electronic switch waits briefly after the waveform crosses zero before allowing current to flow. It then conducts for the remainder of that half-cycle. At the next half-cycle, the process repeats.
At a brighter setting, the dimmer allows more of each half-cycle through. At a lower setting, it delays the start of conduction, so a smaller portion of the waveform reaches the light.
This is a simplified explanation of one common method, not a description of every dimmer design.
The switching occurs too quickly for most people to see directly. Instead, the bulb’s output changes according to the electrical signal it receives and how it responds to that signal.
Leading-edge versus trailing-edge dimming
These two methods control different parts of the AC waveform.
| Feature | Leading-edge dimming | Trailing-edge dimming |
| How it works | Delays the start of conduction during each half-cycle | Starts conduction near the beginning and cuts it off before the half-cycle ends |
| Common association | Traditional electronic dimmers and incandescent lighting | Electronic dimmers often designed with LED loads in mind |
| Main consideration | Some LED drivers may respond poorly to its waveform | Compatibility still depends on the LED driver and dimmer design |
| What to check | Supported bulb types and manufacturer specifications | Supported bulb types and manufacturer specifications |
Trailing-edge dimmers are often suitable for electronic lighting loads, including many LEDs. However, neither method is automatically compatible with every bulb.
A good starting point is the manufacturer’s compatibility information. For further background, NVC Lighting’s dimming guide explains phase-cut dimming and the differences between leading-edge and trailing-edge control.
How Old Dimmer Switches Work Compared With Modern Ones
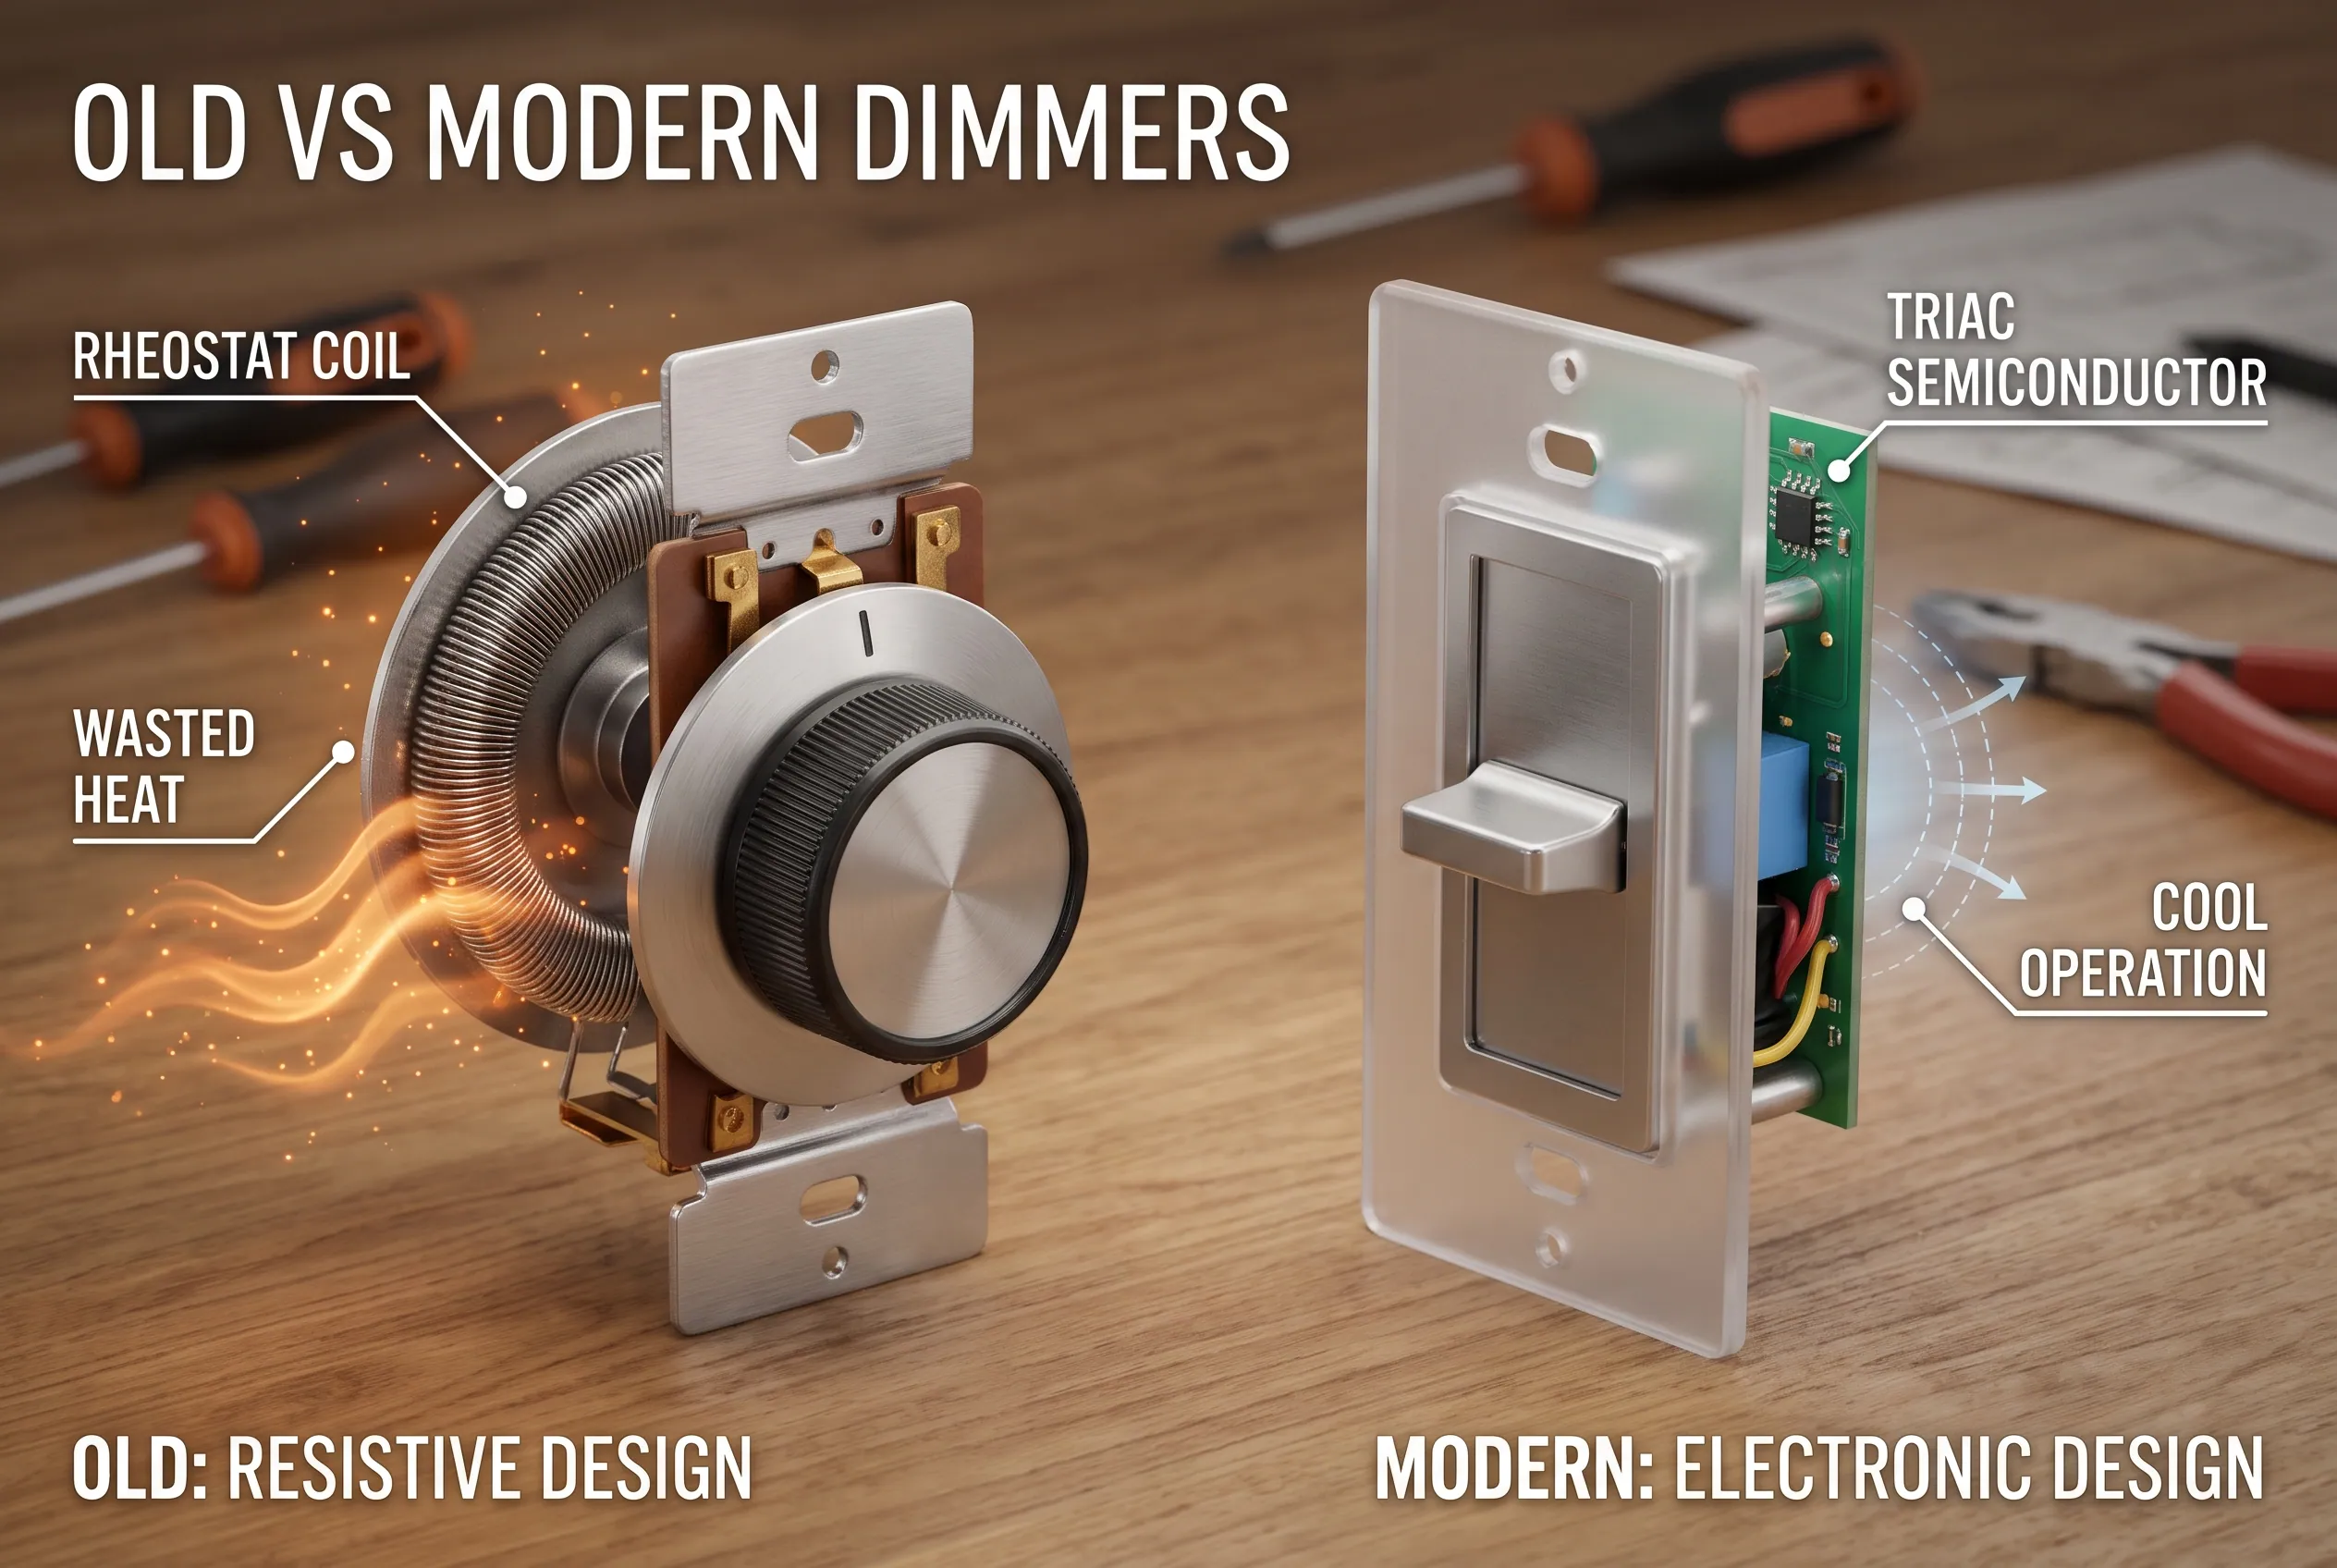
Older dimmer switches did not all use the same technology. Some early designs used variable resistors, also called rheostats, to control electrical current.
A resistor opposes the flow of current. In a traditional resistive dimmer, reducing the current also caused energy to be released as heat. The light became dimmer, but some of the electrical energy was wasted in the dimmer itself.
This approach was inefficient compared with modern electronic dimming. It could also produce considerable heat, which made correct design and installation important.
Modern electronic dimmers use semiconductor components to control power more efficiently. Instead of relying on a large resistance to restrict current, many switch the electrical waveform at carefully controlled points.
The difference matters for two reasons.
First, electronic dimmers generally avoid the large heat losses associated with a basic resistive dimmer. Second, their electrical behavior is better suited to a range of modern lighting products, although compatibility is still essential.
It is worth correcting one common misconception: an older dimmer does not necessarily use a rheostat. Electronic dimmers have been available for decades, so the switch’s actual design matters more than its age alone.
If you have an older dimmer and plan to install LED bulbs, check the switch model and the new bulbs before assuming that the existing equipment will work properly.
How Do Dimmer Switches Work With LED Lights?
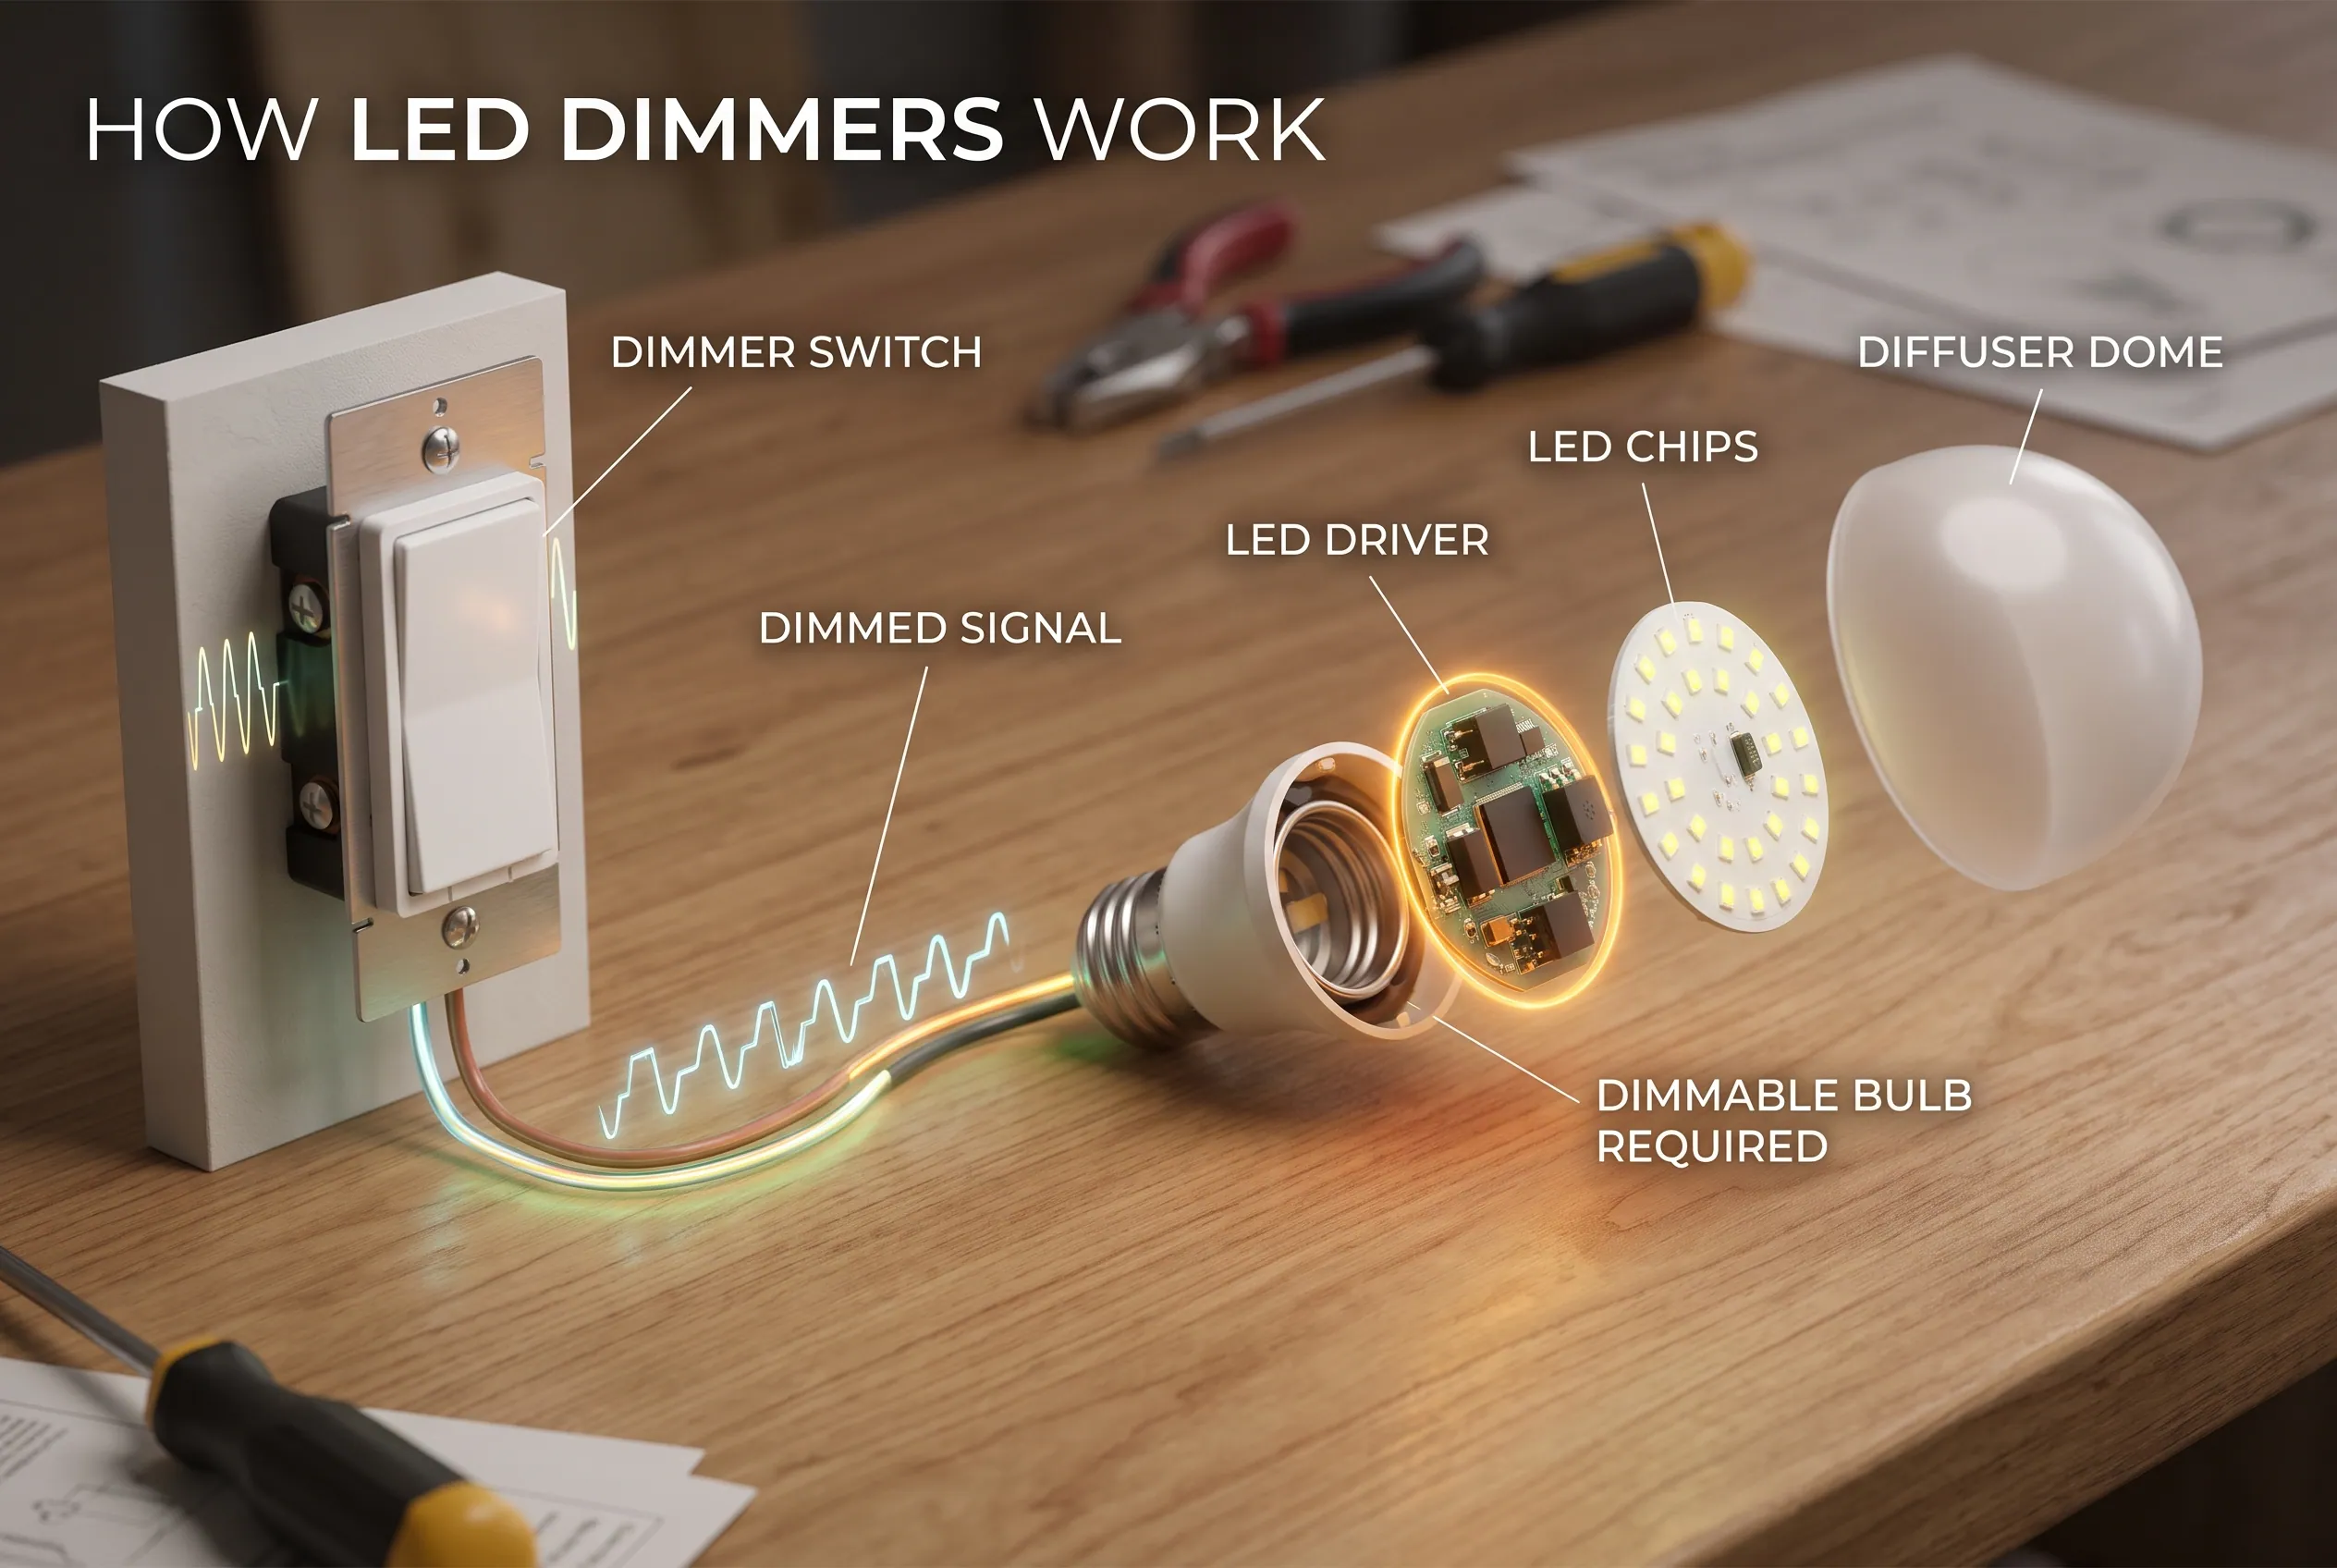
LED dimming is different from dimming an incandescent bulb because an LED relies on electronic components to operate.
An LED bulb usually contains an electronic driver. This small circuit converts incoming electricity into the form needed by the LED. It also helps control how the LED operates.
A dimmer changes the electrical signal reaching the bulb. The LED driver’s job is to respond to that signal in a way that produces the intended light output. Not every driver handles every dimming method equally well.
This explains why a bulb can fit the socket and light up normally but still behave poorly when connected to a dimmer.
Do you need a special bulb for a dimmer switch?
Usually, yes, when the light uses an LED bulb that is being controlled by a dimmer. Look for a bulb explicitly marked as dimmable.
A standard non-dimmable LED may work at full power on a compatible ordinary switch, but that does not mean it can safely or reliably operate with a dimmer. Some non-dimmable products may flicker, behave unpredictably, or fail when paired with incompatible controls.
However, buying a dimmable LED is only the first step. You also need to check whether it works with your particular dimmer.
Manufacturers such as Lutron maintain product compatibility information because performance can differ between bulb and dimmer combinations. Their LED compatibility explain why checking the specific products is more reliable than assuming all dimmable LEDs behave alike.
Why compatibility matters
When an LED bulb and dimmer do not work well together, you may notice:
- Flickering: The light output changes rapidly or irregularly.
- Buzzing: The bulb or dimmer produces an audible sound.
- A limited dimming range: The light suddenly turns off or flickers when you move the control toward its lowest setting.
- Delayed brightness changes: You move the slider, but the light output does not change smoothly.
- Unexpected light output: The bulb may glow faintly or behave abnormally when switched off, depending on the circuit and equipment.
These symptoms can have more than one cause. A product mismatch is one possibility, but a fault in the fixture, switch, wiring, or another part of the circuit may also be responsible.
Before buying replacements, identify the existing dimmer model and check the bulb’s compatibility information. This simple step can save you from repeatedly replacing bulbs that were never a good match for the control.
What Types of Dimmer Switches Are Available?
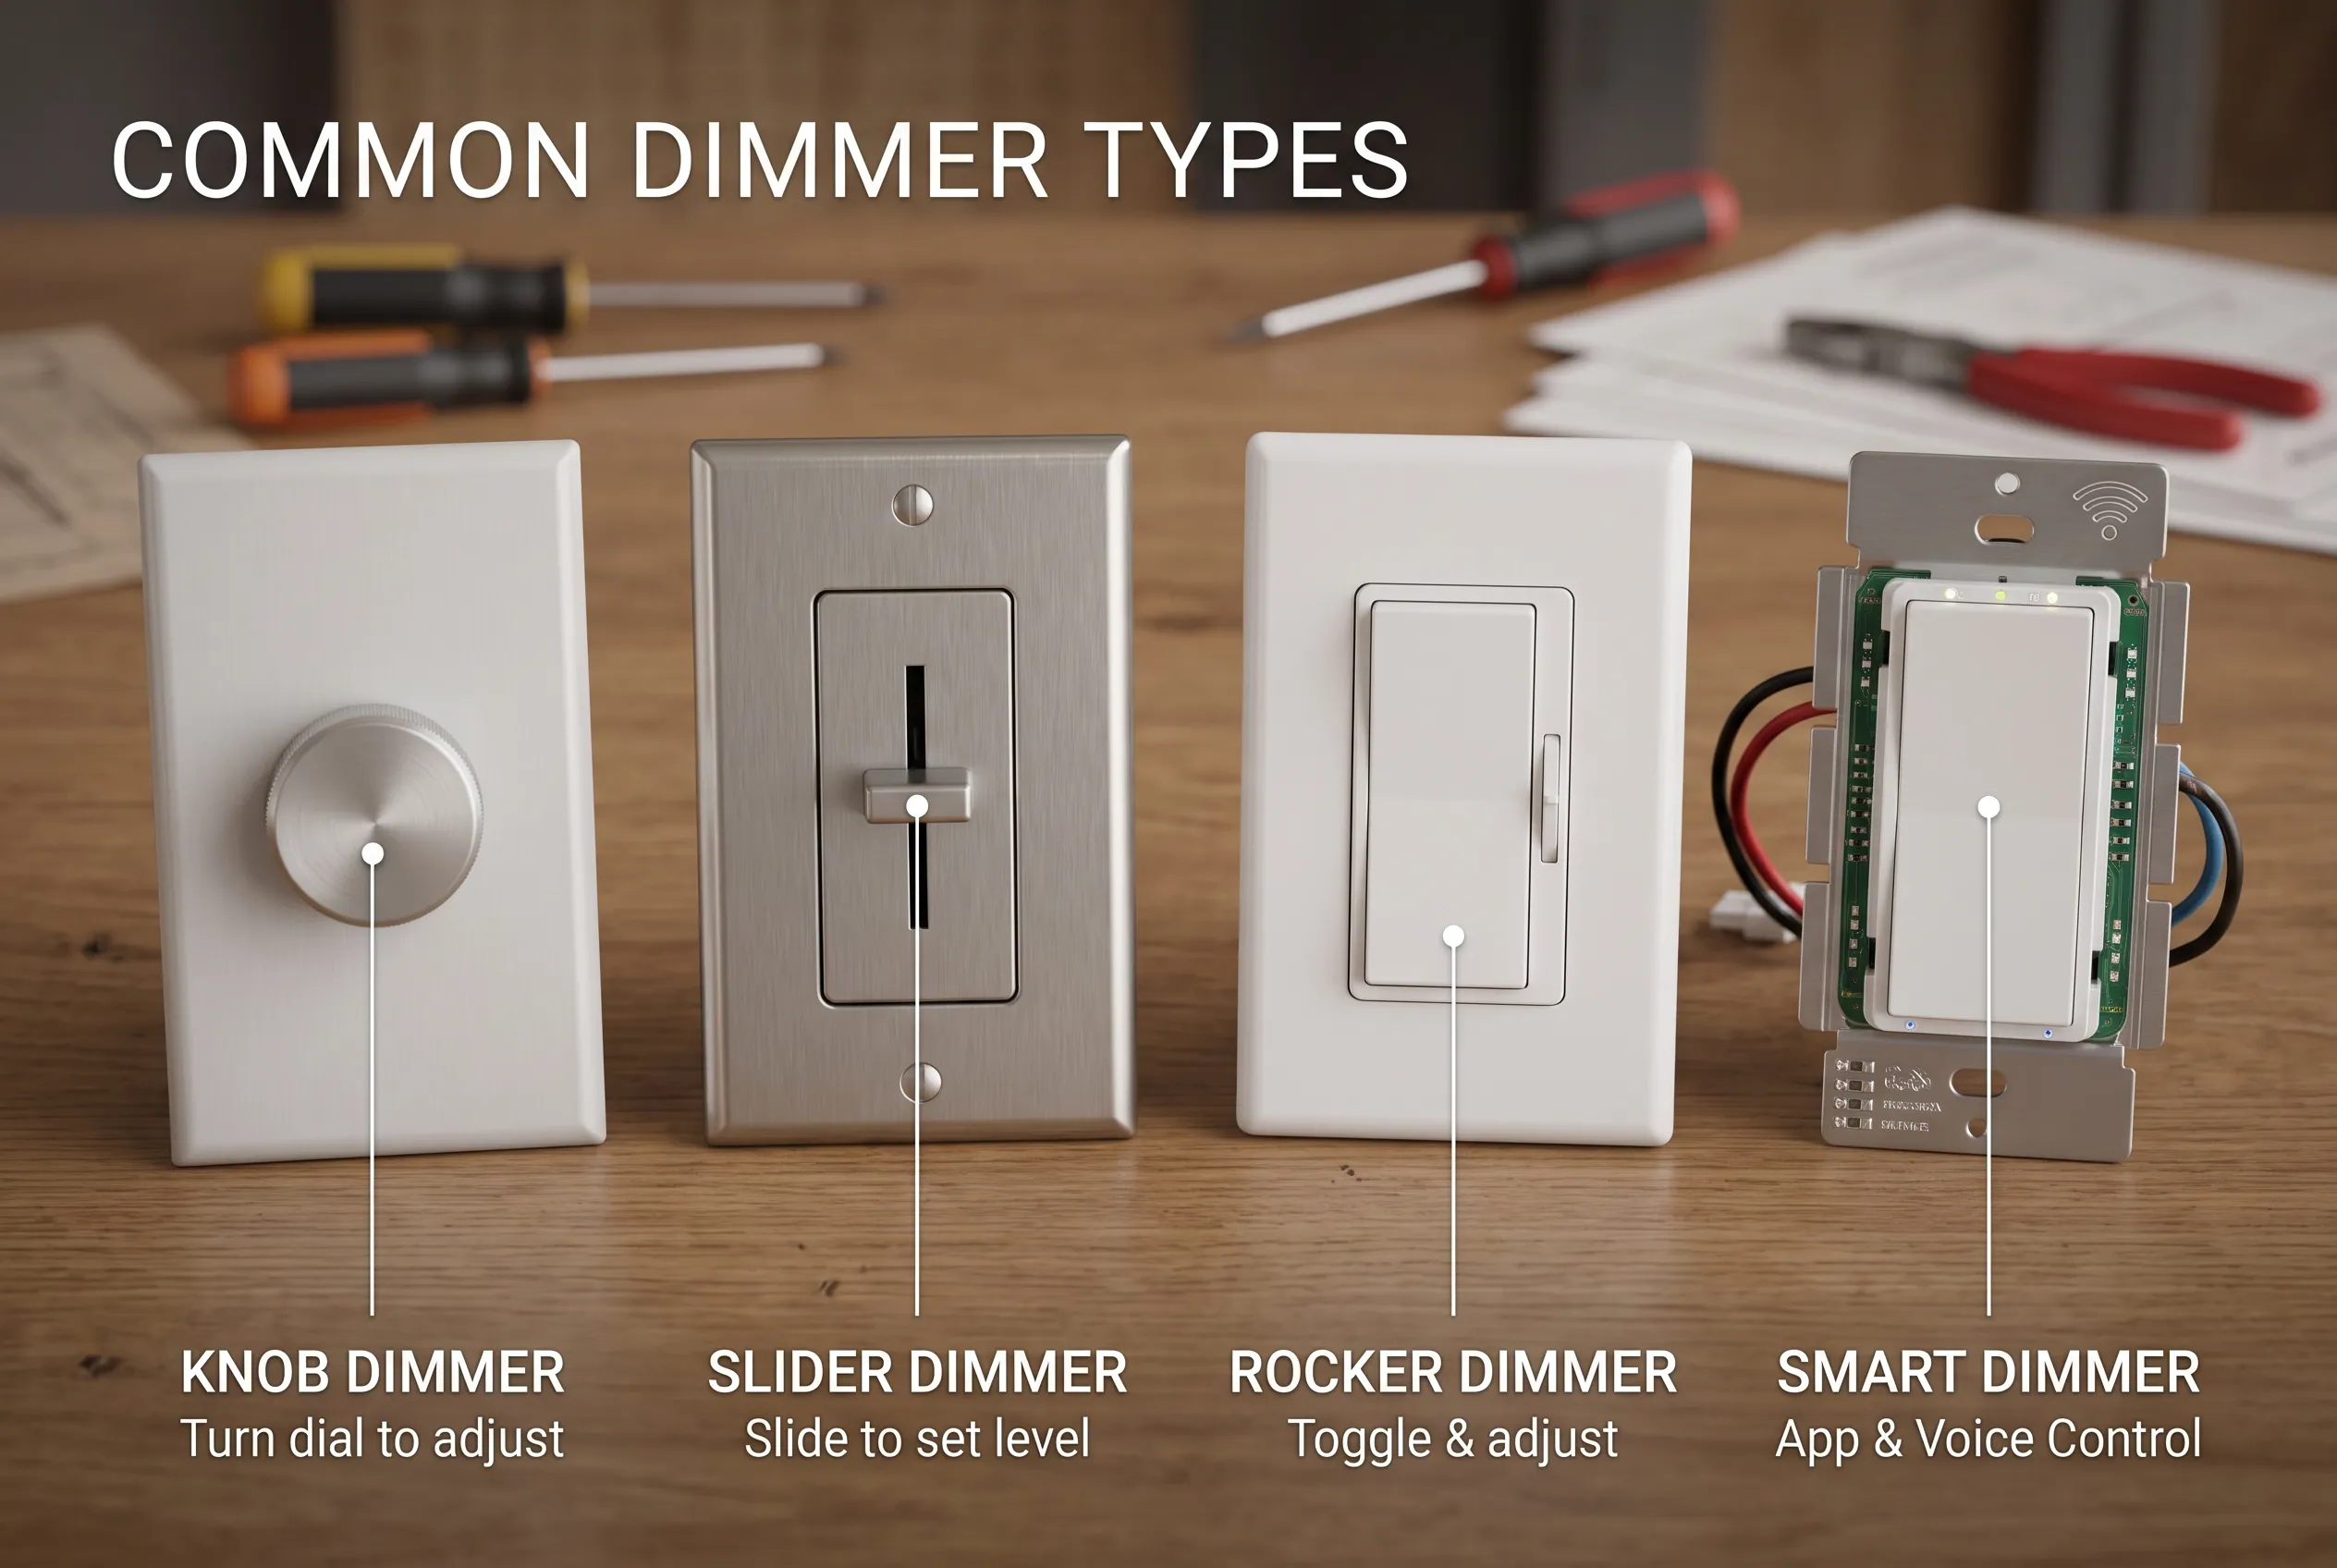
Dimmer switches differ in how you operate them, how they connect to the lighting circuit, and how they control brightness. Choosing a suitable model means looking beyond its appearance.
Knob, slider, rocker, and touch controls
These names describe the physical control rather than the underlying electrical method.
- Knob dimmers: You turn a dial to adjust brightness. They offer a simple, familiar control.
- Slider dimmers: You move a slider to set the desired light level. The visible position helps you remember a preferred setting.
- Rocker dimmers: A rocker-style control may switch the light on and off, while a separate movement or control adjusts brightness.
- Touch dimmers: Some models use touch-sensitive controls to change light output.
- Smart dimmers: These may allow control through an app, voice assistant, schedule, or automation system.
The right style depends on how you use the room and what controls you find convenient. A slider may be useful when you adjust the brightness often, while a smart model may suit someone who wants scheduled lighting.
But the control style does not guarantee compatibility with a bulb. Always check the dimmer’s specifications.
Single-pole and three-way dimmers
A single-pole arrangement typically controls a light from one switch location. A three-way arrangement allows you to control a light from two locations, such as opposite ends of a hallway or at the top and bottom of a staircase.
In a three-way circuit, the dimmer must support that arrangement and be installed according to its instructions. Some systems use one main dimmer and a compatible ordinary switch or companion control at the other location.
Do not assume you can install two ordinary dimmers on the same light circuit and expect them to work together. Some product systems support companion dimmers or remote controls, but the exact arrangement depends on the manufacturer and model.
Smart dimmers and low-voltage DC dimmers
Smart dimmers add connected controls, allowing you to adjust brightness remotely or automate lighting. They can be useful when you want a light to turn on at a particular time or change brightness as part of a smart-home routine.
However, their wiring requirements vary. Some models require a neutral wire, while others are designed to operate without one in certain installations. Check the exact manufacturer’s instructions before buying a smart dimmer for an existing wall box.
Low-voltage DC dimming is another category. It is common in systems such as LED strips powered by a compatible DC supply. These systems may adjust brightness through pulse-width modulation (PWM), which rapidly switches power on and off, or through current control.
A DC dimmer for an LED strip is not automatically suitable for a household AC lighting circuit. Match the dimmer to the power supply, lighting system, and stated electrical ratings.
Do Dimmer Switches Save Electricity?
Dimmer switches can reduce electricity use when they reduce the power drawn by a compatible light. However, the amount saved depends on the bulb, dimmer, brightness setting, and how long you use the light at that setting.
Incandescent bulbs are less efficient than modern LEDs. When you dim an incandescent bulb, you usually reduce its electrical power use, but the bulb still loses much of its energy as heat.
LEDs already use electricity more efficiently to produce light. Dimming a compatible LED generally reduces its power consumption, but the reduction in electricity use does not necessarily match the percentage shown by the slider.
For example, a 50% brightness setting does not guarantee that the bulb uses exactly 50% of its full-brightness electricity. The driver, LED design, and dimmer all affect the result.
The U.S. Department of Energy’s consumer guide to energy-efficient lighting provides useful background on efficient lighting options.
The practical benefit of a dimmer is that it lets you use less light when full brightness is unnecessary. That may reduce power use while also making a room more comfortable. Still, the actual savings depend on your lighting equipment and habits, so a dimmer should not be treated as a guarantee of lower electricity bills.
Why Do Dimmer Switches Flicker, Buzz, or Fail to Dim Properly?
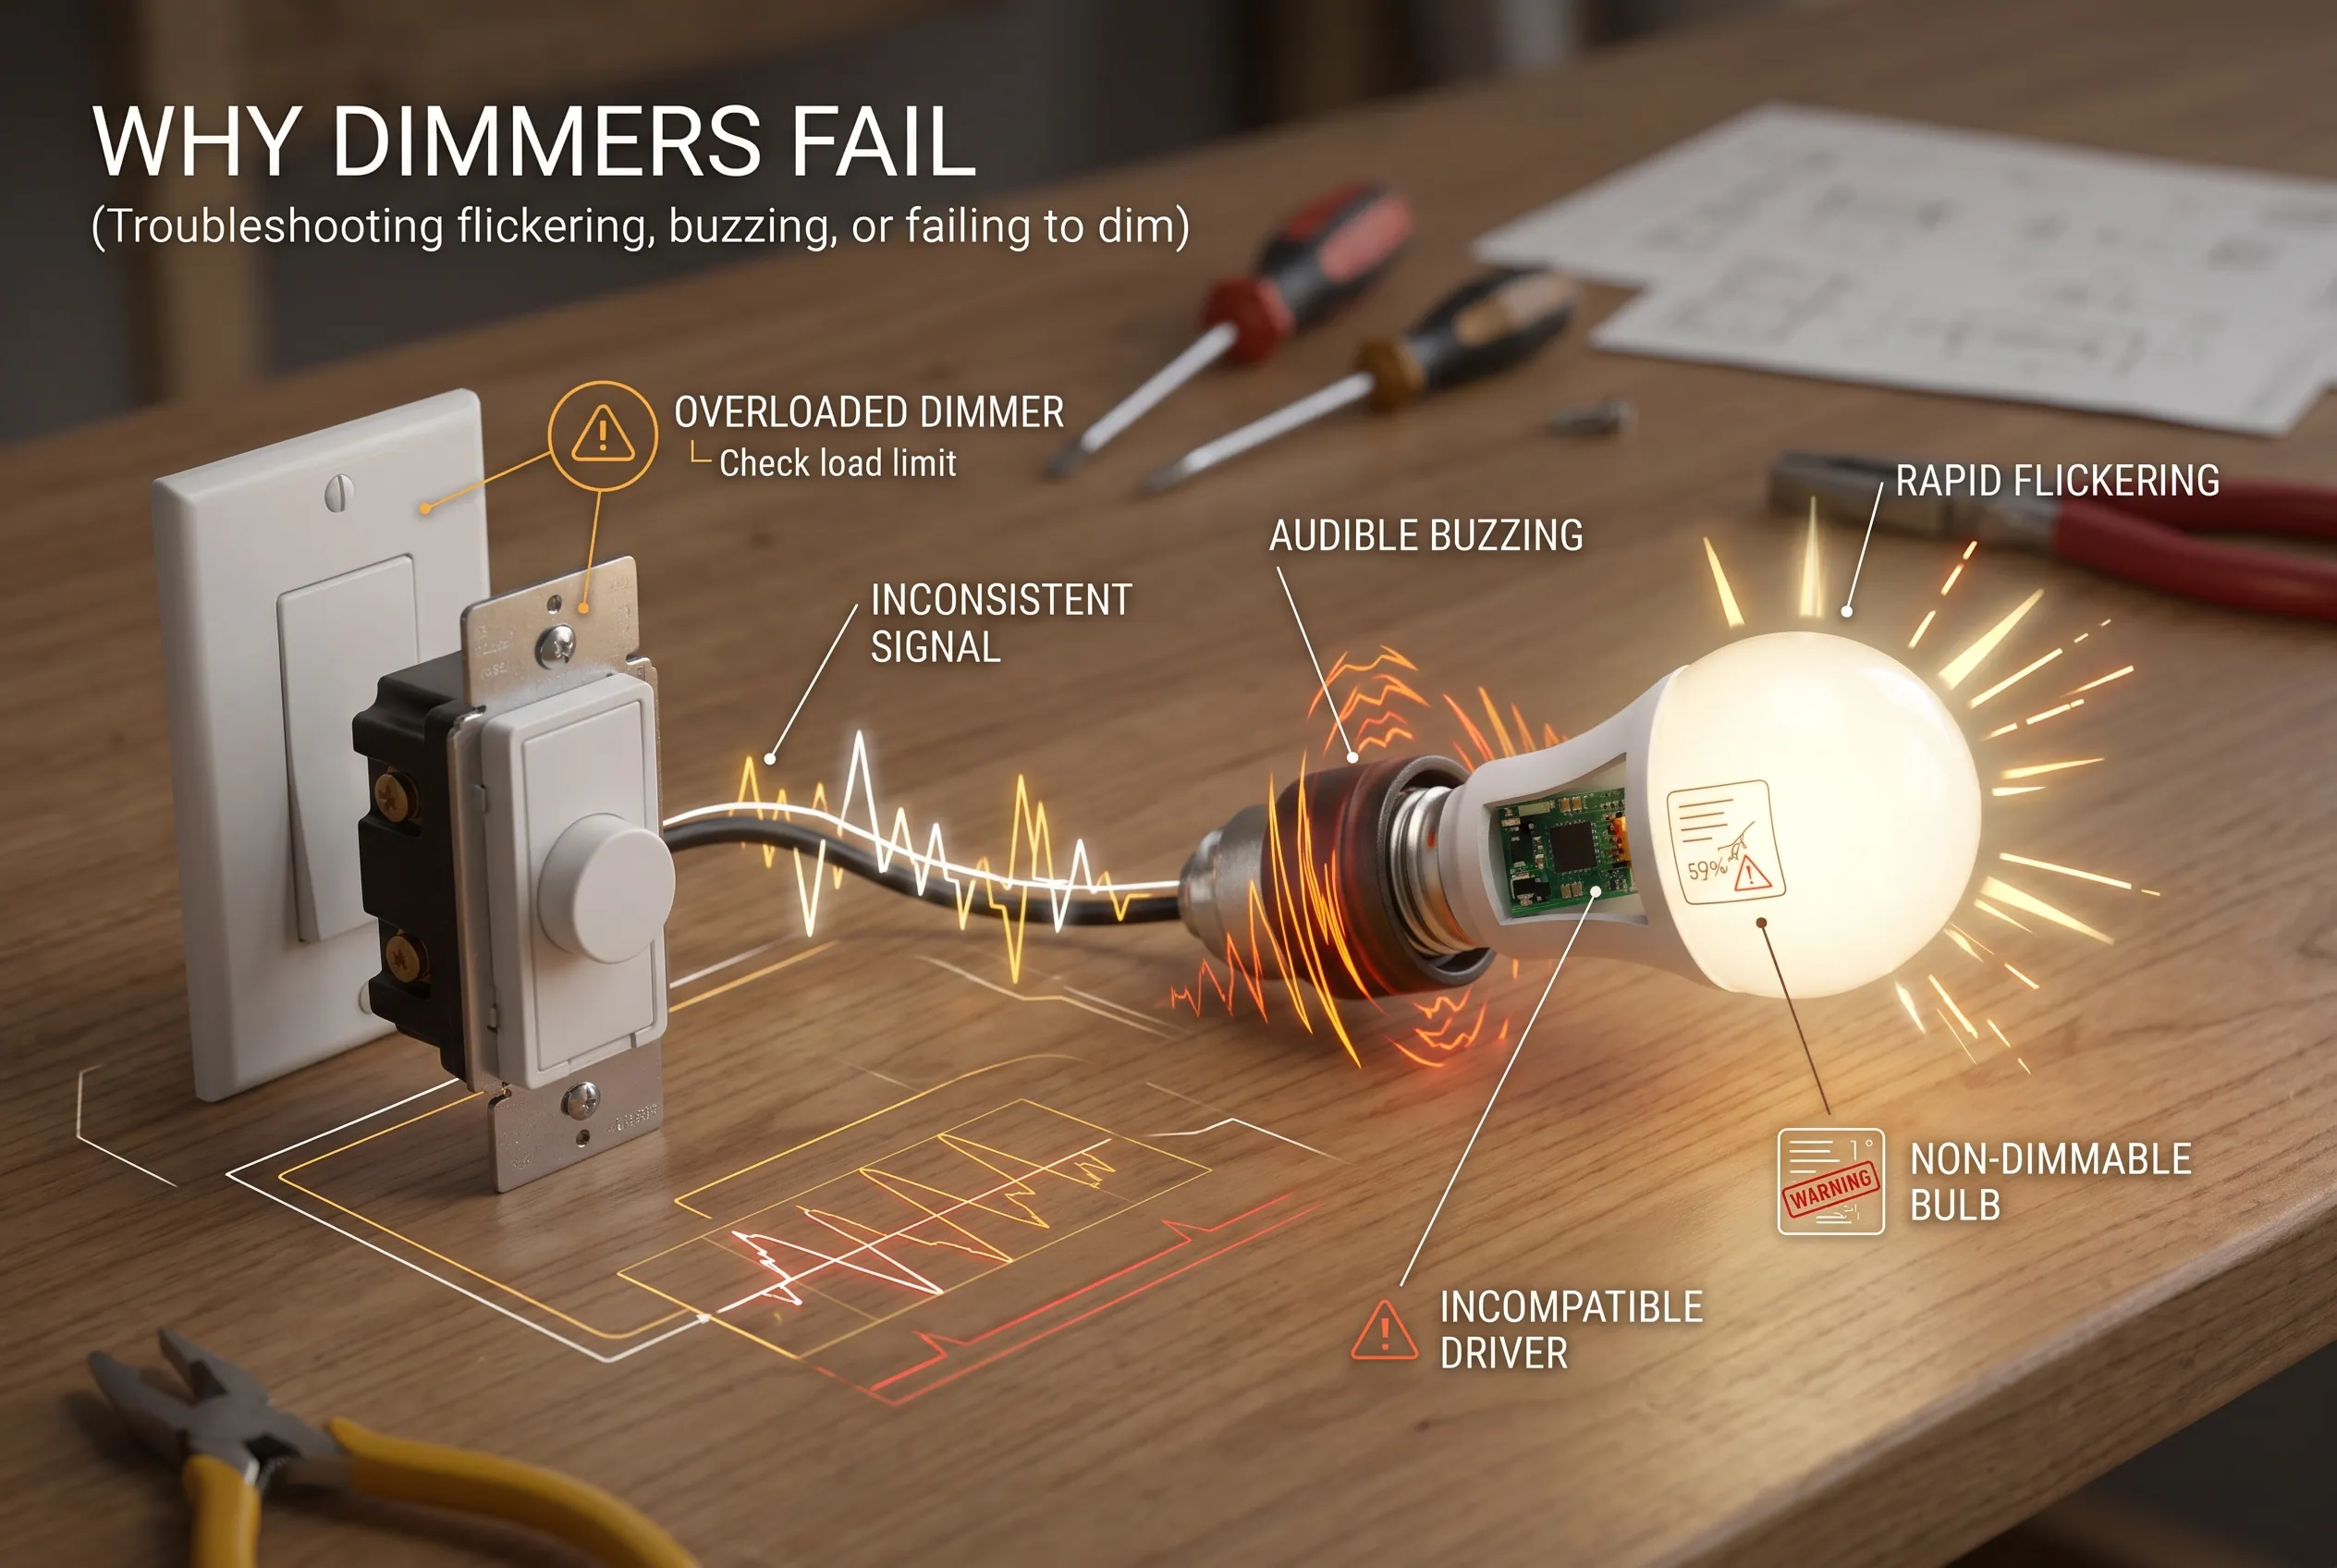
When a dimmer behaves unexpectedly, begin with safe checks rather than replacing several parts at random. Compatibility is often worth checking first, but it is not the only possible cause.
1. Check whether the bulb supports dimming
Look at the LED bulb’s packaging or product specifications. If it is not marked dimmable, do not assume it will work correctly with a dimmer.
If you need a replacement, choose a dimmable bulb that is listed as compatible with your dimmer or recommended by the lighting manufacturer.
2. Confirm the dimmer and bulb are compatible
Find the dimmer’s model number and consult the manufacturer’s compatibility information. Check that the specific bulb or fixture is supported, not merely that both products use the same socket or voltage.
For integrated LED fixtures, check the fixture manufacturer’s recommendations. You may need a compatible dimmer rather than a replacement bulb.
3. Check the dimming range and load rating
Some compatible combinations still need adjustment to achieve smooth performance at low brightness. Certain dimmers have minimum- or maximum-level settings that allow you to adjust the usable dimming range.
Only use these settings if your model supports them, and follow the manufacturer’s instructions. Do not assume every dimmer has the same adjustment procedure.
Also check the dimmer’s total rated LED load and any specified minimum load. The relevant rating may differ from the wattage limits for incandescent lighting.
4. Know when to stop troubleshooting
If compatible products and permitted adjustments do not resolve the issue, the cause may involve the dimmer, fixture, wiring, or another electrical problem.
Stop using the affected equipment and seek qualified electrical help if you notice unusual heat, a burning smell, visible damage, or other signs of an electrical fault. Do not remove the wall plate or attempt wiring repairs unless you are properly equipped and competent to carry out the work safely.
Leviton’s LED dimmer troubleshooting guidance explains how compatibility and minimum-brightness settings can affect performance on supported products.
A bulb replacement may solve a compatibility problem, but persistent symptoms should not automatically be blamed on the bulb.
How to Choose and Install the Right Dimmer Switch
The best dimmer for your home is one that matches the lighting equipment, electrical arrangement, and way you want to control the light.
Before buying, check the following details.
Bulb or fixture type: Confirm whether the light uses incandescent, halogen, LED, or another type of source. Check that the dimmer supports it.
Compatibility: For LEDs, consult the bulb or fixture manufacturer’s compatibility guidance. Do not rely only on appearance, socket type, or the word “dimmable.”
Electrical load: Check the dimmer’s rated load and any minimum-load requirements. Follow the rating that applies to your light source.
Switching locations: Determine whether one switch controls the light or two locations control it. Choose a dimmer designed for the correct arrangement.
Smart features: If you want app control or automation, verify the dimmer’s requirements, including neutral-wire needs, supported bulbs, and compatibility with your smart-home system.
Installation requirements: Check the manufacturer’s instructions and applicable local requirements before planning replacement work. Existing wiring and wall-box conditions can affect whether a particular model is suitable.
Can you install a dimmer yourself?
That depends on the equipment, the existing circuit, local requirements, and your experience with electrical work. A straightforward-looking replacement can still involve wiring arrangements that are unfamiliar or unsafe to handle without the right knowledge.
Before any work on a wall switch, the electrical circuit must be safely isolated, and the absence of voltage must be verified with appropriate equipment. Turning the dimmer off is not the same as safely disconnecting power.
If you cannot identify the circuit, understand the wiring diagram, or verify that the replacement is suitable, hire a qualified electrician. The same applies when the installation requires changes to wiring or when an existing circuit appears damaged or unusual.
When comparing costs, separate the price of the dimmer from installation labor and any extra materials. A cheaper switch is not necessarily the better choice if it does not support your lights or the required switching arrangement.
Frequently Asked Questions About Dimmer Switches
Does a dimmer switch reduce voltage or current?
A conventional electronic phase-cut dimmer changes the portion of the AC waveform delivered to the light. This affects the voltage waveform, current, and power drawn by the connected load. It is not simply a device that turns down voltage in the same way a basic adjustable power supply might.
Can you leave a dimmer switch on all night?
A compatible light can generally operate at a stable dim setting if the products are used within their ratings and instructions. However, buzzing, unusual heat, flickering, burning smells, or visible damage should not be ignored. Follow the product’s instructions and investigate abnormal behavior rather than assuming every combination is suitable for extended use.
Can two dimmers control the same light?
Usually, a conventional multi-location setup uses one dimmer with a compatible switch or companion control. Some product systems support more than one dimming control, but you must follow the manufacturer’s instructions for the exact circuit and model.
Do smart dimmer switches need a neutral wire?
Some smart dimmers require a neutral wire, while other models are designed to work without one in certain setups. Check the installation instructions for the exact model and confirm that it supports your lighting load.
What should you do if a dimmer still buzzes after replacing the bulb?
First confirm that the new bulb and dimmer are compatible. Check the specified load limits and any manufacturer-approved adjustments. If buzzing persists, particularly when accompanied by flickering, unusual heat, or other abnormal behavior, stop using the affected equipment if a fault is suspected and seek qualified electrical help.
Choose a Compatible Dimmer Before Changing Your Lighting
Dimmer switches give you better control over home lighting by regulating the electrical power delivered to a compatible light. Modern electronic dimmers do this more efficiently than older resistive designs, but LED lighting still requires careful attention to compatibility.
Before changing a bulb or switch, identify the existing equipment, check its specifications, and confirm that the new combination is supported. If troubleshooting points toward an electrical fault or the installation requirements are unclear, qualified help is the safer next step.
Disclaimer
Lighting setups, budgets, and wiring conditions vary by home and product. Follow the manufacturer’s instructions, and consult a qualified electrician for uncertain wiring, electrical faults, or installation work beyond your knowledge.