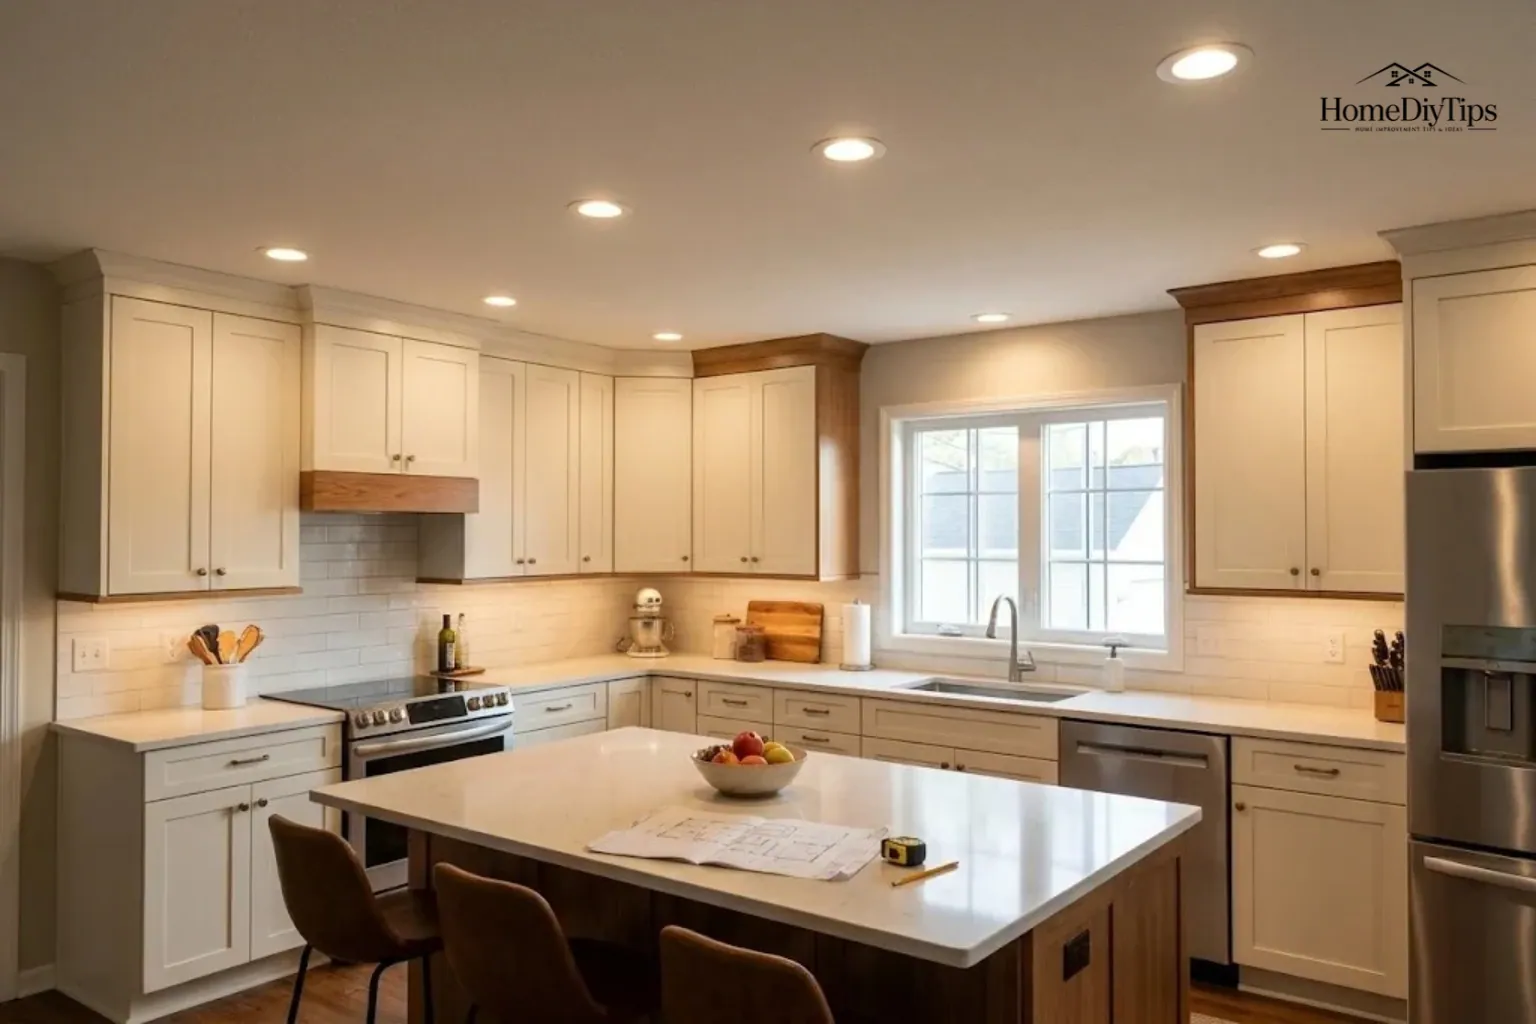
Good can light placement in the kitchen makes cooking, cleaning, and food preparation easier. The goal is to light countertops and work areas without creating dark shadows or putting too much light in one part of the room.
As a starting point, position recessed lights so their light falls near the front working edge of countertops, where practical. Then add general lighting to illuminate the rest of the kitchen. A commonly used spacing guide is to place lights about half the ceiling height apart, so an 8-foot ceiling suggests roughly 4 feet between fixtures. Treat this as a starting point, not a fixed rule, because ceiling height, fixture brightness, beam spread, cabinets, and existing lights all affect the layout.
The best layout is not always a perfect grid. It is a plan that gives you useful light where you need it while keeping the room comfortable and balanced.
Direct Answer
Kitchen can light placement means arranging recessed ceiling lights to illuminate countertops, sinks, cooking areas, and the rest of the room. The right layout depends on cabinet positions, ceiling height, fixture output, and existing lighting.
Practical Home Tip
Before choosing fixture positions, draw your kitchen and mark the front edge of each countertop, the sink, the cooktop, and the island. Use these points to plan task lighting first, then add general lighting while checking fixture specifications and ceiling conditions.
Where Should Kitchen Can Lights Be Placed?
Kitchen can lights, also called recessed lights, are installed inside the ceiling so their main bodies sit above the ceiling surface. They can provide general room lighting or focus light on specific areas.
Start by dividing your kitchen into two lighting needs.
Task lighting helps you perform activities such as chopping vegetables, washing dishes, and preparing meals. These areas need light that reaches the work surface without being blocked by your body.
General lighting makes the whole kitchen easier to see. It helps illuminate open floor areas, walkways, and spaces between cabinets and appliances.
For most kitchens, plan task lighting around these areas first:
- Countertops used for food preparation.
- The sink and nearby cleaning area.
- The cooking area, including the cooktop where appropriate.
- A kitchen island or peninsula used for chopping, mixing, or serving.
After marking these locations, plan general lighting for the remaining areas.
This order matters. If you simply divide the ceiling into equal squares, the lights may be evenly spaced while missing the parts of the kitchen that need the most attention.
Imagine standing at a counter beneath upper cabinets. A light positioned behind your head may cast your shadow across the cutting board. Moving the useful light toward the front of the counter can reduce that problem.
Also consider your existing lighting. A kitchen with under-cabinet LED strips, a range-hood light, and pendant lights over an island may need fewer recessed fixtures than a kitchen relying on ceiling lights alone.
How Far Should Kitchen Can Lights Be From Walls and Cabinets?
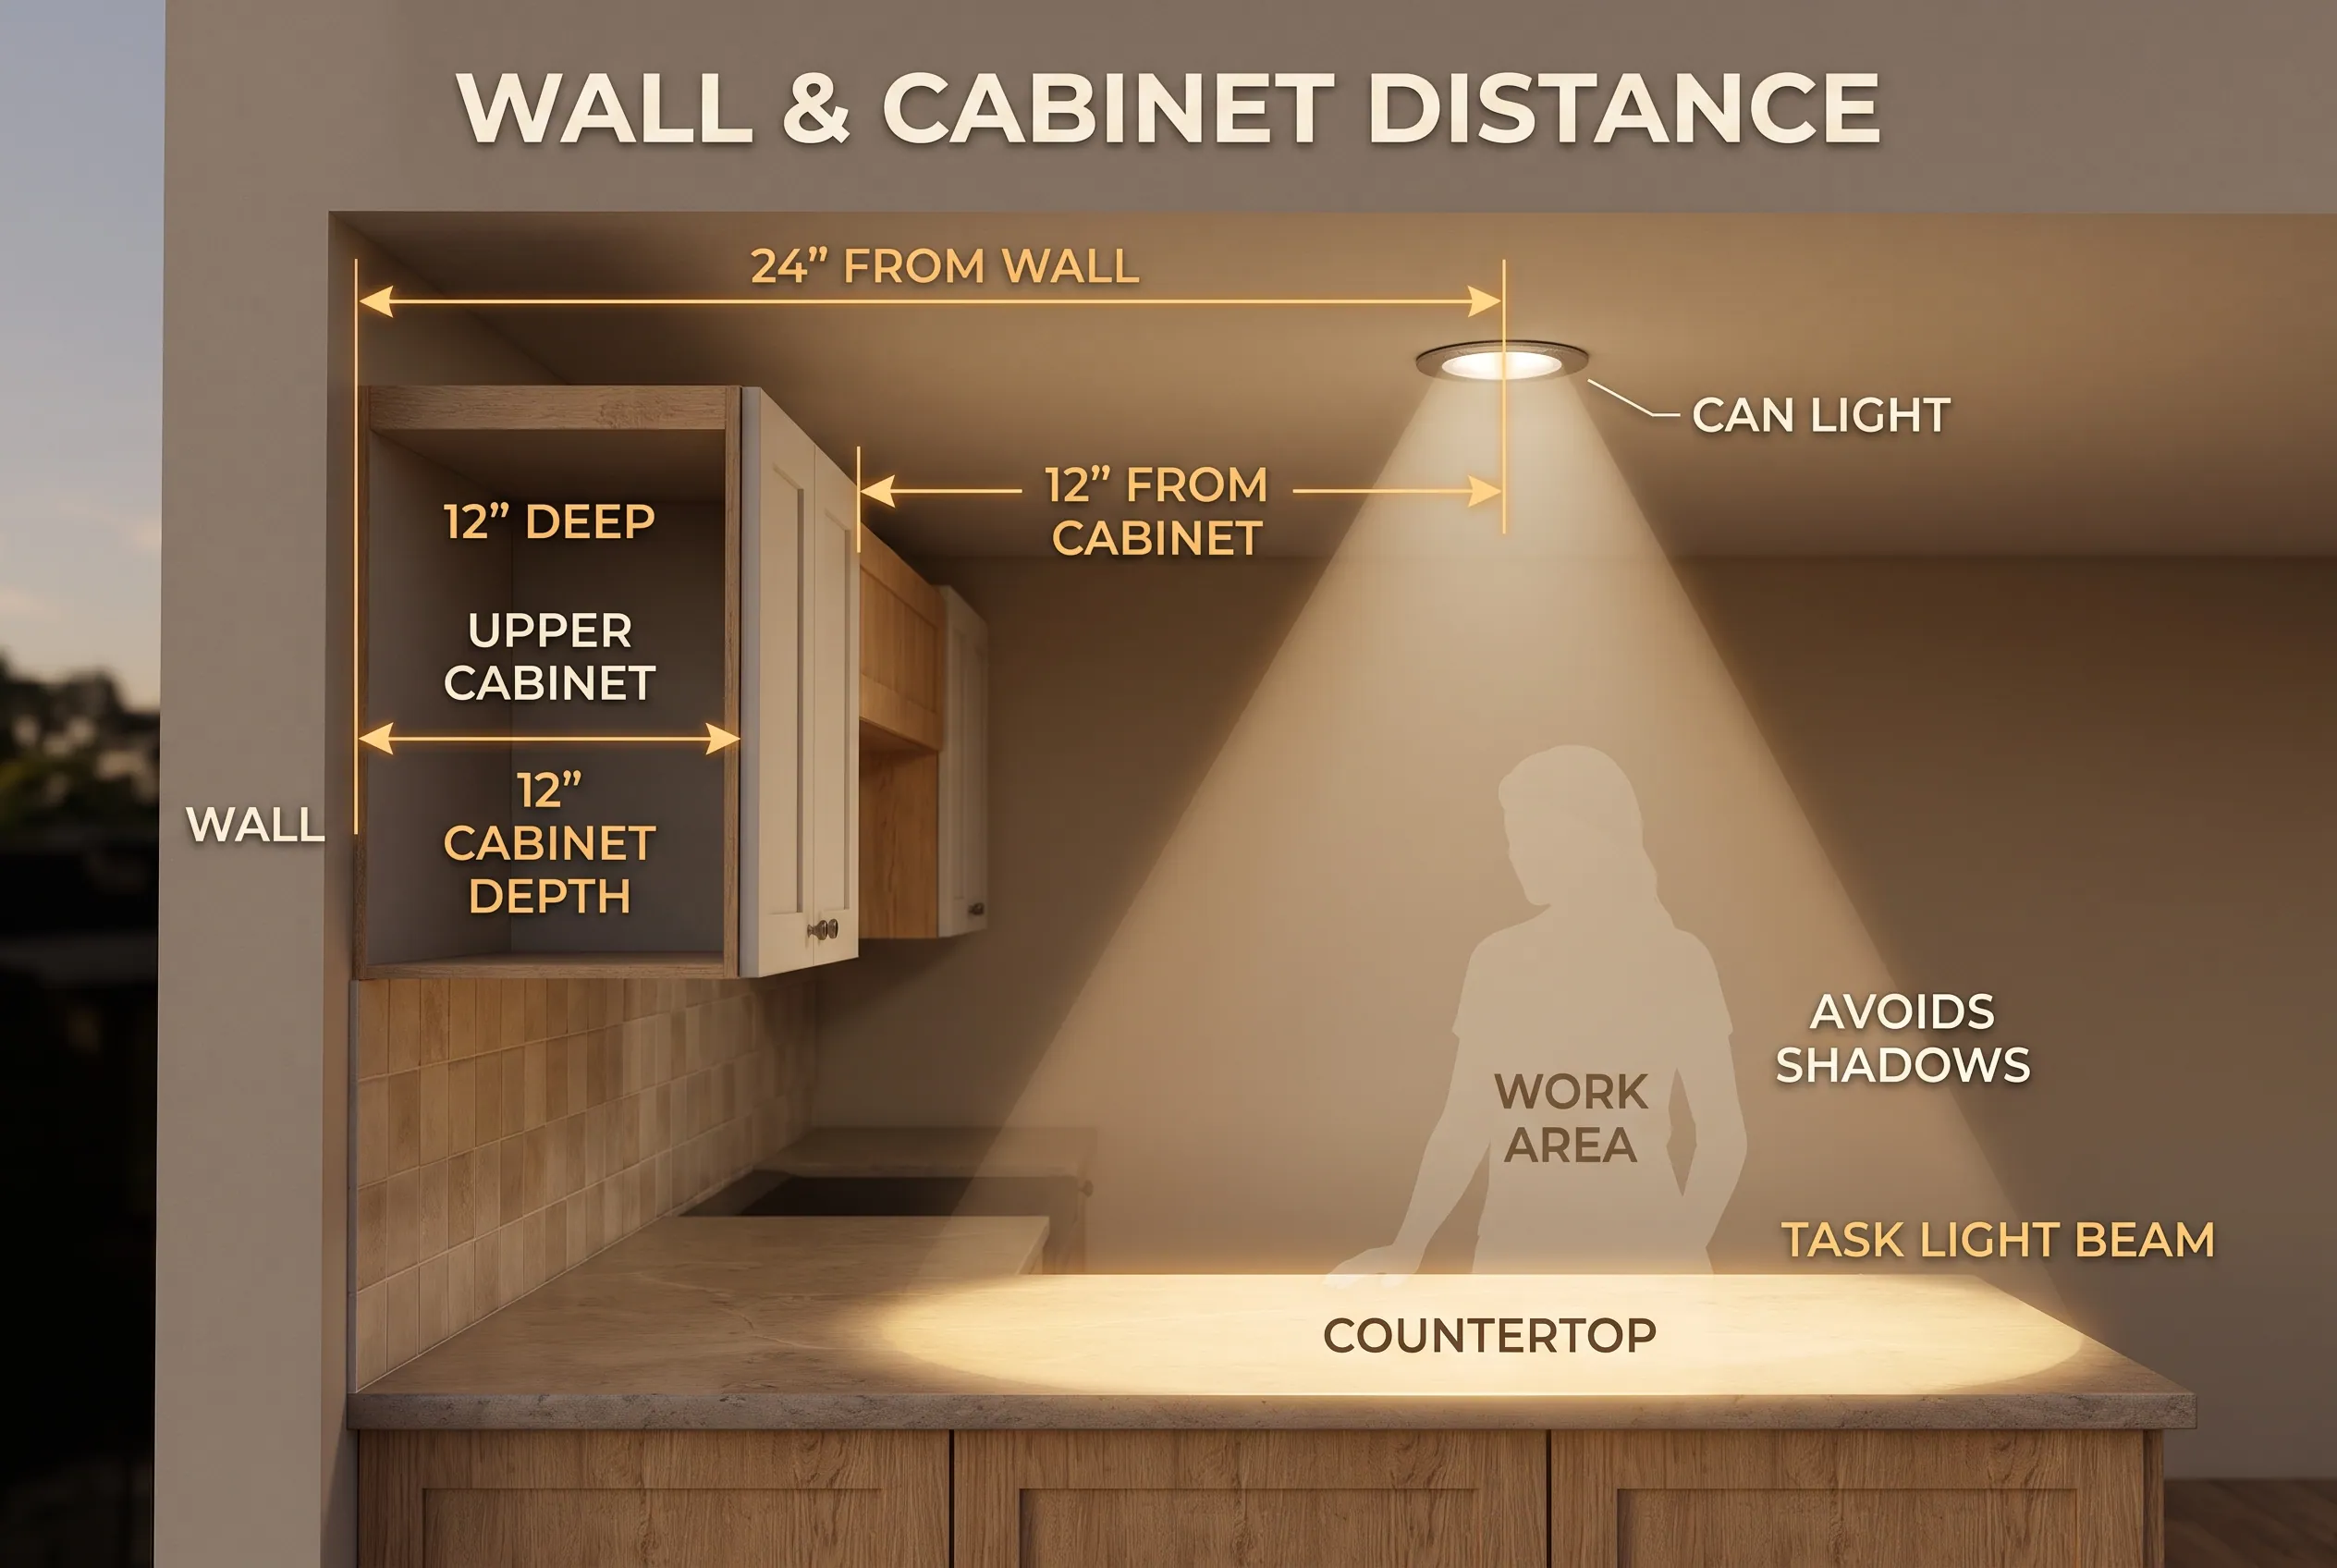
Wall distance and cabinet distance are closely related, but they are not the same measurement. Confusing them can lead to a poor layout.
Some recessed-lighting guides suggest placing fixtures around 12–18 inches from the face of upper cabinets. Other guidance measures from the wall or describes where the light should fall on the countertop. These measurements cannot be used interchangeably without considering cabinet depth and counter size.
Measuring from the wall or cabinet face
Start by measuring the depth of your upper cabinets. Many kitchen upper cabinets are approximately 12 inches deep, although actual dimensions vary.
Suppose the front face of your upper cabinets is 12 inches from the wall. A fixture center that is 24 inches from the wall would be approximately 12 inches beyond the cabinet face.
That is a useful example of why both reference points matter. It is not a universal placement recommendation for every fixture or kitchen.
For your own layout:
- Measure from the wall to the front face of the upper cabinets.
- Mark the countertop’s front edge on your ceiling plan.
- Use the intended working area to estimate where the fixture’s light should fall.
- Check the fixture’s beam spread and installation guidance before settling on the position.
The Philips Hue guide to recessed-light distance from walls and The Home Depot’s layout guide offer useful starting points, but their measurements should be interpreted according to the reference point each guide uses.
Aligning lights with the countertop
The countertop is often a better planning reference than the empty ceiling space.
When you stand at a kitchen counter, your body occupies part of the area between the wall and the room. The light should reach the work surface in front of you rather than create a large shadow across it.
For this reason, consider the usable countertop area when placing each fixture. Do not simply center every light between the walls.
Also check for tall cabinets, deep shelves, and other objects that could affect where light falls. A fixture may provide good general illumination but still leave a particular part of the counter poorly lit.
If you plan under-cabinet lighting, consider it alongside the recessed lights. Under-cabinet strips can illuminate the counter from a position closer to the work surface, helping reduce shadows from overhead light alone.
How Far Apart Should Kitchen Recessed Lights Be?
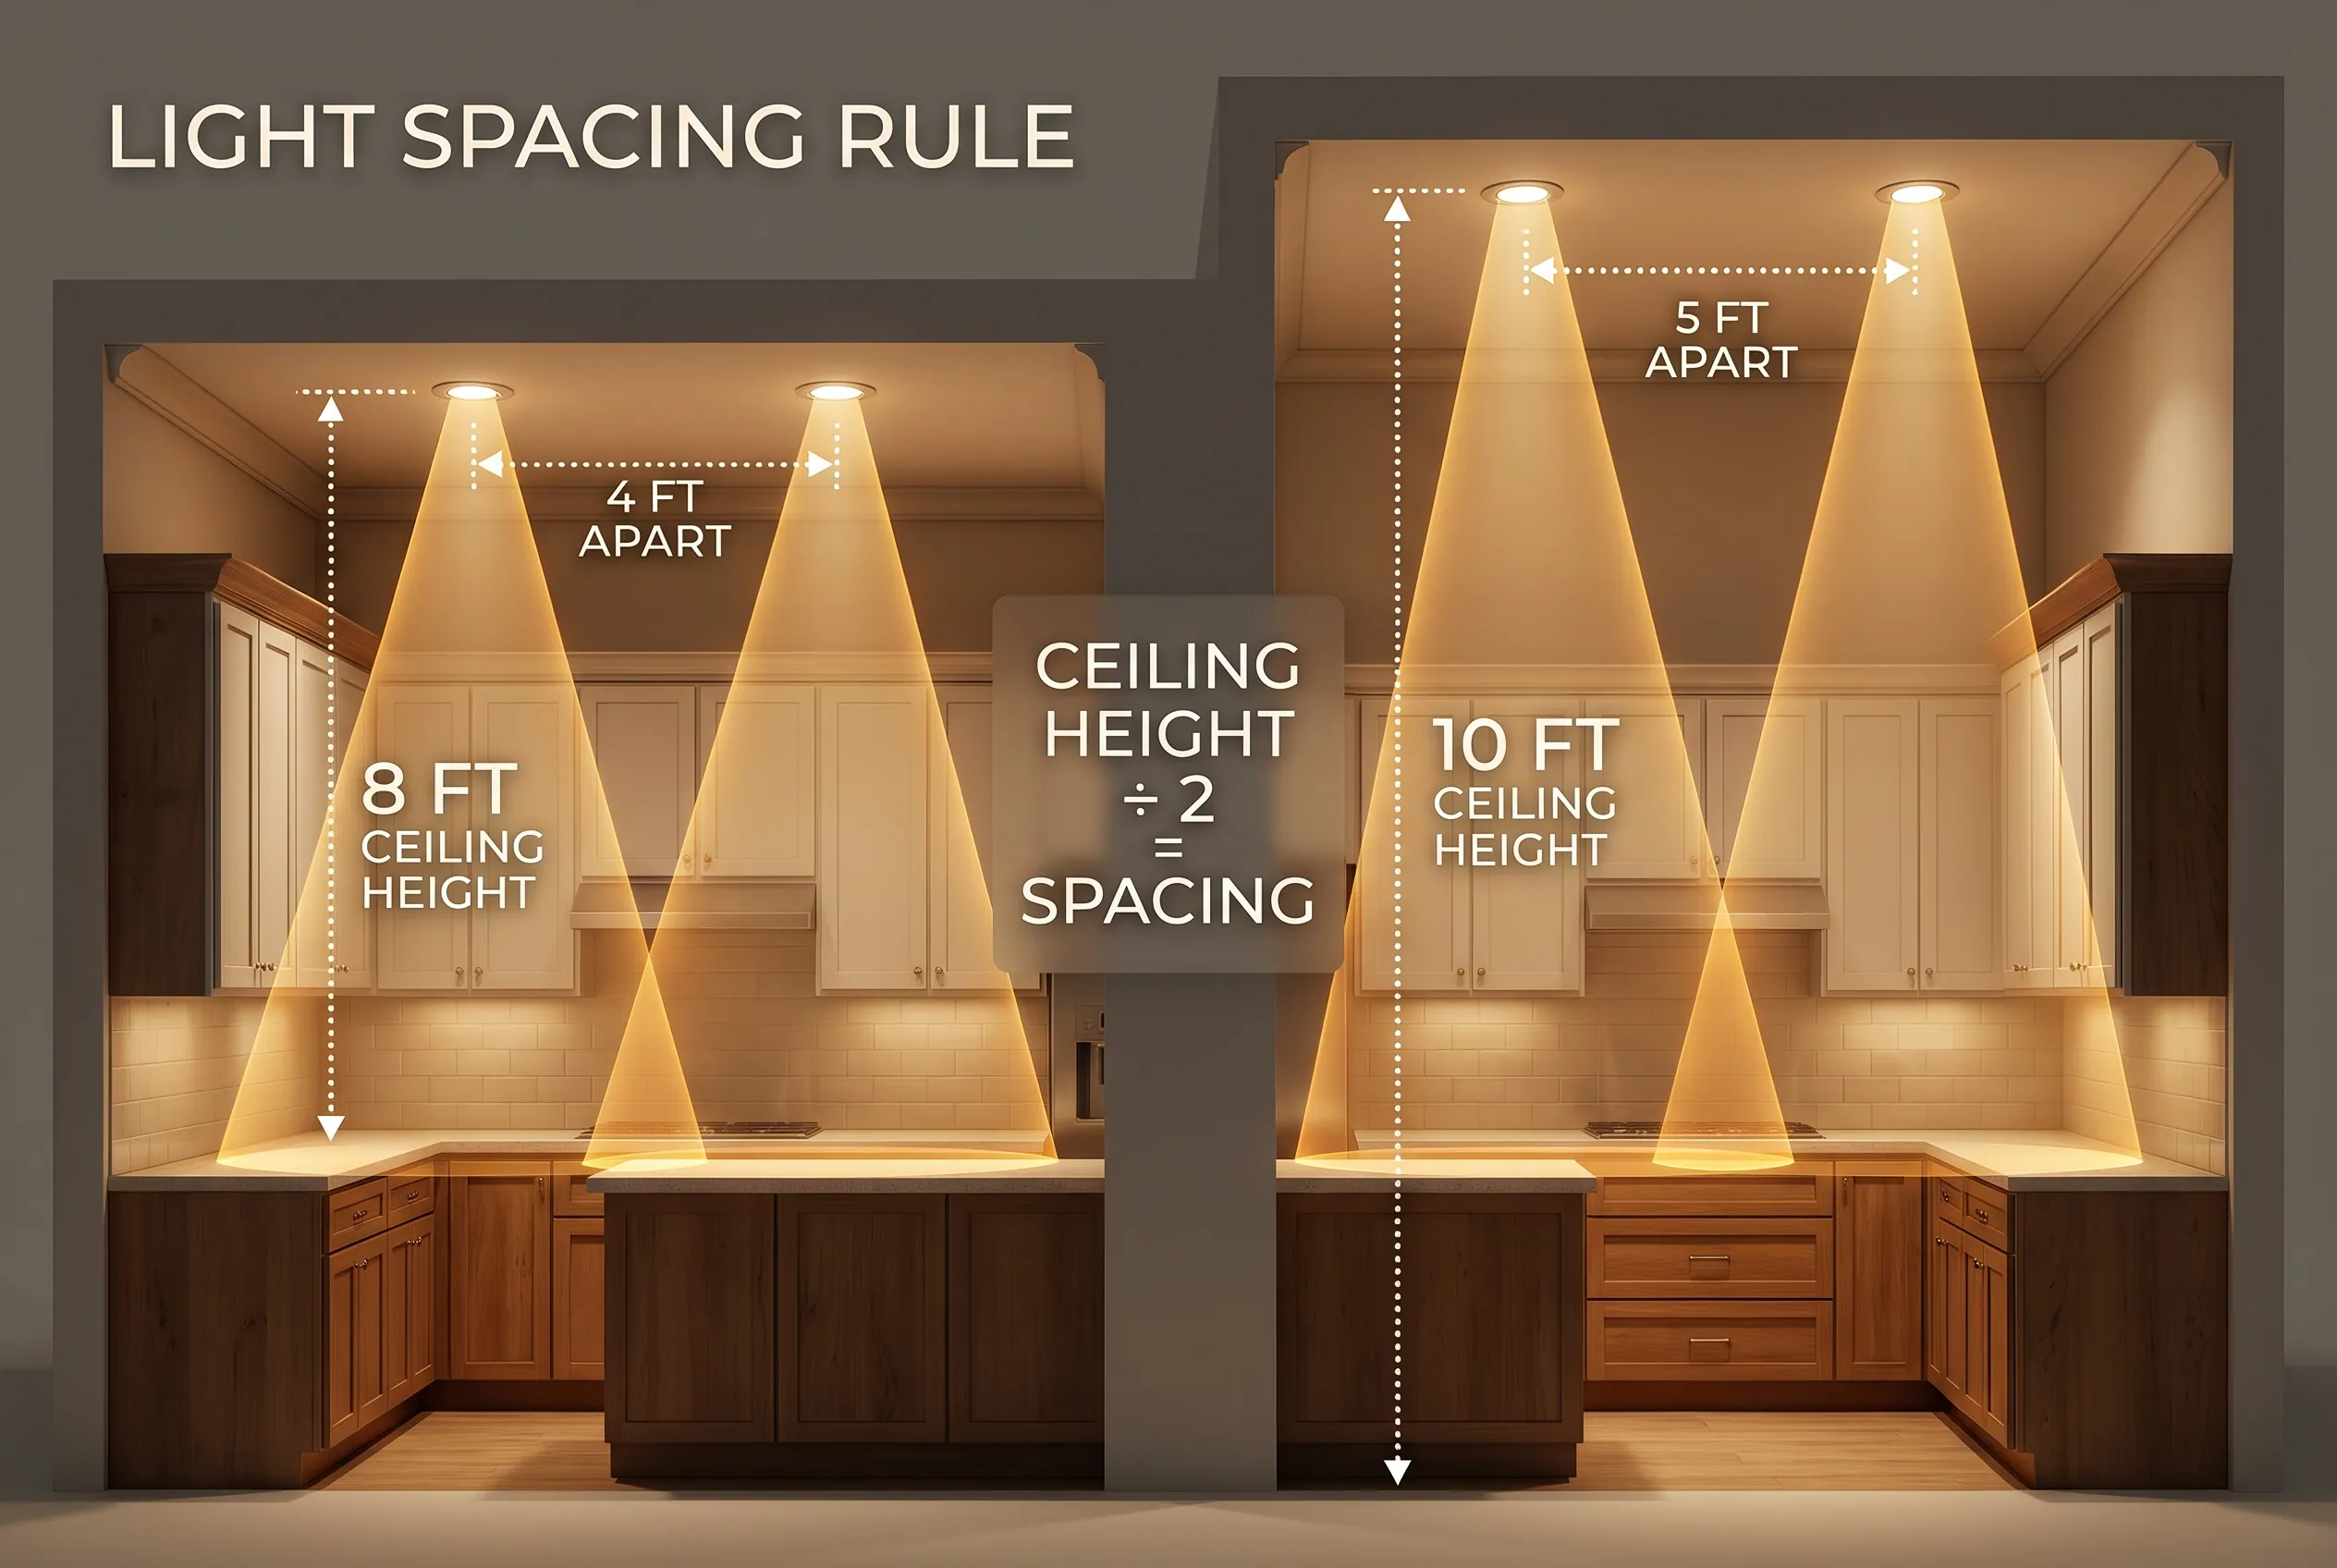
A common starting rule is to divide the ceiling height by two to estimate the distance between recessed lights. The Home Depot and Lowe’s both describe this as a general planning guideline, with adjustments needed for the room and fixture.
Here are two simple examples.
| Ceiling height | Initial spacing estimate |
| 8 feet | About 4 feet |
| 10 feet | About 5 feet |
These distances are measured from one fixture to the next, typically center to center. They are not instructions for measuring from a wall, cabinet face, or countertop.
The rule provides a starting point for general lighting. It does not automatically give you the correct spacing above every work surface.
For example, a narrow beam of light covers less area than a wide beam. A fixture with a different light output may also need a different spacing pattern to produce an even result.
When planning your kitchen, consider these factors:
- Ceiling height: A higher ceiling changes how the light reaches the work surface.
- Beam spread: A wider beam may illuminate a larger area than a narrow beam.
- Fixture output: Lights with different lumen ratings can produce different brightness levels.
- Cabinet arrangement: Upper cabinets and tall units affect where useful light is needed.
- Existing lighting: Pendants, windows, and under-cabinet lights can reduce the need for additional ceiling fixtures.
Use the spacing rule to sketch your first layout. Then adjust it so the countertops, sink, island, and other work areas receive enough light.
How Many Recessed Lights Does a Kitchen Need?
There is no single correct number of recessed lights for every kitchen. Floor area helps you plan, but the final quantity also depends on fixture output, beam spread, ceiling height, and other light sources.
A kitchen with strong under-cabinet lighting may need fewer ceiling fixtures over its counters. A kitchen with tall ceilings or dark finishes may need a different plan to reach the desired level of brightness.
Example: A 12 × 12-foot kitchen
A 12 × 12-foot kitchen has 144 square feet of floor area.
That measurement alone does not tell you exactly how many lights to install. First, identify the areas that need task lighting. Next, plan general lighting for the rest of the room.
Some lighting guides offer rough fixture-count ranges for rooms of this size. These can help you begin a sketch, but they should not be treated as a reliable final answer without considering the actual fixtures and layout.
Use this planning method instead:
- Draw the kitchen’s dimensions.
- Mark upper and lower cabinets, countertops, the sink, appliances, and any island.
- Mark existing light fixtures, including pendants and range-hood lights.
- Add proposed task lights near the areas where you work.
- Add general lights for the remaining areas, using spacing guidance as an initial check.
- Review the plan for dark counters, poorly lit corners, and overlapping pools of light.
If the layout looks crowded, do not assume that adding more fixtures will solve every problem. The issue may be poor placement, insufficient light on the counter, or a need for under-cabinet lighting instead.
Likewise, if the ceiling has fewer fixtures than you expected but every important area is well lit, the design may be working as intended.
Where to Place Lights Around Kitchen Work Areas
Each part of the kitchen has a different purpose. Planning lights by zone helps you avoid placing fixtures where they contribute little useful light.
Countertops and food-preparation areas
Countertops are among the most important places to plan task lighting.
Position recessed lights so their light reaches the working part of the counter. When upper cabinets sit above the counter, consider the cabinet face and the front edge of the work surface before choosing the fixture position.
Avoid relying on a central ceiling row if it leaves the counter behind the person standing there.
Under-cabinet LED lighting can be especially useful for chopping, measuring ingredients, or reading small labels. It also provides an additional lighting layer without requiring another ceiling opening.
A practical way to check your plan is to imagine standing at each main preparation area. Ask whether the proposed fixture will light the surface in front of you or whether your body may block much of the beam.
Sinks and cooking areas
The sink is another important work area. A well-positioned light can help you see dishes, food, and the basin more clearly.
Consider where you stand when washing dishes and where the sink is located in relation to nearby windows and cabinets. Existing lighting may already provide some of the needed illumination.
The cooktop also needs useful task lighting. Many range hoods have built-in lights, so check whether they already illuminate the cooking surface before adding more fixtures nearby.
Avoid placing recessed lights so close to a hood or tall cabinet that the fixtures create unwanted glare or an awkward light pattern.
Always follow the selected fixture’s instructions and the requirements for its location. A fixture intended for a general ceiling area is not automatically suitable for every installation condition.
Kitchen islands and peninsulas
The best recessed lighting arrangement for an island depends on how you use it.
An island used for food preparation may benefit from recessed lights that illuminate its working surface. An island used mainly for eating or casual conversation may be better served by decorative pendant lights, perhaps alongside general recessed lighting in the room.
You can also combine recessed lights with pendants if their purposes are clear. For example, recessed fixtures can provide general illumination while pendants add focused light and visual interest over the island.
Avoid adding fixtures simply to fill empty ceiling space. Check how the light reaches the countertop and whether existing pendants already provide enough task lighting.
For a peninsula, consider its connection to the surrounding counters. Plan light for the peninsula’s useful work surface while maintaining adequate lighting in the adjoining walkway.
Tall cabinets, refrigerators, and pantries
Tall cabinets and appliances can change the way light moves through the kitchen.
A refrigerator, pantry cabinet, or tall storage unit may create a darker area beside or beneath it. Check these areas on your sketch and consider whether they need separate light coverage.
Pantries may also benefit from dedicated lighting, especially when shelves extend deep into the cabinet. Recessed ceiling lights can provide general illumination, but they may not light every shelf equally.
If you already have a light inside a pantry or a separate ceiling fixture nearby, include it in your plan before deciding whether another recessed light is necessary.
Can Light Placement for Different Kitchen Layouts
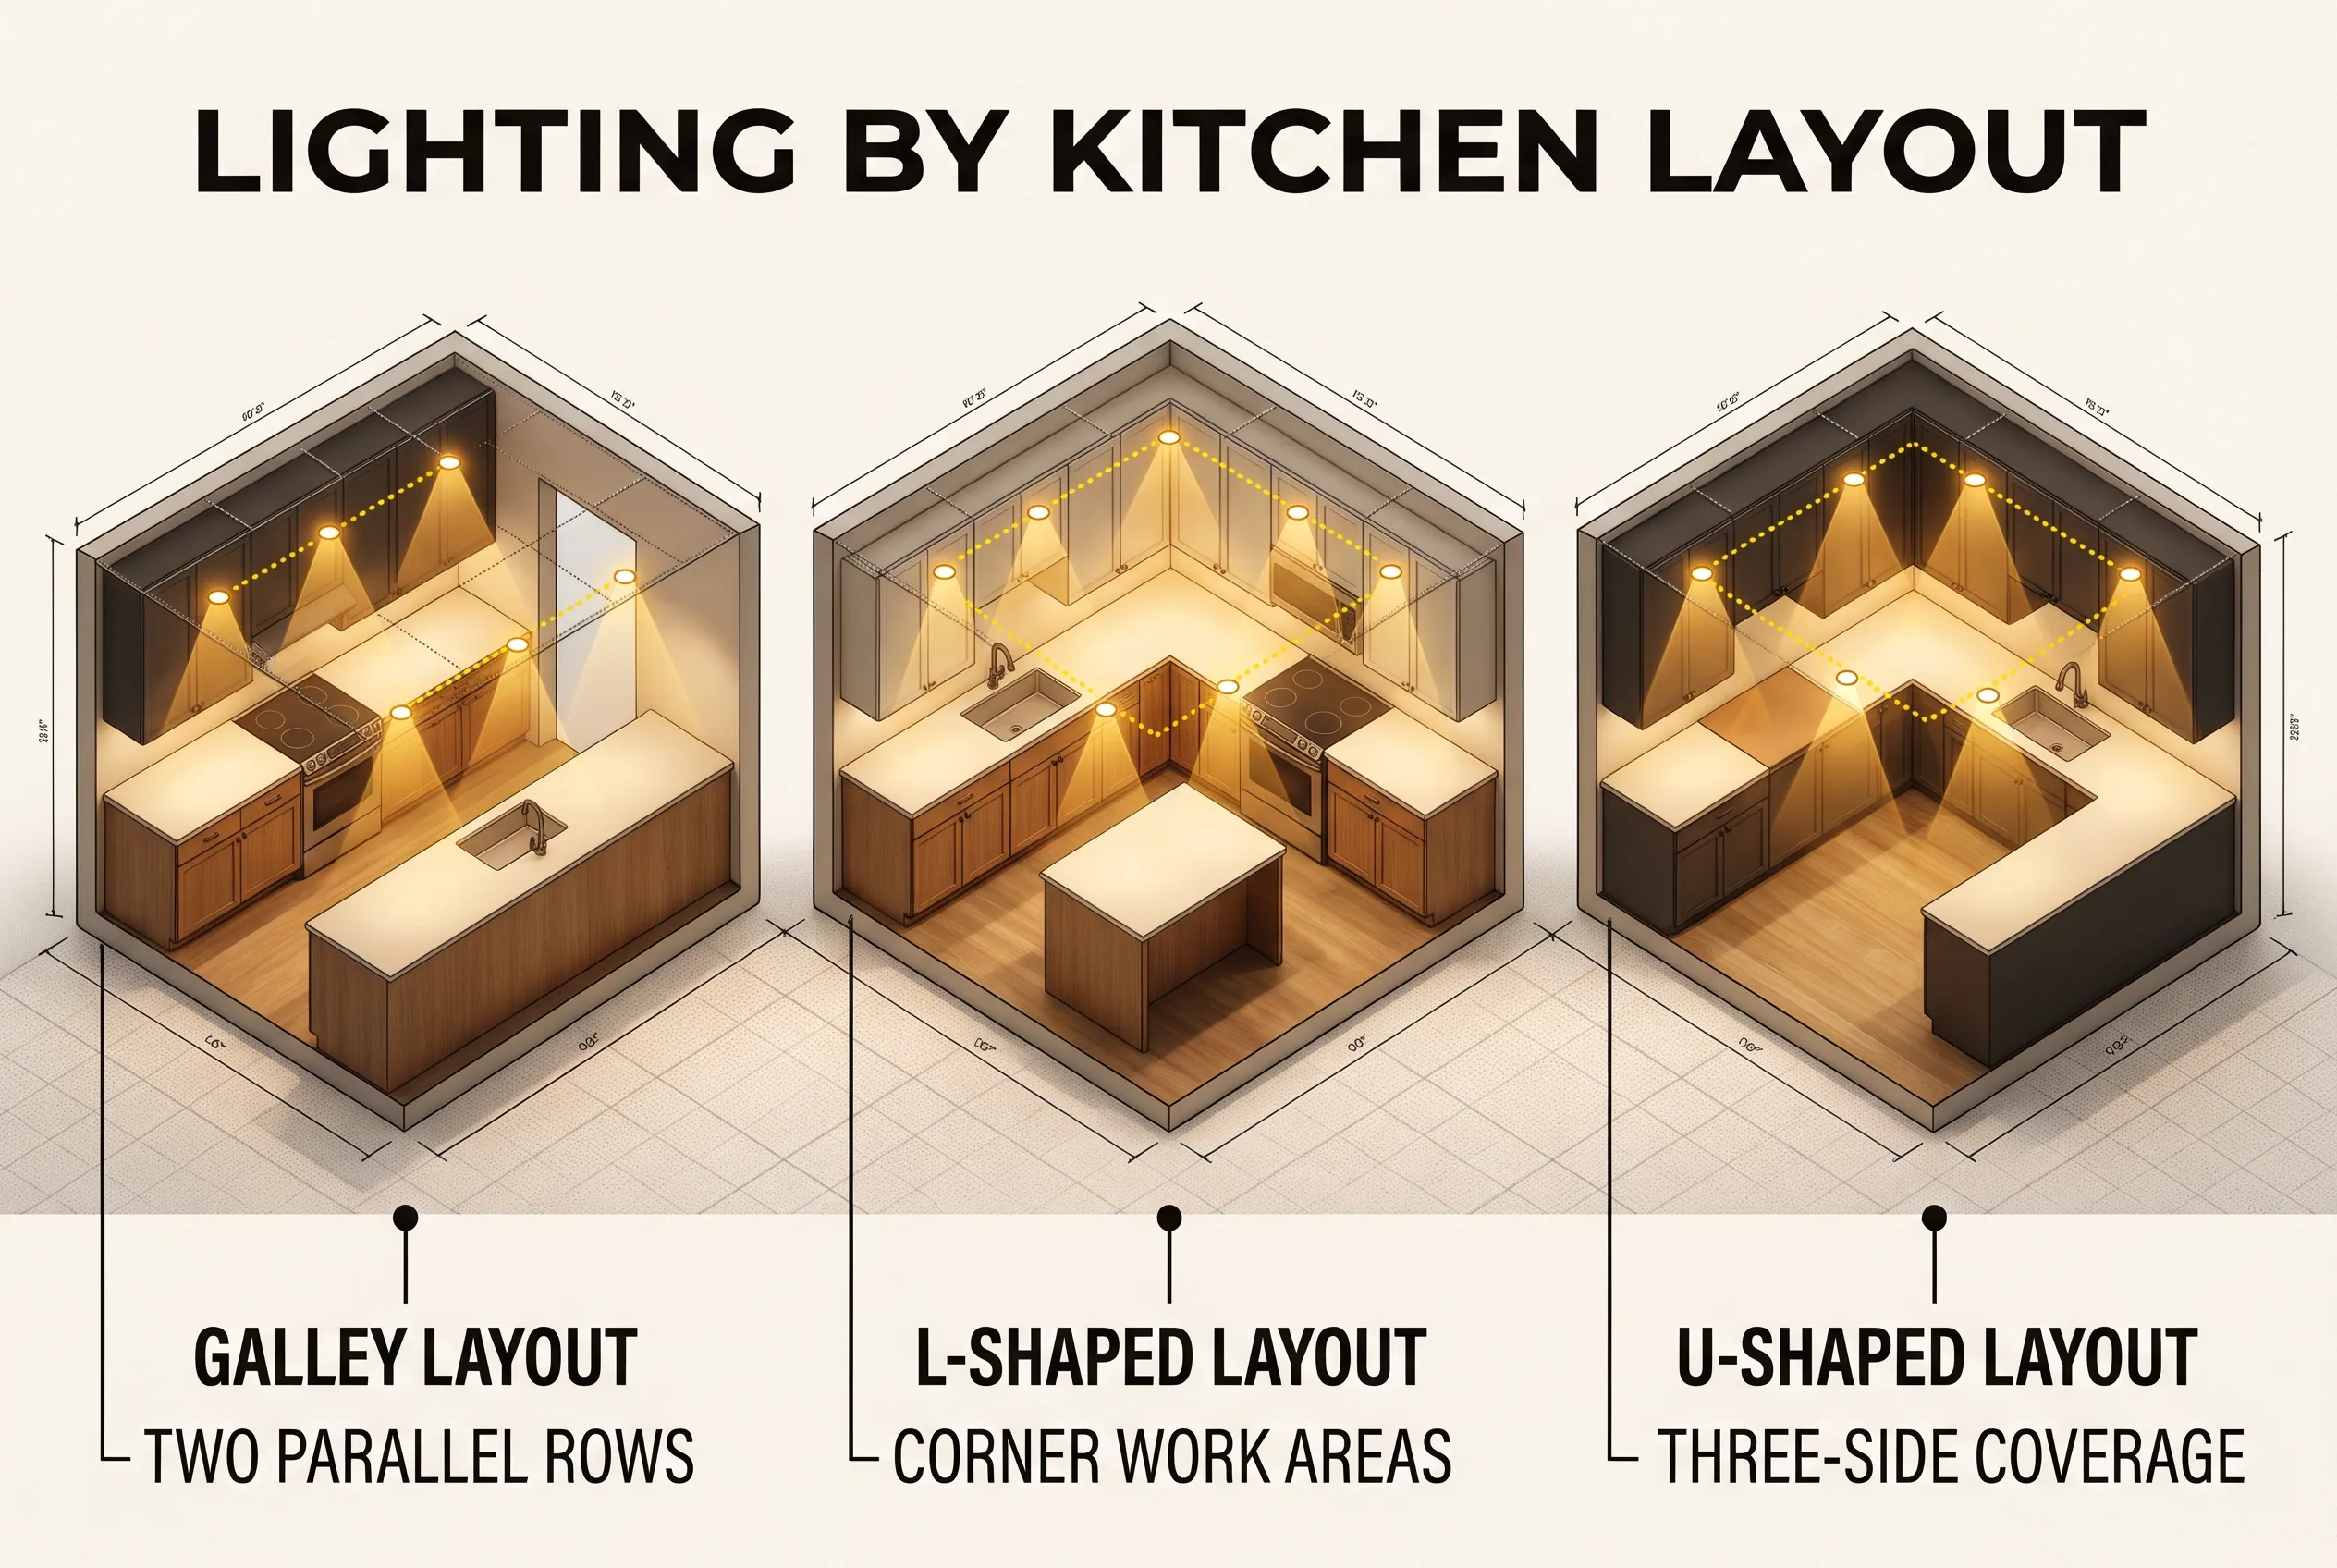
A useful arrangement for one kitchen may not work for another. The shape of the room affects where fixtures belong and how far apart they can be.
Galley kitchens
Galley kitchens have two main rows of cabinets or work surfaces facing each other, usually across a narrow walkway.
A single central row of recessed lights may provide general lighting but leave parts of the counters poorly lit. Consider the work surfaces along both sides when planning the layout.
You may need separate fixture positions for the two counter runs, depending on the width of the kitchen, ceiling height, and light output.
Keep the walkway in mind as well. You need useful general lighting for safe movement between counters without crowding the ceiling with unnecessary fixtures.
L-shaped and U-shaped kitchens
L-shaped and U-shaped kitchens have counters that turn corners. These changes in direction can make a simple grid less useful.
Follow the main work areas when sketching the lights. Pay attention to the corner counter, where two runs meet and the position of the person working may change.
For a U-shaped kitchen, evaluate each side separately before bringing the full layout together. The room may need different fixture positions depending on cabinet depth and the location of the sink or cooktop.
Keep the final layout visually balanced where practical, but do not sacrifice work-surface lighting just to make the ceiling look symmetrical.
Small and open-plan kitchens
In a small kitchen, excessive recessed lighting can make the ceiling look cluttered and the room feel overly bright. Instead, choose fixtures that provide appropriate coverage and make use of task lighting where it helps.
In an open-plan kitchen, think about how the kitchen connects to the dining or living area. The lighting should support cooking and cleaning without making the kitchen look disconnected from the rest of the space.
Separate controls can help you adjust the kitchen lights independently of the adjoining room’s lights.
For example, you may want brighter task lighting while preparing dinner but a softer level of general lighting when the kitchen is no longer in use.
Are 4-Inch or 6-Inch Recessed Lights Better for a Kitchen?
Both 4-inch and 6-inch recessed lights can work in a kitchen. Neither size is automatically the better choice for every room.
The decision should depend on the fixture’s light output, beam spread, ceiling height, and the appearance you prefer.
| Feature | 4-inch recessed lights | 6-inch recessed lights |
| Appearance | Smaller, more discreet openings | Larger, more visible openings |
| Potential use | Focused lighting or a cleaner, smaller-fixture look | General room illumination or broader lighting needs |
| What to check | Brightness, beam angle, and work-surface coverage | Brightness, beam angle, and glare |
| Best decision method | Match the actual light distribution to the intended area | Match the actual light distribution to the intended area |
A small fixture can still produce strong light, while a larger fixture is not automatically brighter. Check the lumen rating and beam pattern rather than judging performance from diameter alone.
Also consider whether the fixtures will be visible from adjoining rooms. A smaller opening may suit a minimalist design, while larger fixtures may fit another kitchen’s style better.
Before buying, compare compatible fixtures using their actual specifications. A well-planned 4-inch fixture can be useful for one task, while a 6-inch model may make more sense for another.
Brightness, Color Temperature, and Dimmers
Placement is only part of kitchen lighting. The brightness and appearance of the light also affect how useful the layout will be.
Understanding lumens and color temperature
Lumens describe how much light a source produces. They help you compare light output, although they do not tell you by themselves how much light will reach a particular countertop.
Color temperature, measured in Kelvin (K), describes whether light appears warmer or whiter.
Lower Kelvin values usually look warmer, while higher values look whiter or cooler. For example, 2700K–3000K is commonly used for a warm appearance, while some kitchens use lighting in the 3000K–3500K range for a whiter look.
Neither range is compulsory. Choose a color appearance that suits your cabinets, countertops, finishes, and personal preference. If possible, compare lights in person because the same color temperature can look different against different materials.
For more guidance on selecting downlights, including color appearance and product compatibility, consult ENERGY STAR’s light-fixture guidance.
Combining recessed, under-cabinet, and pendant lighting
A kitchen usually works better when different lights have distinct jobs.
Recessed lights can provide general illumination. Under-cabinet strips can help light preparation surfaces. Pendant lights can provide focused light over an island while adding a decorative element.
The aim is not to use every type of light. It is to avoid relying on one type to solve every lighting need.
If your counters already have effective under-cabinet lights, you may not need as many recessed fixtures directly above them. If your island already has useful pendant lighting, the recessed layout can focus on the rest of the kitchen.
Think about how you use the room at different times of day. You may need brighter lighting for cooking and a softer combination of lights for an evening meal.
Using compatible dimmers
A dimmer lets you adjust light output instead of choosing between fully on and fully off.
This is useful when the kitchen serves several purposes. You might want bright light for food preparation and a lower setting for casual conversation.
However, not every LED fixture works with every dimmer. Check the lighting manufacturer’s compatibility information before purchasing or connecting the controls. ENERGY STAR specifically advises checking dimmer compatibility when selecting downlights.
If you are replacing an existing fixture or dimmer, do not assume the old control will work correctly with the new LED lights.
How to Sketch Your Kitchen Lighting Layout Before Installation
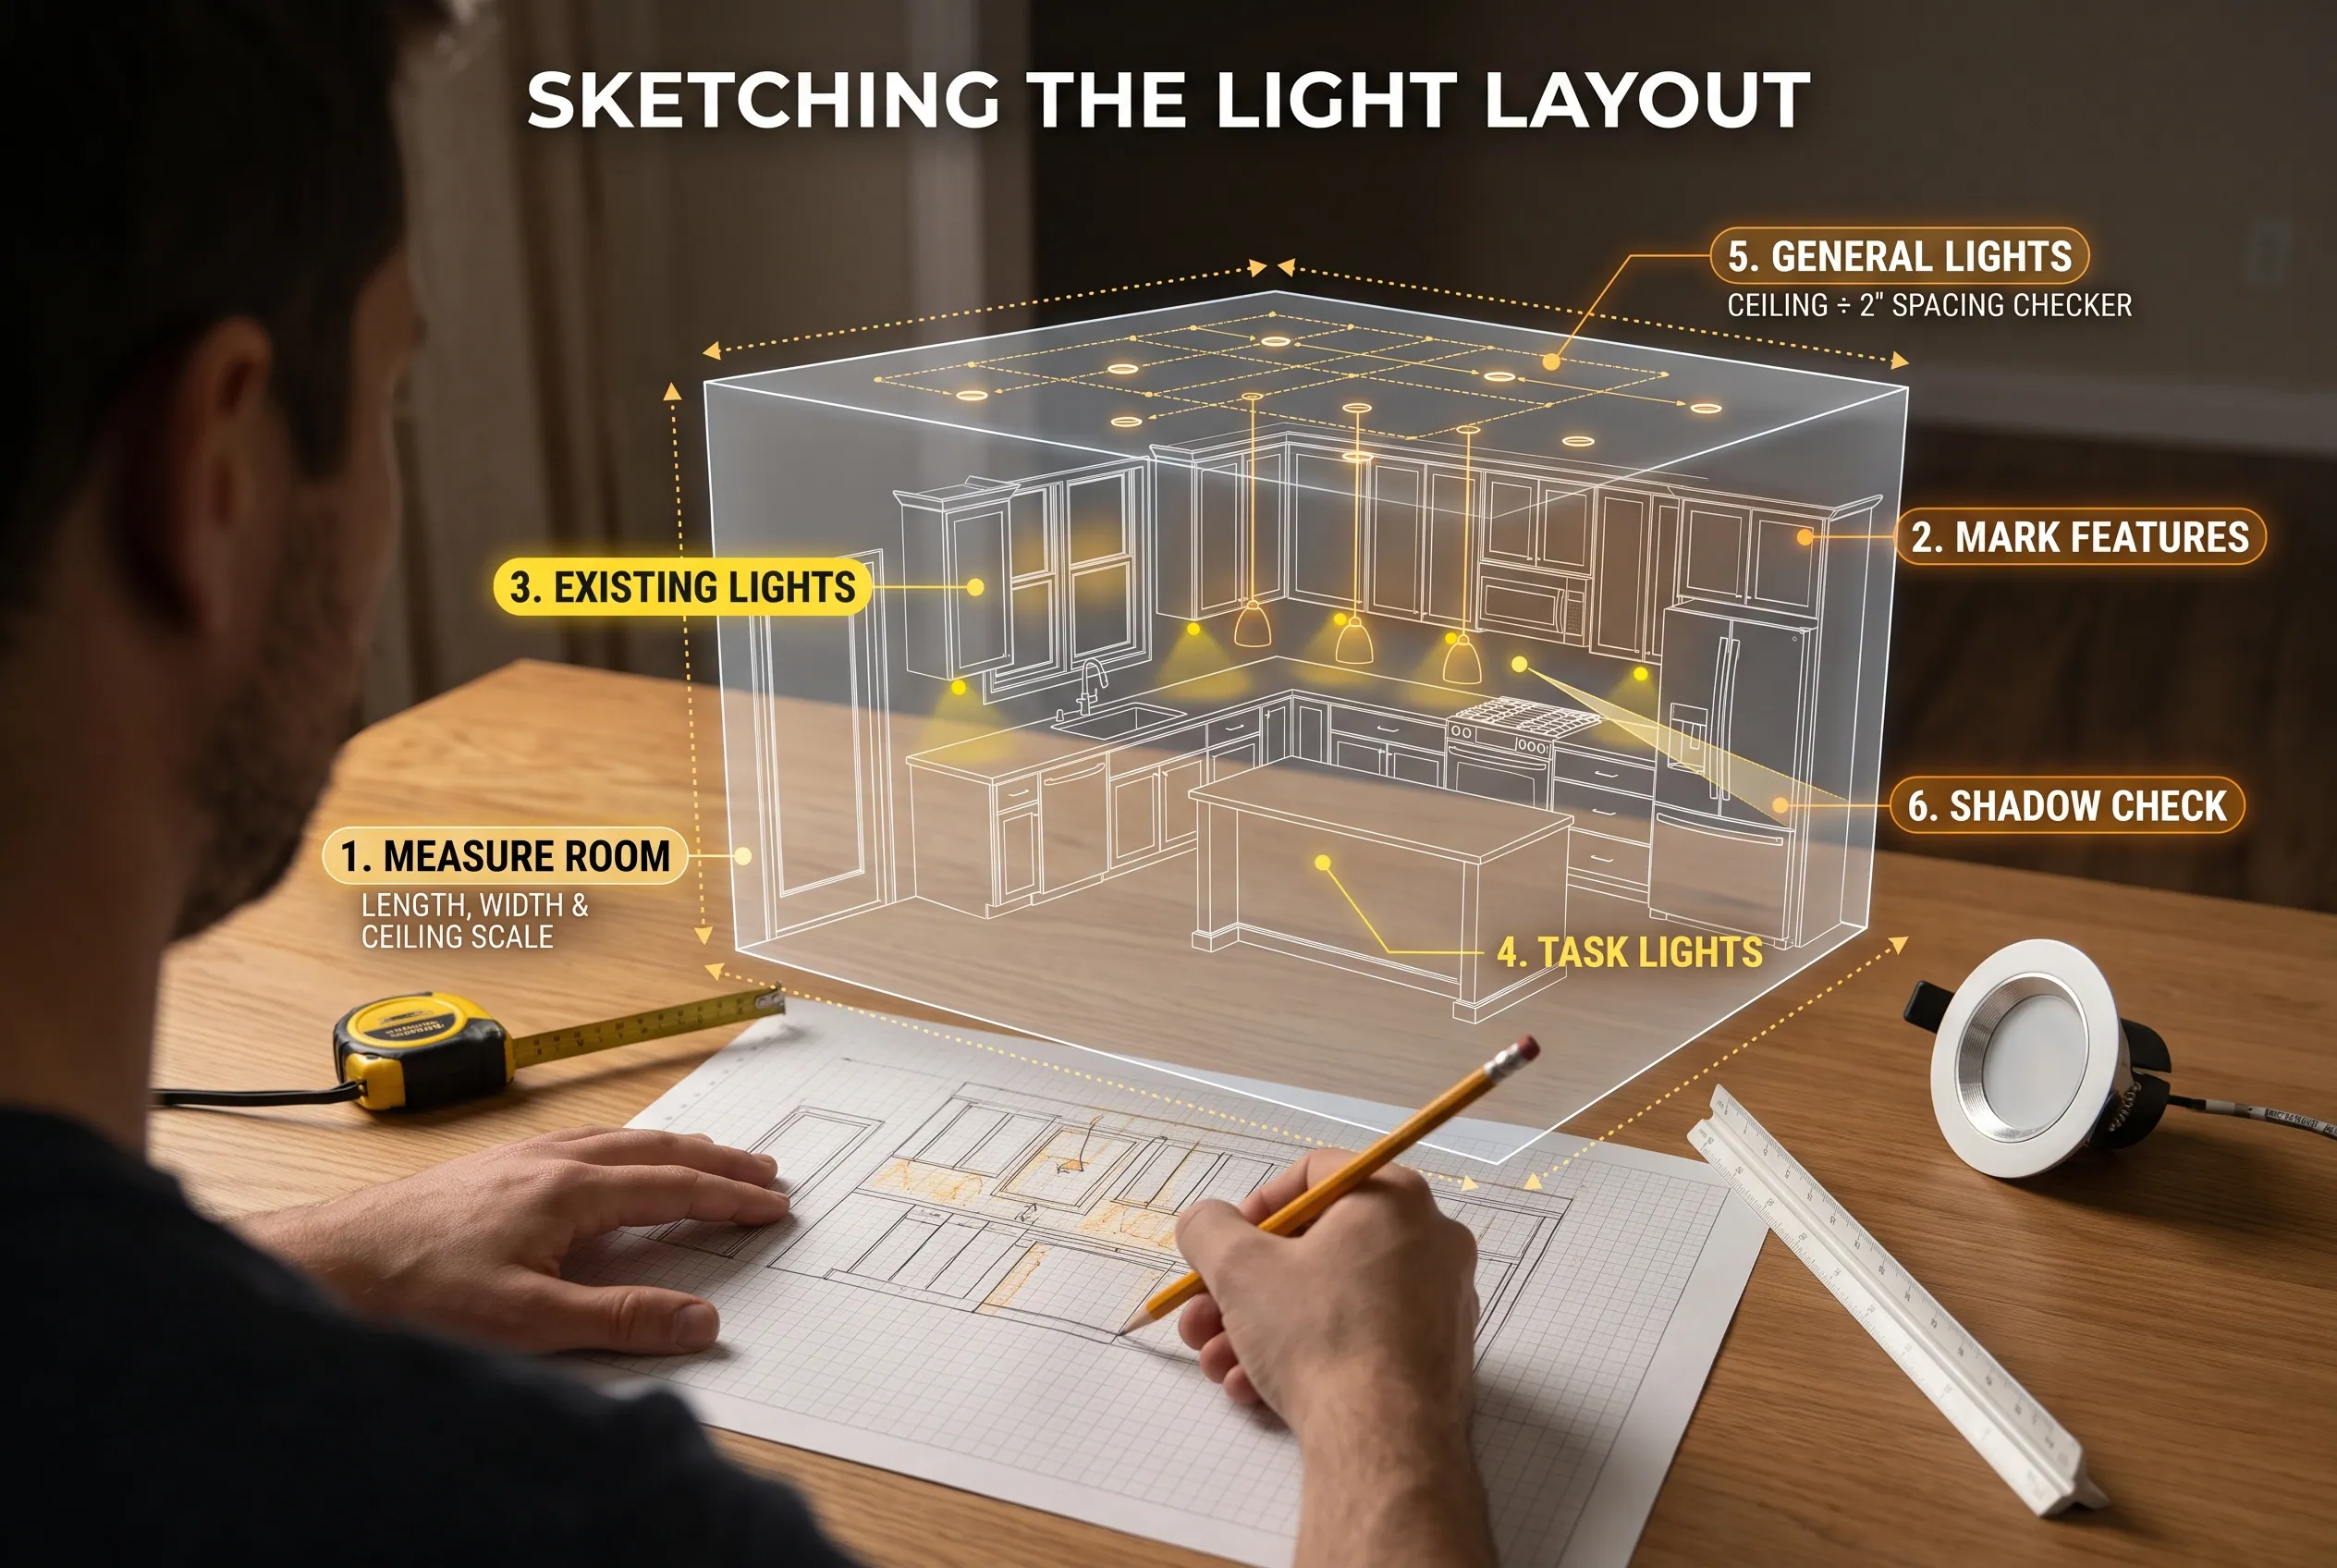
A simple drawing can help you catch placement problems before any holes are cut in the ceiling.
Follow these steps to prepare a basic plan.
Step 1: Measure the room.
Measure the kitchen’s length and width, and note the ceiling height. Draw the room to scale on graph paper or use a simple digital drawing tool.
Step 2: Mark cabinets and work surfaces.
Draw the upper cabinets, lower cabinets, countertops, island, sink, cooktop, refrigerator, and other major features. Mark the front edge of each important countertop.
Step 3: Add existing lighting.
Include windows, ceiling fixtures, pendant lights, under-cabinet lights, and range-hood lights. This helps you see where additional lighting may be useful and where it may be unnecessary.
Step 4: Mark task-light positions.
Start with the counters, sink, and cooking areas. Choose tentative positions that allow light to reach the useful working surfaces.
Step 5: Add general lighting.
Use the half-ceiling-height rule as an initial spacing check, then adjust the layout to suit the room and fixtures.
Step 6: Review shadows and dark areas.
Imagine standing at each work surface. Check whether the proposed lights could leave your work area in shadow, whether a corner needs more coverage, or whether several beams overlap unnecessarily.
Step 7: Confirm the installation requirements.
Before buying or installing the fixtures, confirm that they suit the ceiling, insulation conditions, electrical setup, and intended controls. The sketch is a lighting plan, not a substitute for checking the actual installation conditions.
If you need help confirming fixture locations around ceiling framing or existing wiring, have a qualified electrician review the plan before work begins.
Common Kitchen Can Light Placement Mistakes
A few mistakes can reduce the benefit of an otherwise attractive lighting design.
Following a perfect grid without considering work areas: Even spacing may look tidy, but it does not guarantee good lighting on the countertops. Start with the work areas, then organize the remaining fixtures.
Confusing wall distance with cabinet distance: These measurements use different reference points. Mark both on your drawing so you can check the actual fixture position.
Relying only on a spacing formula: The half-ceiling-height rule is a starting point. Beam shape, brightness, ceiling height, and existing light sources still matter.
Choosing fixtures by diameter alone: A 4-inch light is not automatically more focused or brighter than every 6-inch option. Compare the actual specifications.
Ignoring existing light sources: Adding recessed lights over a well-lit island may create excess brightness, while a poorly lit counter may still need more focused light.
Cutting holes before checking the ceiling: Ceiling framing, wiring, insulation, and fixture requirements can affect where lights can safely go. Confirm these conditions before making changes.
A useful final check is to review the plan in three ways: look at the overall room coverage, the countertop illumination, and the position of each light relative to cabinets and other fixtures.
What to Check Before Installing Recessed Kitchen Lights
Once the layout looks right on paper, confirm that the selected fixtures are suitable for the actual ceiling.
Check the manufacturer’s instructions for the required housing, clearances, wiring, and installation method. If the fixture may touch ceiling insulation, choose a model rated for insulation contact, commonly marked IC. ENERGY STAR explains that non-IC-rated downlights generally need clearance from insulation, and the required conditions should be checked against the specific product instructions.
Look for appropriate safety certification and make sure the selected fixture is suitable for its intended location. Also confirm whether you need remodel housing for an existing ceiling or new-construction housing where framing is accessible.
Before changing wiring or installing new fixtures, turn off power at the appropriate breaker and follow the product instructions. If you are uncertain about existing wiring, circuit capacity, ceiling conditions, or local permit requirements, use a qualified electrician.
You do not need to solve every electrical detail while making the first lighting sketch. You do need to confirm the important conditions before committing to fixture locations or cutting ceiling openings.
Frequently Asked Questions
How many recessed lights for a 12 × 12 kitchen?
A 12 × 12-foot kitchen has 144 square feet, but its area alone does not determine the number of lights. Start by mapping countertops, the sink, cooking areas, and other light sources, then choose fixtures and spacing that provide useful coverage without unnecessary overlap.
What is the 5’7″ lighting rule?
The exact phrase “5’7″ lighting rule” is not established in the layout guidance reviewed for this article as a universal recessed-lighting rule. A more widely used starting guideline is to divide ceiling height by two to estimate fixture spacing. Actual placement still depends on the fixture and the kitchen layout.
How far from the wall should kitchen can lights be?
The appropriate distance depends on cabinet depth, countertop alignment, beam spread, and the lighting goal. Start by marking the countertop’s front edge and cabinet face on a drawing, then choose a position that directs useful light onto the work surface. Published guidelines use different reference points, so avoid treating their measurements as interchangeable.
Should recessed lights line up with upper cabinets or the countertop edge?
Prioritize useful lighting on the countertop. A ceiling layout that aligns perfectly with the cabinets may still create shadows on the work surface. Use the cabinet face and countertop edge as references, and adjust fixture positions to suit the actual beam and the area where you work.
Are 4-inch or 6-inch lights better for kitchen islands?
Either can work. The better choice depends on the island’s size and use, the fixture’s brightness and beam spread, and whether you already have pendant lights. Compare the actual light output and coverage rather than choosing based on diameter alone.
Make Your Kitchen Lighting Plan Work for Your Space
Start by measuring your kitchen and marking the countertops, cabinets, sink, cooking area, and island. Place task lighting where it will reach the work surfaces, then plan general lighting around it.
Use spacing formulas and published measurements as starting points, not strict rules. Check your chosen fixtures, consider existing lighting, and confirm the installation requirements before cutting ceiling openings. A thoughtful layout can make the kitchen easier to work in while keeping the ceiling clean and balanced.
Disclaimer
Kitchen layouts, ceiling conditions, budgets, and lighting needs vary, so the measurements and examples in this guide are starting points rather than universal requirements. Follow the fixture manufacturer’s instructions and check local electrical requirements; consult a qualified electrician when installation involves uncertain wiring, ceiling conditions, or other electrical work.