Outdoor lights make it easier to use your yard, patio, balcony, and walkways after dark. But dirt, rain, growing plants, and damaged parts can reduce their performance over time. A little regular care helps keep them clean, bright, and working properly.
Outdoor lighting maintenance mainly involves cleaning fixtures, checking visible damage, clearing nearby plants, and testing timers or sensors. You should also inspect seals, mounting hardware, and exposed wiring. The exact routine depends on your fixture type, material, weather, and manufacturer’s instructions.
Most basic cleaning and visual checks are manageable for homeowners. However, damaged wiring, transformer faults, repeated electrical trips, and hardwired repairs should be handled by qualified professionals.
Direct Answer
Outdoor lighting maintenance means cleaning fixtures, checking lenses, seals, mounts, and visible wiring, clearing nearby plants, and testing controls. Follow product instructions; leave damaged wiring and electrical faults to qualified professionals.
Experience
Check outdoor lights after dark as well as during daylight. This makes dim areas, blocked beams, and lights that stay on easier to spot. A visual check cannot diagnose hidden wiring or transformer faults.
What Does Regular Outdoor Lighting Maintenance Include?
Outdoor lighting maintenance means keeping your fixtures, lenses, visible wiring, and lighting controls in good condition. It also includes checking whether lights point in the right direction and whether plants or debris block their beams.
You do not need to dismantle your lighting system to maintain it. Start with simple checks and deal with visible problems before they affect other parts of the system.
A Simple Outdoor Lighting Maintenance Schedule
Different fixtures need different levels of care. Use this flexible schedule as a starting point rather than a fixed rule for every home.
|
Maintenance task |
When to do it |
|
Look for dim, flickering, or non-working lights |
During a regular visual check |
|
Remove leaves and obvious debris |
Whenever they collect around fixtures |
|
Check plant growth and fixture positions |
During seasonal yard maintenance |
|
Clean lenses and housings |
When dirt or buildup becomes noticeable |
|
Inspect visible seals and mounting hardware |
During seasonal checks |
|
Check timers and photocells |
When daylight hours change or lighting schedules seem wrong |
|
Inspect the system after a major storm |
When conditions are safe |
|
Arrange professional system maintenance |
As recommended for the system and its environment |
For an installed landscape lighting system, Kichler recommends one or two maintenance visits per year. Harsh weather, coastal exposure, heavy landscaping, and frequent irrigation may call for closer attention.
You can read its recommendations in Kichler’s Landscape Maintenance Guide.
A useful habit is to look at your outdoor lights after dark. Check whether each area receives the light you expect. This simple check can reveal problems that are easy to miss during daylight.
How to Clean Outdoor Light Fixtures Properly
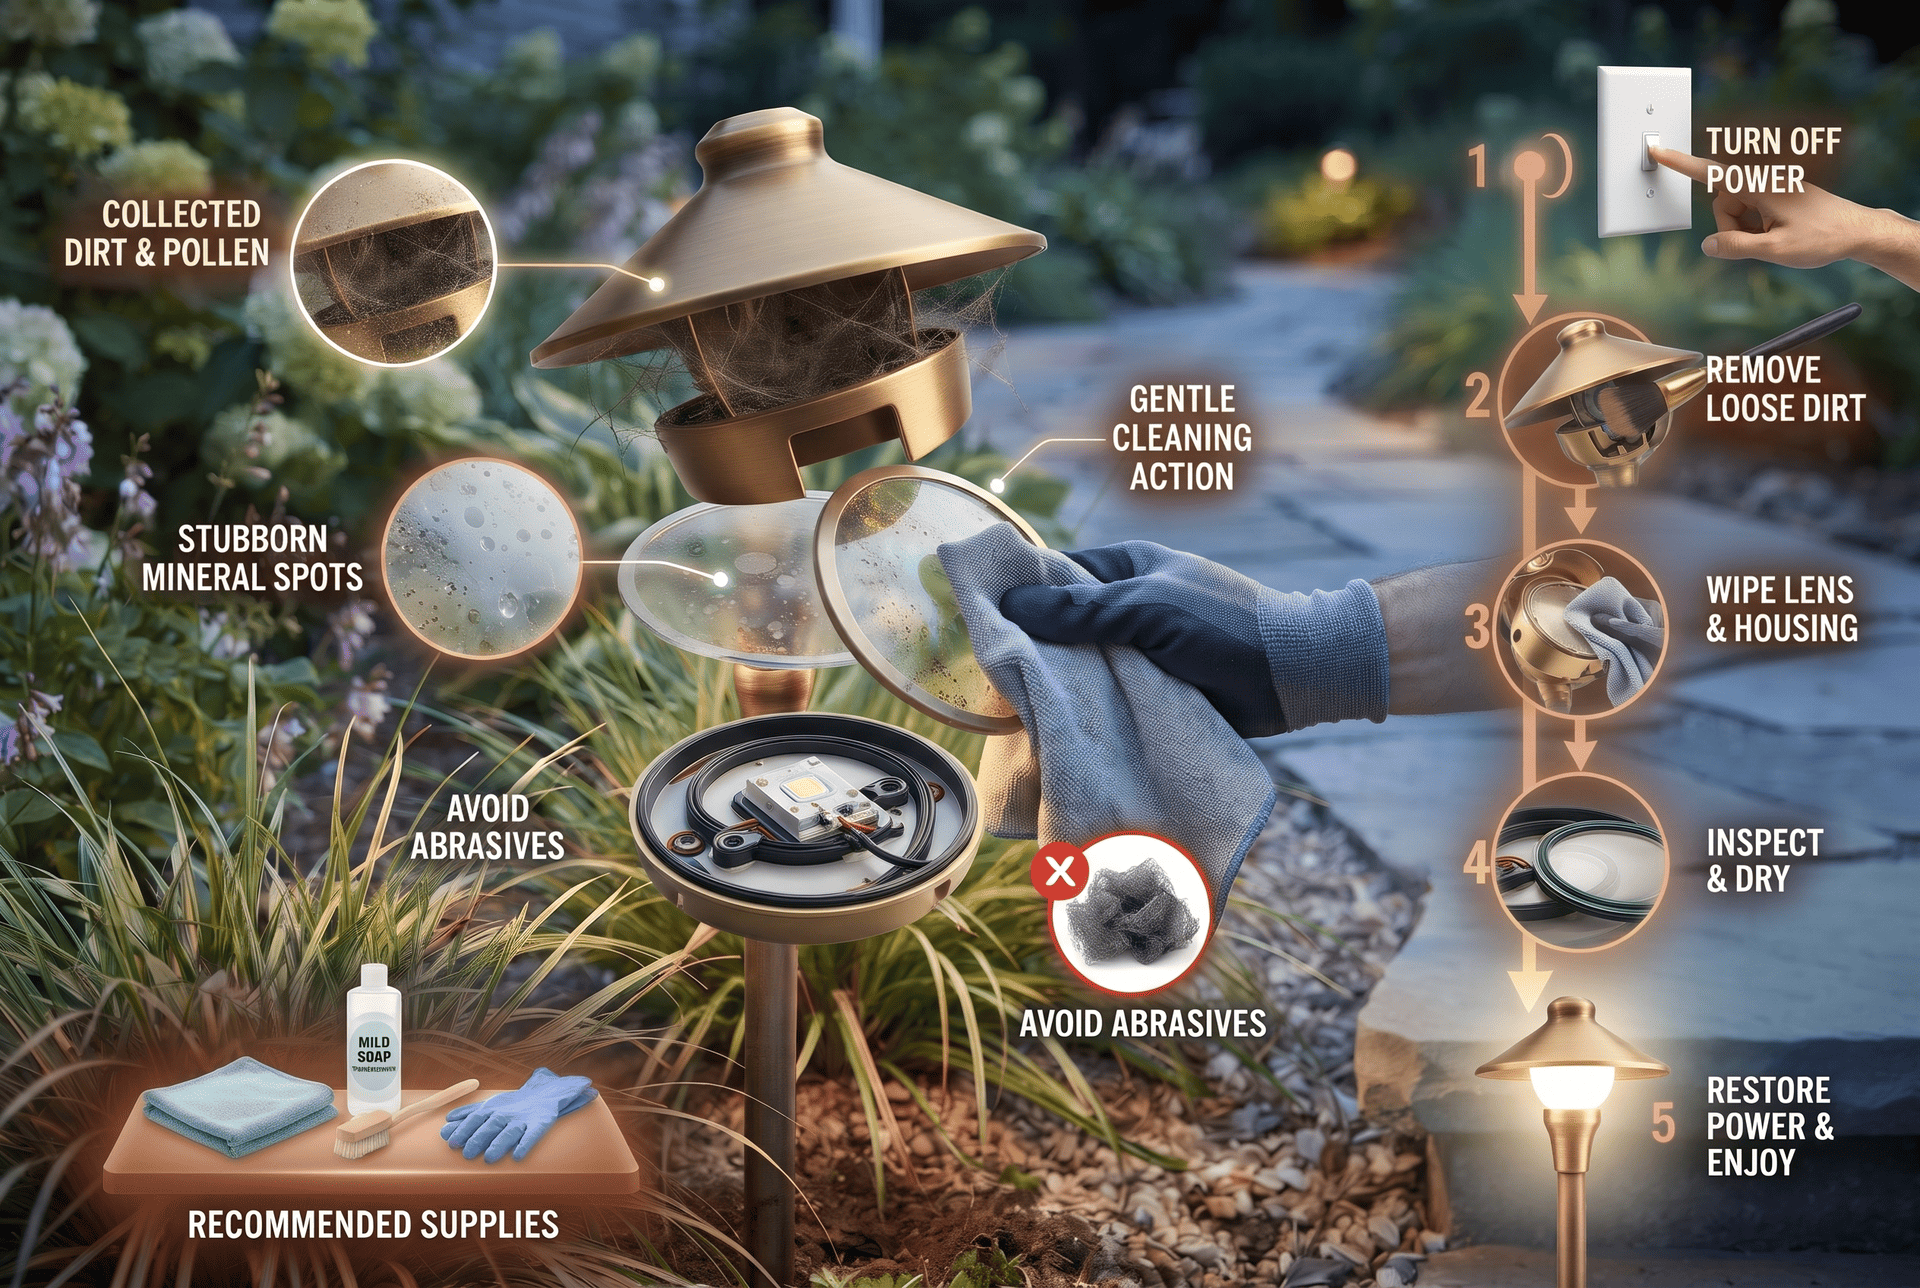
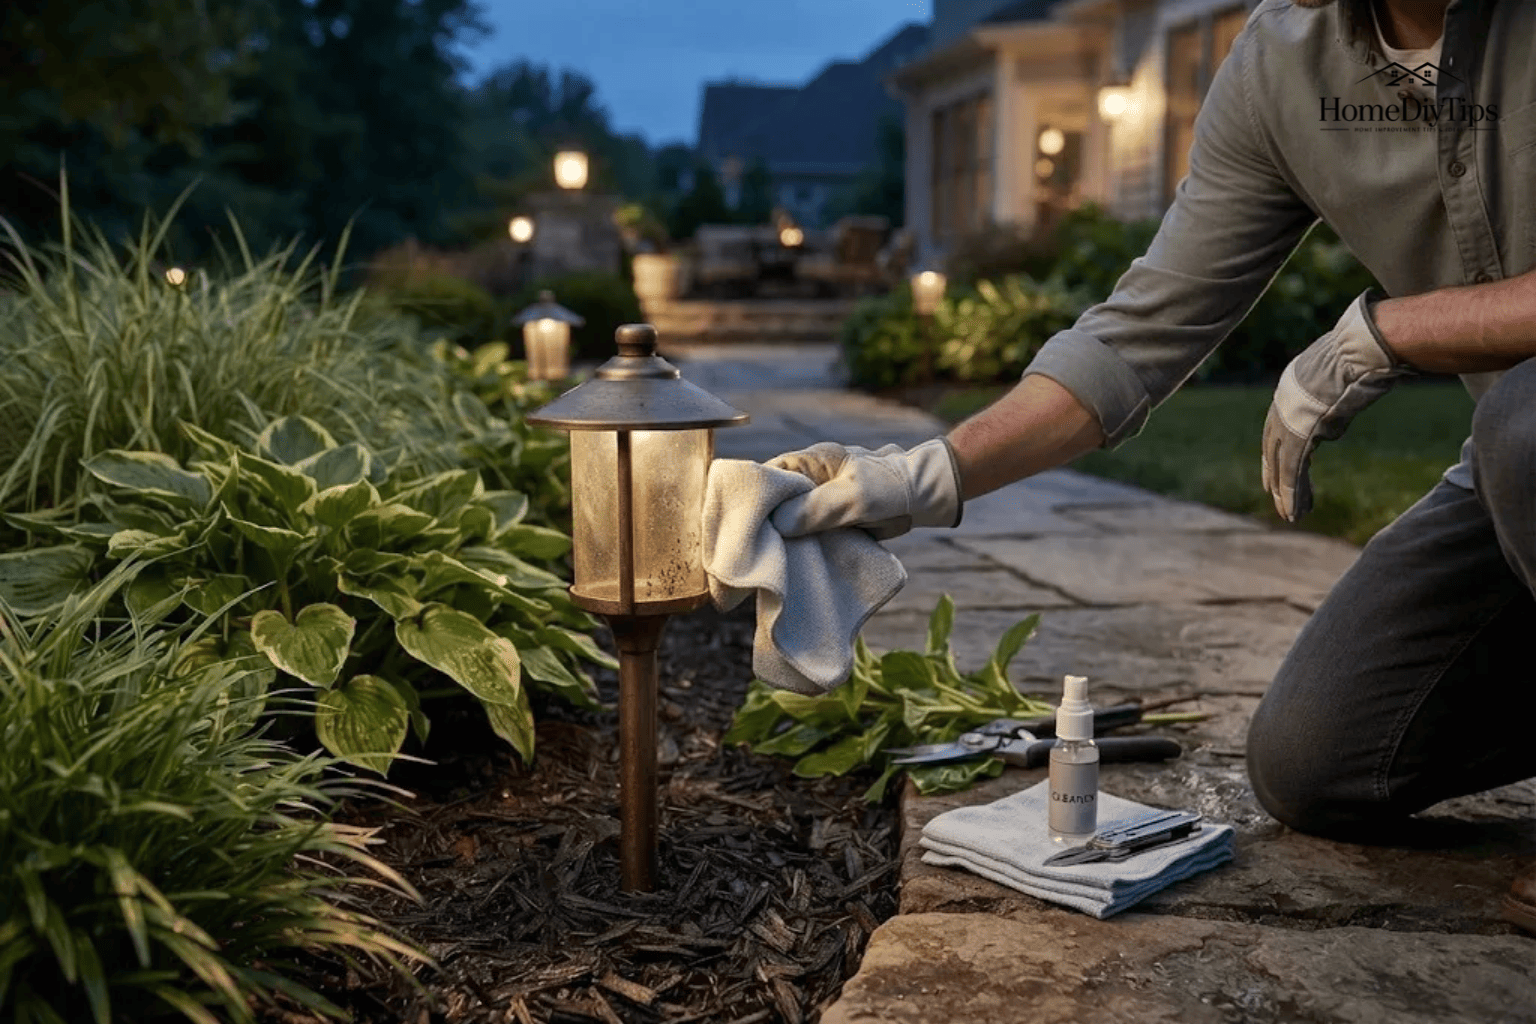
Dirt, pollen, dust, cobwebs, and water spots can collect on outdoor fixtures. They may make a working light look dull or reduce the amount of light passing through its lens.
Cleaning does not require expensive equipment. Most basic jobs need a soft cloth, a little mild soap, and clean water. Always check the fixture manual first because some finishes and lenses need special care.
What You Need
Gather these basic supplies:
- Soft microfiber cloths
- Mild soap, if permitted by the manufacturer
- Clean water
- A soft brush for loose dirt
- A dry, clean cloth
- Gloves if you are handling dirty or rough surfaces
Avoid steel wool, rough scouring pads, strong solvents, and abrasive cleaners unless the manufacturer specifically approves them.
Follow These Cleaning Steps
Step 1: Turn off the lighting.
Switch off the fixture and allow the bulb or housing to cool. For a low-voltage landscape lighting system, turn off its transformer according to the manufacturer’s instructions.
For hardwired fixtures, use the correct power disconnect before cleaning. Do not open electrical housings or work on damaged components. If you cannot identify a safe way to isolate the power, ask a qualified electrician.
Step 2: Remove loose dirt.
Use a soft brush or dry cloth to remove leaves, cobwebs, and loose dust. Avoid pushing dirt into seams, sockets, or electrical openings.
Step 3: Clean the lens and housing.
Dampen a soft cloth with clean water. Add a little mild soap only when the product instructions allow it. Wipe the exterior gently, paying attention to the areas where dust and water spots collect.
Do not spray water directly into the fixture. Avoid soaking joints, cable entries, or openings.
Step 4: Remove stubborn spots carefully.
Some outdoor lights develop white mineral marks from hard water or irrigation spray. Do not immediately reach for vinegar or a strong cleaning solution. Acidic cleaners can damage some coatings and metal finishes.
Check the manufacturer’s instructions for an approved cleaning method.
Step 5: Dry and inspect the fixture.
Use a clean, soft cloth to dry surfaces that the manufacturer allows you to wipe. Look for cracks, damaged seals, loose covers, or signs of water inside the housing.
Allow the fixture to dry completely before restoring power, following its instructions.
A clean lens should look clear and allow light to pass through without a heavy layer of dirt. If the light remains dim, investigate other possible causes rather than repeatedly cleaning it.
What Parts of Outdoor Lighting Should You Inspect?
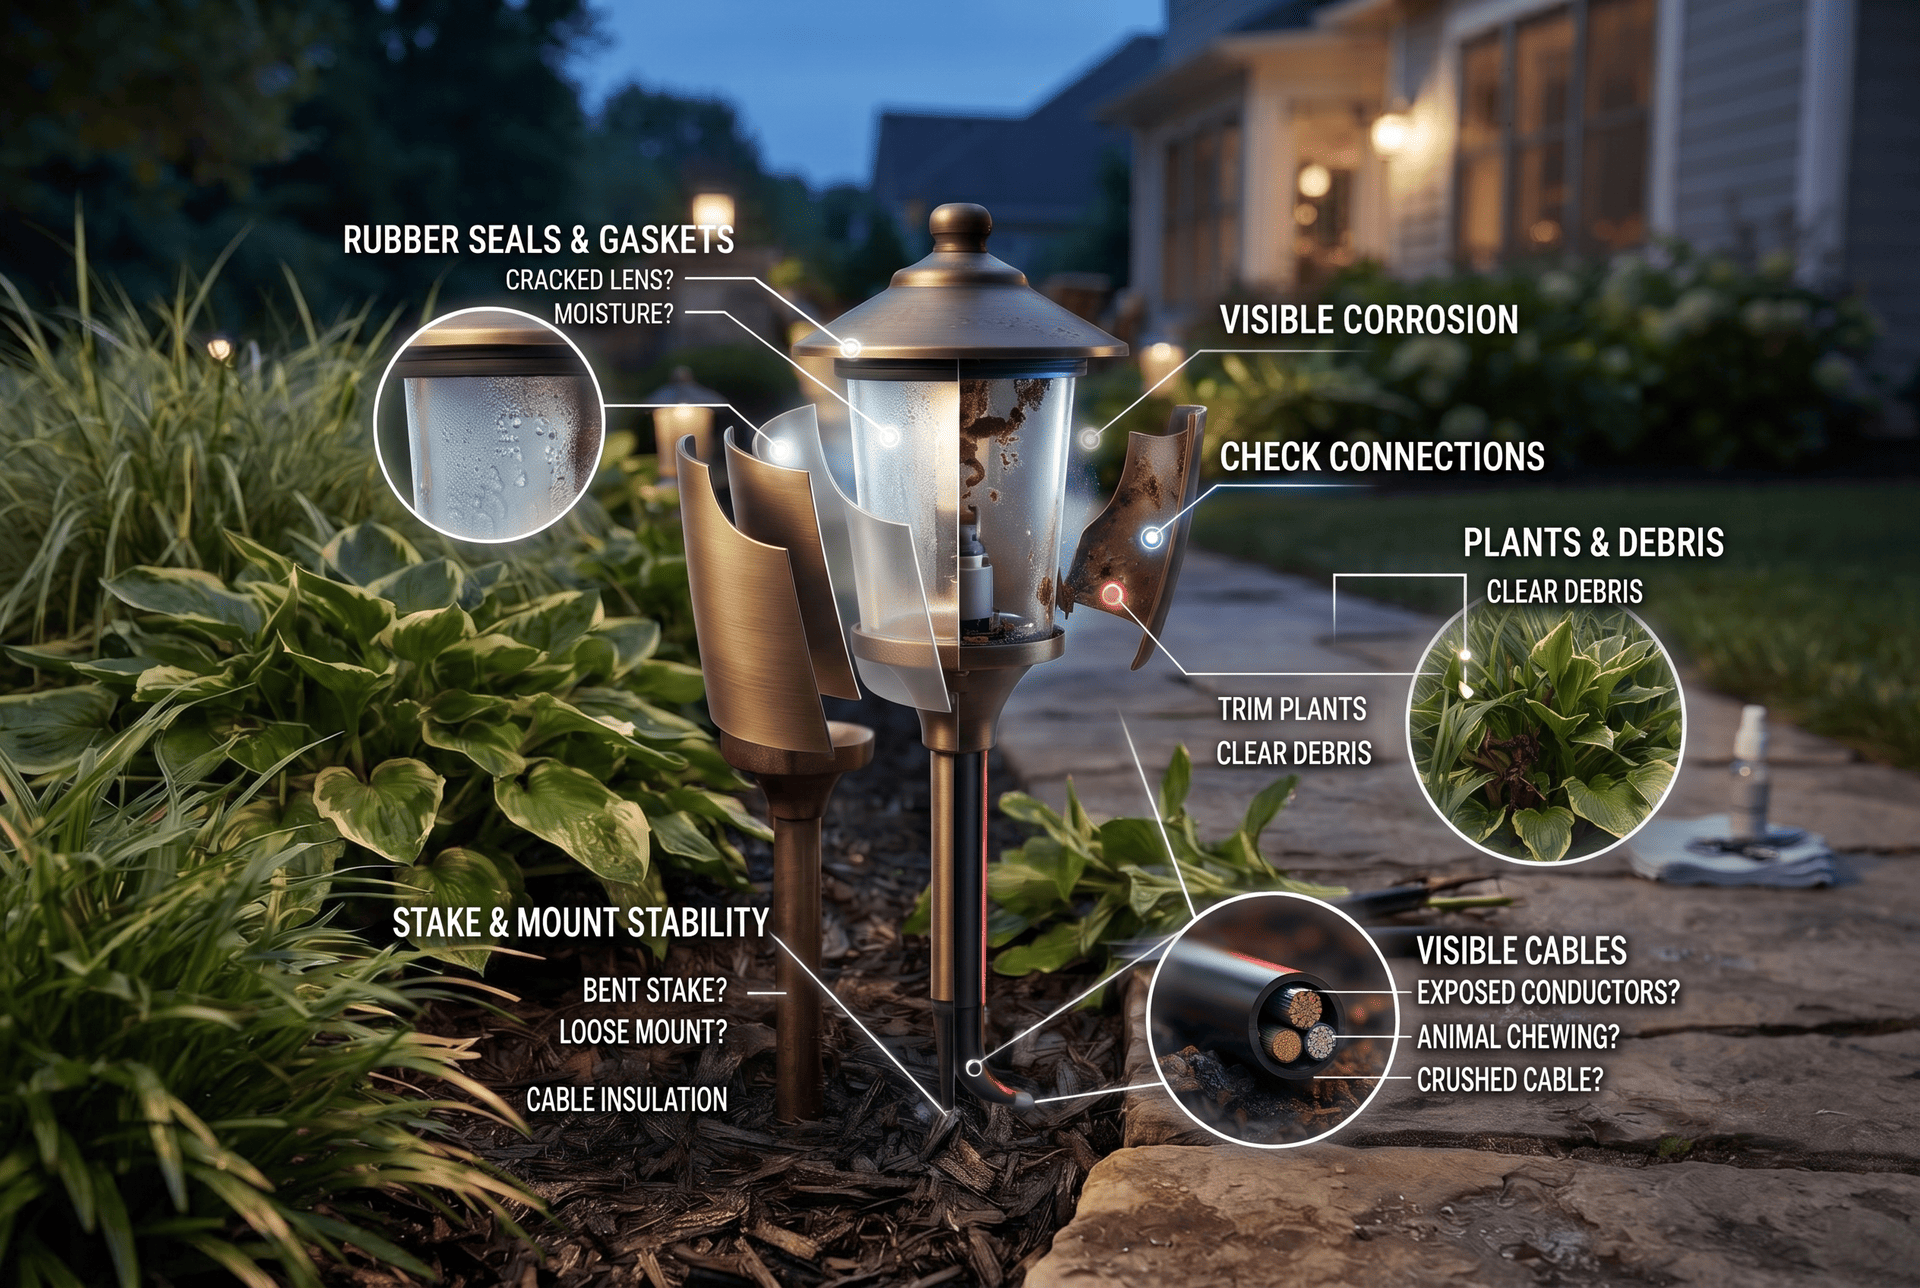
Cleaning is only one part of outdoor lighting maintenance. You should also look for physical damage that could affect the fixture or its electrical system.
A quick inspection is especially useful after heavy rain, strong winds, landscaping work, or lawn mowing.
Check Fixture Lenses, Seals, and Gaskets
Outdoor fixtures often use rubber seals, gaskets, or O-rings to keep water and dirt out. These parts help protect the internal components from outdoor conditions.
Look for:
- Cracked or cloudy lenses
- Missing or loose covers
- Damaged rubber seals
- Visible corrosion
- Unusual moisture or condensation inside the fixture
- Water collecting where it should not
A little surface condensation does not always prove that a fixture has failed. However, repeated moisture inside the housing, standing water, or visible corrosion deserves attention.
Do not open a damaged fixture to investigate electrical parts. Turn off the power and arrange a suitable inspection.
Check Mounts, Stakes, and Visible Wiring
Pathway lights and landscape spotlights may shift when soil moves or someone accidentally hits them with a mower.
Check whether fixtures still point toward the areas you want to illuminate. Look for loose brackets, bent stakes, and unstable mounts.
You can straighten an accessible, undamaged stake if the manufacturer’s instructions allow it. Avoid forcing a fixture that feels stuck or has damaged wiring.
Also look at visible cables. Watch for:
- Cuts or crushed insulation
- Exposed conductors
- Loose or damaged connectors
- Cables uncovered by erosion or gardening
- Signs of animal chewing
Do not repair, splice, or bury damaged electrical cables as a beginner. A qualified professional should inspect and repair them.
Keep Plants and Debris Away
Plants can block light beams as they grow. Shrubs, grass, and low branches may also hold moisture against fixture housings.
Trim nearby growth so the light can reach its intended area. Remove leaves and debris from around the base of fixtures, but take care not to damage their cables.
Check the sprinkler direction too. Regular water spray can leave mineral marks and increase moisture exposure.
The goal is not to remove all nearby plants. Keep enough space around the fixture for the light to work properly and for you to inspect it.
How to Maintain Outdoor LED Lights and Lighting Controls
LED lights are widely used outdoors because they use less electricity than traditional incandescent lighting and generally last longer. However, they still need basic care.
A good LED maintenance routine focuses on clean lenses, clear airflow where the design requires it, sound fixtures, and working controls.
Outdoor LED Light Maintenance
First, find out whether your fixture uses a replaceable LED bulb or an integrated LED module.
A replaceable bulb can often be changed when it stops working, provided the replacement matches the fixture’s specifications.
An integrated LED fixture has its light source built into the unit. In some designs, the LED module cannot be replaced separately. The manufacturer may require replacement of a larger component or the entire fixture.
Check the product manual and warranty before buying replacement parts.
LEDs also lose brightness gradually over time. This process is sometimes called light-output depreciation. It means an LED may still work while producing less light than when it was new.
ENERGY STAR’s LED lighting guide explains how LED lifetime relates to maintaining useful light output.
If an LED looks unusually dim, start by checking its lens and surrounding conditions. If cleaning does not help, consider aging, fixture damage, or a system problem.
Do not assume that every dim LED needs immediate replacement.
Check Timers and Photocells
Outdoor lighting controls determine when lights turn on and off.
A photocell is a light sensor that detects surrounding brightness. It helps turn lights on at dusk and off when daylight returns.
A timer follows a set schedule. Smart lighting controls may also use an app or other programmed settings.
Check these controls when:
- Lights turn on too early or too late.
- Lights remain on during daylight.
- Lights fail to turn on at dusk.
- The schedule no longer matches your household’s needs.
Make sure the sensor is not blocked by leaves, dirt, or an object that prevents it from detecting daylight.
Also review timer settings when seasonal daylight hours change. A timer that worked well in summer may not match the darker evenings of winter.
If the controls appear correct but the lights still behave strangely, the sensor, controller, power supply, or wiring may need professional attention.
What Are the Most Common Outdoor Lighting Problems?
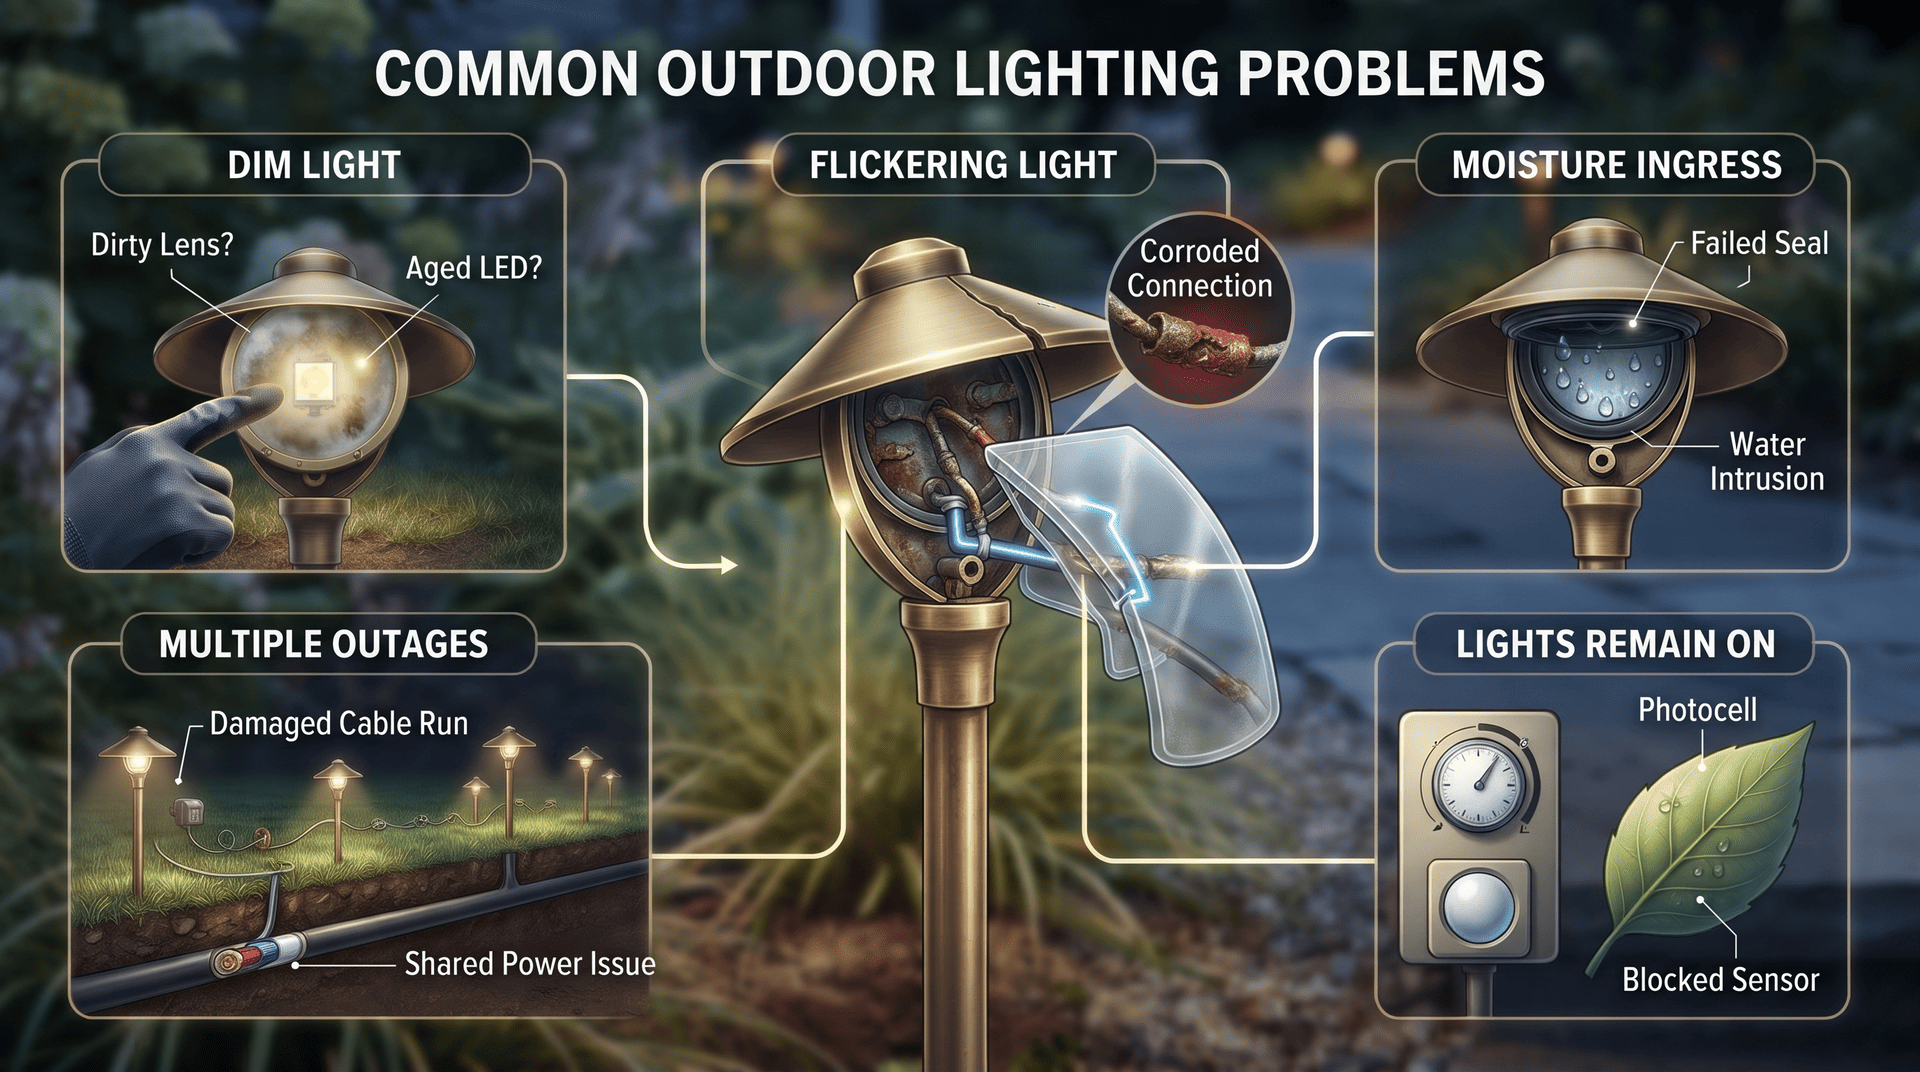
Outdoor lighting problems can appear as dim bulbs, flickering, complete outages, or lights that stay on too long.
The best first step is to identify how much of the system is affected. One failed fixture suggests a different problem from an entire group of lights going dark.
|
Problem |
Possible cause |
Safe first check |
|
Dim light |
Dirty lens, aging LED, or system issue |
Inspect and gently clean the exterior |
|
Flickering light |
Fixture, connection, or control fault |
Check whether one light or several are affected |
|
One light will not turn on |
Failed bulb or damaged fixture |
Check the bulb only if it is designed to be replaceable |
|
Several lights stop working |
Shared power, transformer, or wiring problem |
Identify the affected group |
|
Moisture inside a fixture |
Damaged seal or water intrusion |
Look for visible cracks or repeated condensation |
|
Lights remain on |
Timer or photocell problem |
Review external settings and sensor position |
Why Do Several Landscape Lights Fail Together?
Many landscape lighting systems use a low-voltage transformer. It reduces the household electrical supply to a lower voltage for compatible landscape fixtures.
Several lights may share the same transformer or wiring run. A problem affecting that shared system can therefore affect more than one fixture.
Another possible issue is voltage drop. This means the electrical voltage becomes lower along a wiring run, which can affect the performance of fixtures farther from the power source.
Corroded connections and damaged cables can also cause unreliable operation.
A homeowner discussion about a low-voltage landscape system described one light blinking while other lights in the same run stopped working. Commenters suggested possible moisture and corrosion, but the discussion did not establish a confirmed diagnosis. It is a useful reminder that several symptoms can have one shared cause, not proof that water is always responsible.
When multiple lights fail, record which fixtures are affected and when the problem occurs. Give this information to a lighting technician rather than attempting to open the transformer or repair buried connections.
When Should You Stop Troubleshooting?
Stop DIY troubleshooting and seek qualified help when you notice:
- Repeated GFCI or breaker trips
- Damaged, exposed, or buried wiring
- Water inside electrical components
- Burning smells, unusual heat, or sparking
- A transformer or hardwired fixture fault
- A fixture mounted in a difficult or unsafe location
A GFCI, or ground-fault circuit interrupter, is a safety device that helps protect people from electrical shock. Do not bypass it because an outdoor light keeps switching off.
The Electrical Safety Foundation International’s outdoor electrical safety guidance explains why outdoor equipment, damaged wiring, and electrical protection deserve attention.
How to Care for Different Outdoor Light Fixture Materials
Outdoor lights come in several materials and finishes. The correct cleaning method depends on what your fixture is made of.
Using the wrong product may remove a protective coating, scratch a lens, or change the intended appearance.
|
Fixture material |
Maintenance advice |
|
Brass |
Follow finish instructions; natural color changes may occur |
|
Copper |
Recognize natural patina before attempting restoration |
|
Bronze |
Protect the original finish and check for actual surface damage |
|
Stainless steel |
Use suitable cleaners and soft cloths |
|
Painted or powder-coated aluminum |
Avoid abrasive cleaners that can damage the coating |
|
Glass and plastic lenses |
Use approved gentle cleaning methods |
How to Restore Faded Outdoor Light Fixtures
Before trying to restore a faded fixture, identify the material and finish.
A darker copper surface may be natural patina rather than damage. Some bronze fixtures also develop changes in appearance over time.
Painted aluminum presents a different situation. Its color may fade or its coating may become damaged through prolonged exposure to sunlight and weather.
Use these steps before choosing a restoration method:
- Look for the manufacturer’s name and model number.
- Check whether the finish is painted, coated, polished, or naturally weathered.
- Clean the exterior using an approved method.
- Allow it to dry and examine the surface again.
- Use a manufacturer-approved restoration product only when the finish requires it.
Do not apply metal polish, paint, or abrasive products to every fixture. A product that works on one metal may damage another.
For material-specific advice, see Hunza’s Product Care guidance and the CAST Lighting FAQs.
If a finish has peeled, exposed the base material, or developed substantial corrosion, ask the manufacturer or a suitable repair professional about restoration or replacement.
How Seasonal Weather Affects Outdoor Lighting Maintenance
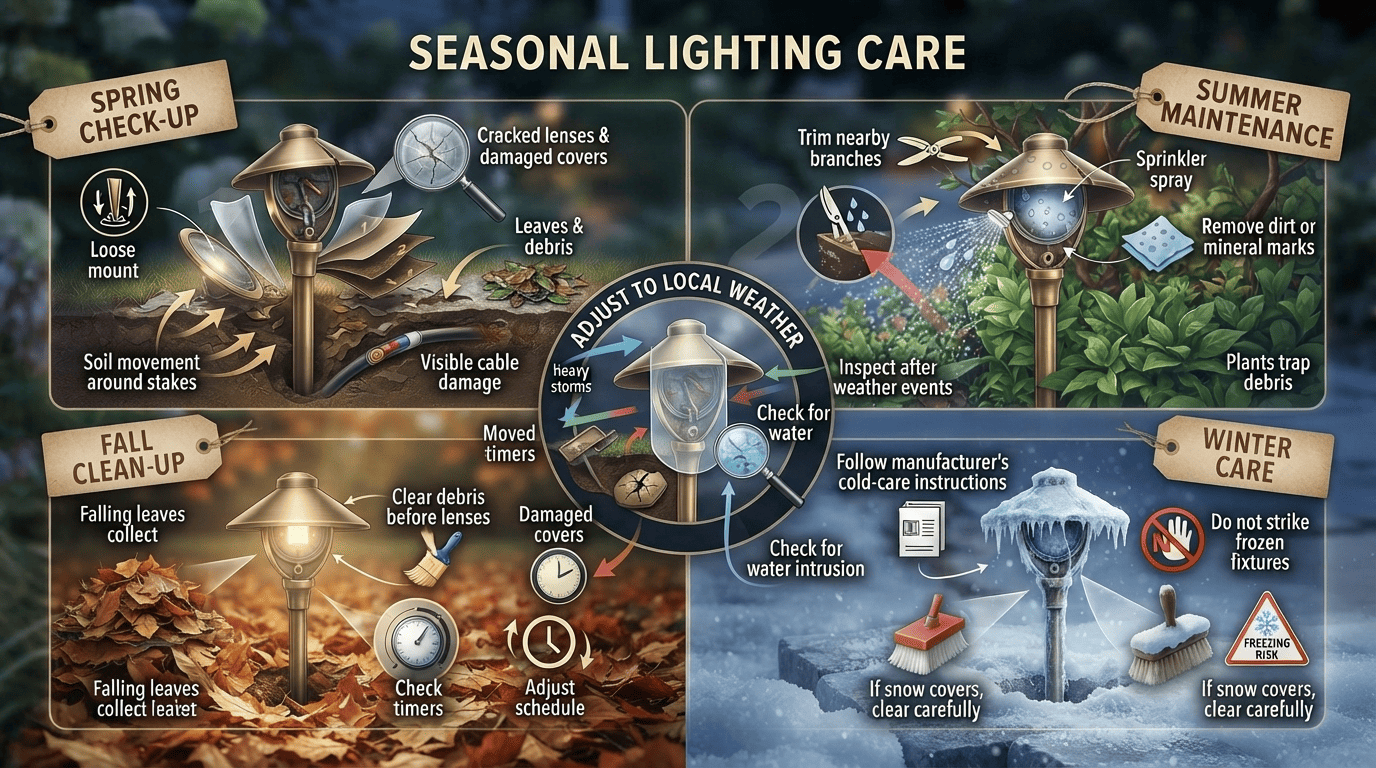
Outdoor lights face different conditions throughout the year. A home in a snowy region has different maintenance needs from a coastal property exposed to salty air.
Adjust your routine to match local weather instead of following one schedule for every household.
Spring
After winter, check fixtures for:
- Loose mounts or tilted pathway lights
- Cracked lenses and damaged covers
- Soil movement around stakes
- Leaves and debris
- Visible cable damage
Spring is also a useful time to check whether garden growth blocks lights or covers fixtures.
Summer
Warm weather often brings faster plant growth and increased irrigation.
Trim nearby branches and shrubs. Check whether sprinkler spray reaches fixtures, and remove dirt or mineral marks using an approved cleaning method.
Also make sure plants do not trap debris against the housing.
Fall
Falling leaves can collect around pathway lights and garden fixtures. Remove them before they cover lenses or block light output.
Check timers as evenings become darker. Make sure your lighting schedule still suits the times when you use outdoor areas.
Winter
Snow, ice, frost, and freezing temperatures can affect outdoor fixtures and their surroundings.
Follow the manufacturer’s instructions for cold-weather care. Do not strike frozen fixtures or force stuck parts into position.
If snow covers a light, clear it carefully without putting pressure on its lens or housing.
After Heavy Storms
Strong winds and heavy rain can shift fixtures, move soil, expose cables, or damage covers.
Wait until conditions are safe, then inspect the visible parts of your system. Leave damaged electrical equipment alone until a qualified professional can check it.
Homes near the coast, in very hot areas, or in places with heavy dust may need more frequent inspections because of their environmental exposure.
DIY Outdoor Lighting Maintenance vs. Professional Repairs
Many routine maintenance jobs are suitable for homeowners. Others involve electrical risks or equipment that needs specialist knowledge.
Knowing the difference helps you avoid unnecessary service costs without putting yourself or your property at risk.
|
Basic homeowner upkeep |
Professional help |
| Cleaning accessible fixture exteriors |
Hardwired electrical repairs |
|
Removing leaves and loose debris |
Buried cable damage |
|
Trimming nearby plants |
Transformer and electrical faults |
| Checking external timer settings |
Repeated GFCI or breaker trips |
|
Observing loose or damaged fixtures |
High-mounted or difficult-to-reach fixtures |
|
Checking visible fixture condition |
Damaged electrical connections |
A landscape lighting specialist can help with low-voltage system problems, fixture positioning, and landscape lighting repairs.
A qualified electrician is more appropriate for household electrical supply problems, hardwired repairs, and repeated electrical safety trips.
Check the Warranty Before Replacing a Fixture
Before paying for a new fixture or repair, look for its model number and warranty information.
Some manufacturers offer limited warranties on fixtures, finishes, or LED components. Coverage may differ between product types and may exclude damage caused by misuse or improper installation.
Keep your receipts, installation information, and basic maintenance notes together. This can make warranty checks and repair requests easier.
How Much Does Outdoor Lighting Repair Cost?
Professional repair prices vary with location, labor rates, fixture type, and the problem involved.
An Angi guide updated October 28, 2026, reports a national average landscape lighting repair cost of about $250, with many reported projects falling between $120 and $400. It also reports service-call minimums of approximately 75–150.
These are broad US estimates, not guaranteed prices. A simple fixture repair may cost less than replacing damaged underground wiring or repairing a transformer.
Before agreeing to a repair, ask the provider to explain:
- The inspection or service-call fee.
- Whether labor is included in the estimate.
- Whether replacement parts are included.
- Whether additional wiring or excavation work may be needed.
- Whether the work and replacement parts carry a warranty.
You can compare the estimates with Angi’s landscape lighting repair cost guide.
A clear written estimate helps you understand what you are paying for.
Outdoor Lighting Maintenance Mistakes to Avoid
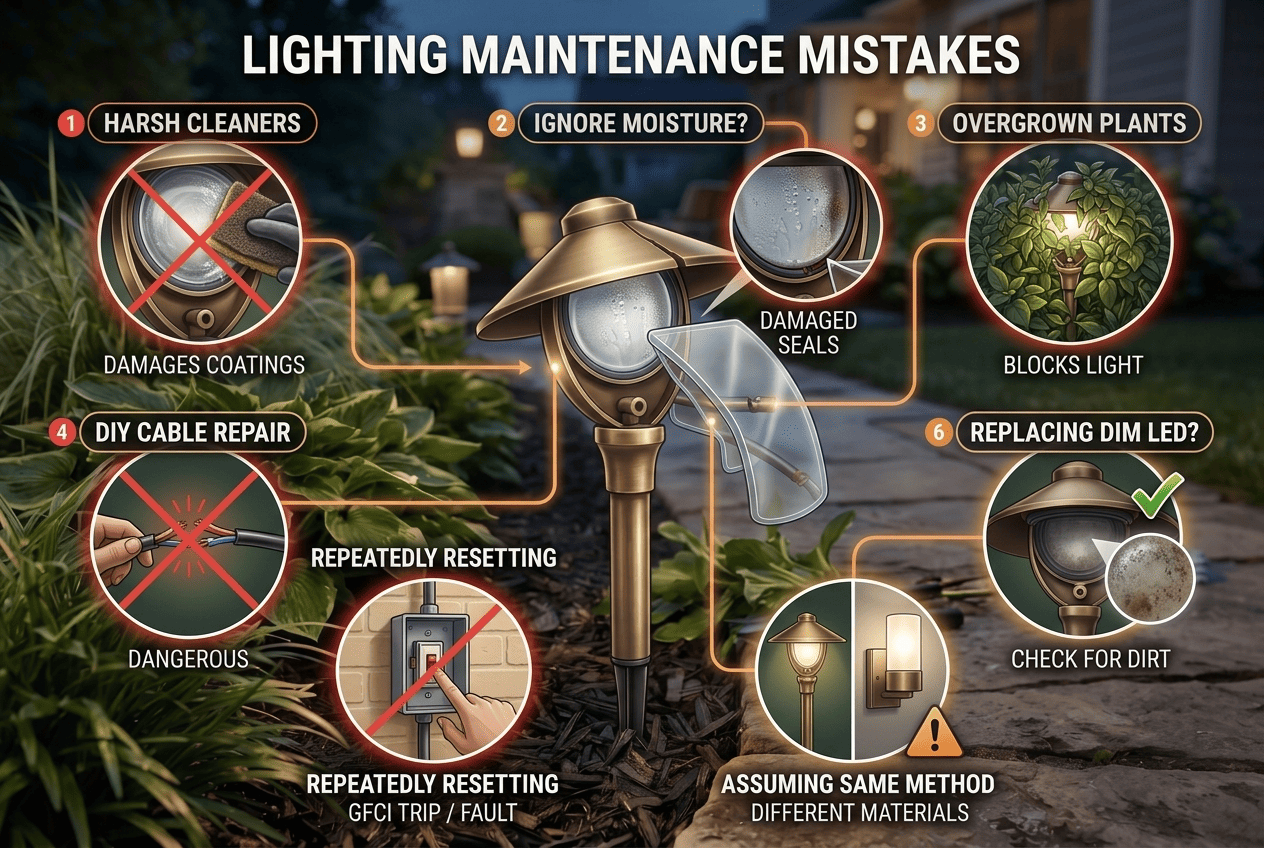
Even simple maintenance can cause problems when done with the wrong tools or assumptions.
Avoid these common mistakes:
Using harsh cleaners: Strong chemicals and abrasive pads can damage coatings, lenses, and metal finishes. Check the manufacturer’s cleaning instructions first.
Ignoring moisture: Repeated condensation, standing water, and corrosion may indicate a damaged seal. Do not treat them as ordinary dirt.
Letting plants cover fixtures: Overgrown plants can block beams and hold moisture around housings. Include lighting in your regular garden maintenance.
Pulling or repairing damaged cables: A damaged cable is not a simple cleaning problem. Do not splice or bury it without proper professional repair.
Replacing every dim LED: Gradual brightness loss may be normal. Check for dirt, system problems, and warranty coverage before buying replacements.
Assuming every fixture is the same: Materials, coatings, LED designs, and electrical systems differ. A cleaning method suitable for one fixture may damage another.
Repeatedly resetting a tripping safety device: A GFCI or breaker trip can signal a fault. Do not bypass the device or keep resetting it without resolving the cause.
A careful inspection is usually more useful than rushing into a repair.
Frequently Asked Questions About Outdoor Lighting Maintenance
What Are Some Common Problems with Outdoor Lighting?
Common outdoor lighting problems include dim bulbs, flickering, complete outages, damaged lenses, moisture inside fixtures, and faulty timers or photocells. Dirt, aging LEDs, damaged seals, wiring problems, and power supply faults can all affect performance. Start by checking visible conditions and external settings, then seek professional help for electrical faults.
How Long Should Outdoor Lights Last?
Outdoor light lifespan depends on the bulb or LED, fixture quality, weather exposure, operating hours, and maintenance. LEDs generally last longer than traditional incandescent bulbs, but their brightness gradually decreases with use. The fixture housing, seals, and electrical components may wear out before the LED itself. Check the manufacturer’s rated lifetime and warranty rather than assuming every outdoor light lasts the same number of years.
How Do You Restore Faded Outdoor Light Fixtures?
First identify the material and finish. Clean the fixture gently using an approved method, then check whether the fading is dirt, natural patina, or damage to a protective coating. Copper and bronze may change color naturally, while painted aluminum may need manufacturer-approved refinishing. Avoid polishing or painting a fixture until you know which treatment suits its surface.
How Do You Maintain Outdoor LED Lights?
Keep LED lenses and housings clean, remove surrounding debris, and check for visible cracks or moisture. Inspect replaceable bulbs and integrated LED fixtures differently because some built-in light sources cannot be changed separately. Check the product manual and warranty before ordering replacement parts. If brightness changes continue after cleaning, investigate possible fixture or system faults.
A Simple Outdoor Lighting Maintenance Checklist
Use this checklist during your regular outdoor lighting checks:
- Look for dim, flickering, or non-working fixtures.
- Clean dirty lenses and accessible housings.
- Remove leaves and debris around lights.
- Trim plants that block light beams.
- Check visible seals, covers, and mounting hardware.
- Look for exposed or damaged wiring without handling it.
- Review timers and photocell settings.
- Check for damage after severe weather.
- Review manufacturer instructions and warranty details.
- Contact a qualified professional when an electrical or system fault appears.
Outdoor lighting maintenance does not need to become a complicated project. Regular cleaning, careful inspections, and a little attention to seasonal changes can help keep your fixtures working as intended.
Start with the visible parts of your lighting system. When you find damaged wiring, recurring electrical problems, or signs of water inside a fixture, leave the repair to a qualified professional.
Disclaimer
Outdoor lighting needs vary by fixture, material, weather, and property, and repair costs vary by location and fault. Follow the manufacturer’s instructions and use a qualified professional for damaged wiring, transformer faults, hardwired repairs, or repeated electrical trips.