Peel-and-stick wallpaper is a simple way to refresh a bedroom, living room, home office, or rental space without applying traditional wallpaper paste. The key to a neat finish is preparing the wall properly, aligning the first strip carefully, and smoothing the material as you work. Even beginners can achieve a polished look by taking their time and following the wallpaper manufacturer’s instructions.
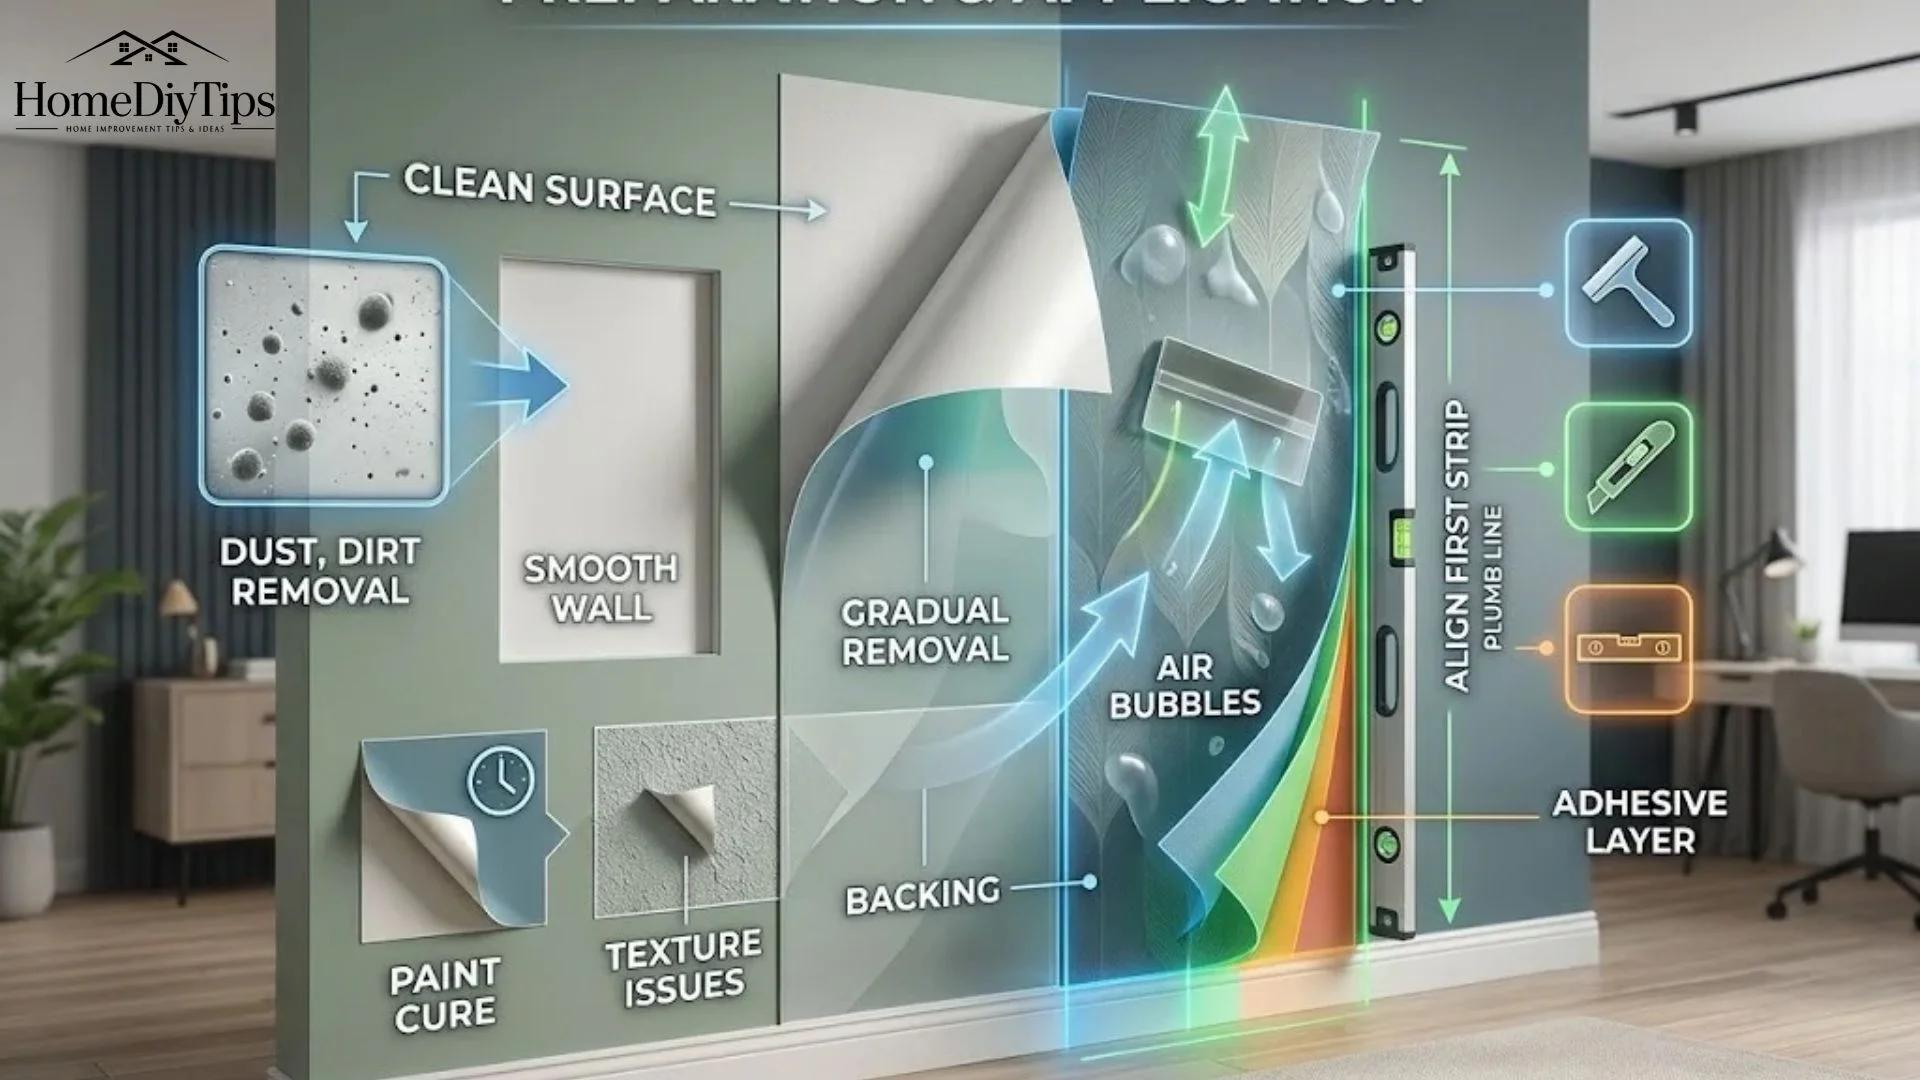
Before you begin, check that your walls are smooth, clean, completely dry, and suitable for the product you have chosen. Dust, textured paint, moisture, and paint that has not fully cured can prevent the adhesive from sticking properly. Once the surface is ready, measure the wall, plan the pattern, and apply each strip gradually instead of removing all the backing at once.
This guide explains how to put up peel-and-stick wallpaper step by step, including how to handle corners, windows, outlets, and other challenging areas. You will also learn how to avoid bubbles, check whether your walls are suitable, and remove the wallpaper with less risk of damaging the surface.
Direct Answer
To put up peel-and-stick wallpaper, prepare a clean, smooth, dry wall, mark a straight starting line, and apply each strip gradually while smoothing out air bubbles. Follow the manufacturer’s instructions for seams and surface compatibility.
Experience
The first strip sets the direction for the entire wall, so take extra time to align it with a level or plumb line. Test a small sample first, especially on painted walls, textured surfaces, or rental properties where removal could affect the finish.
Is Peel-and-Stick Wallpaper Right for Your Wall?
Peel-and-stick wallpaper works best on smooth, clean, dry, and properly prepared surfaces. It has an adhesive backing protected by a removable liner, so you can position the wallpaper without mixing paste or applying a separate adhesive.
However, it is not suitable for every wall.
Walls that are generally suitable include:
- Smooth, painted drywall that has fully cured.
- Smooth plaster in good condition.
- Clean, sealed surfaces specifically approved by the wallpaper manufacturer.
- Certain previously painted surfaces that have passed a small adhesion test.
Walls that may cause problems include:
- Heavily textured walls, such as pronounced orange-peel or popcorn finishes.
- Damp walls, areas with active leaks, or surfaces affected by mold.
- Flaking, peeling, chalky, or damaged paint.
- Very rough, porous, or unsealed concrete.
- Newly painted walls that have not cured for the period required by the product manufacturer.
Texture can prevent the adhesive from making consistent contact with the wall. Moisture may weaken adhesion, while peeling paint can come away with the wallpaper when you remove it.
If you rent your home, do not assume that peel-and-stick wallpaper is automatically damage-free. Removal depends on the wallpaper adhesive, paint quality, wall condition, and how long the covering remains in place. Check your lease if necessary and test a sample in an inconspicuous area before covering an entire wall.
Tools and Materials You Need
Gather your supplies before opening the wallpaper. Having everything within reach makes it easier to keep the first strip straight and avoid unnecessary interruptions.
Here is what you will need:
- Peel-and-stick wallpaper: Buy enough to cover the intended area, allowing for pattern matching, trimming, and mistakes.
- Measuring tape: Measure the wall height and width accurately.
- Pencil: Mark measurements and your starting guide lightly.
- Level or plumb line: Establish a straight vertical line for the first strip.
- Sharp utility knife: Trim excess material around ceilings, baseboards, windows, and other edges.
- Cutting mat or suitable cutting surface: Protect your work surface when cutting wallpaper.
- Smoothing tool: Use a wallpaper smoother or the tool recommended by the manufacturer to press the material against the wall.
- Clean, lint-free cloth: Remove dust and wipe suitable surfaces during preparation.
- Mild cleaning solution: Use one appropriate for the wall’s finish, following the paint and wallpaper instructions.
- Step ladder: Reach the upper part of the wall safely.
- Scissors: Make preliminary cuts and handle small adjustments.
- A second person, if available: An extra set of hands can help support long strips and manage patterned wallpaper.
You may also need a straightedge for cutting and a small sample of the wallpaper for testing.
A sharp blade is especially important. A dull blade can drag the material, create ragged edges, or pull the wallpaper away from the wall. Replace the blade when it starts tearing instead of cutting cleanly.
How to Prepare a Wall for Peel-and-Stick Wallpaper
Wall preparation has a major effect on the final result. Even expensive wallpaper can develop lifting edges or bubbles if it is applied over dust, grease, moisture, or an unsuitable finish.
1. Inspect the wall
Look closely at the entire surface. Check for peeling paint, cracks, nail holes, loose plaster, damp patches, and rough areas.
Repair minor defects using a suitable wall filler. Once the repair has dried, sand it smooth and remove all sanding dust. Significant moisture problems or loose wall finishes should be addressed before you install wallpaper.
If the wall has heavy texture, check the manufacturer’s surface requirements rather than assuming the adhesive will cover it.
2. Clean the surface
Remove dust, fingerprints, grease, and other residue using a cleaning method suitable for the existing paint or wall finish.
Avoid soaking drywall or other surfaces that could be damaged by excessive moisture. If you use a cleaning solution, follow its instructions and allow the wall to dry completely before proceeding.
Do not apply wallpaper over cleaning residue, damp patches, or recently repaired areas that have not fully dried.
3. Check the paint condition
The paint should be firmly attached to the wall, not chalky, flaking, or peeling. If the paint comes off when you rub the surface or when you test the wallpaper sample, the wall may need further preparation.
New paint requires special attention. Paint may feel dry to the touch before it has fully cured and developed its intended properties.
The required waiting period varies by paint, wall conditions, and wallpaper product. Some general guides mention shorter waiting periods, while manufacturers such as York Wallcoverings and NextWall specify longer periods for their peel-and-stick products.
Follow the instructions for your exact wallpaper and paint rather than relying on one universal waiting time. When the requirements are unclear, contact the manufacturer before installing.
4. Test a small sample
Apply a small piece of wallpaper to an inconspicuous part of the prepared wall, following the product instructions.
Check whether it adheres evenly and whether the surface or paint shows signs of damage when the sample is removed according to the recommended method.
A sample test cannot guarantee that the entire installation will perform identically, but it can reveal obvious compatibility problems before you commit to the full wall.
How to Measure and Cut Wallpaper
Accurate measurements help reduce waste and make the installation easier.
Start by measuring the wall height from the top edge near the ceiling to the bottom edge near the baseboard. Measure the width of the wall as well, especially if you plan to cover several adjoining walls.
For each vertical strip, measure the wall height and account for a little extra material at the top and bottom for trimming. An allowance of a couple of inches at each end is often useful, provided it is compatible with the roll dimensions and manufacturer’s instructions.
Cut the first strip using your measurements. If the wallpaper has a repeating pattern, check where the design falls before cutting the next piece.
Patterned wallpaper may require extra material because each strip must line up with the previous one. Florals, geometric shapes, stripes, and large motifs can all create different matching requirements.
Before cutting several strips, inspect the roll label for its pattern repeat and match type. Keep the strips in their intended order so you can follow the design consistently.
It is also wise to inspect all rolls for color or batch differences before installation. Using rolls from different production batches on the same wall can sometimes result in visible variations.
How to Put Up Peel-and-Stick Wallpaper Step by Step
Once the wall is prepared and the strips are cut, you can begin installation. Work patiently, especially on the first strip, because its position affects every strip that follows.
Step 1: Mark a Straight Starting Line
Do not assume that the corner of the wall or the ceiling is perfectly straight. Even a small angle can make the wallpaper look increasingly crooked as you move across the room.
Use a level or plumb line to draw a light vertical guide near the starting edge. Position it according to the width of your first strip and the manufacturer’s installation guidance.
Check the line from top to bottom before proceeding. This guide gives you a reliable reference for aligning the first strip.
Step 2: Position the First Strip
Hold the first strip against the wall and align its edge with the guide line. Make sure the design is oriented correctly and that enough material remains at the top and bottom for trimming.
Avoid removing the entire backing liner immediately. Instead, peel away a small section at the top and fold the liner back on itself.
This exposes only the adhesive you need to begin positioning the wallpaper while leaving the rest of the strip easier to control.
Step 3: Attach the Top Section
Press the exposed adhesive gently against the wall, checking the alignment before applying firm pressure.
Use your smoothing tool to press the wallpaper from the center outward toward the edges. This helps push trapped air out instead of sealing it beneath the material.
If the strip is noticeably crooked, follow the manufacturer’s instructions for repositioning it. Some products allow limited adjustment, but repeatedly pulling the wallpaper away from the wall can stretch the material or reduce adhesion.
Step 4: Work Down the Wall Gradually
Continue peeling away the backing in manageable sections. As you expose more adhesive, smooth the wallpaper against the wall before moving farther down.
Keep the strip supported so it does not fold onto itself or stick to the wrong part of the surface.
Work from the center outward with steady, overlapping smoothing strokes. Check the edges as you go and correct small wrinkles before they become difficult to remove.
Avoid pulling the wallpaper tightly to make it fit. Stretching can distort the pattern and create gaps when the material relaxes.
Step 5: Add the Next Strip
Cut the next piece according to the wall measurements and pattern requirements. Position it beside the first strip, matching the design at eye level and checking the alignment along the full length.
Whether the edges should meet, overlap, or follow another seam arrangement depends on the specific wallpaper. Follow the manufacturer’s instructions rather than applying one seam rule to every product.
Apply the second strip gradually, smoothing it as you work. Continue checking the pattern and seams before moving on to the next piece.
Step 6: Trim the Excess Material
When the strip is securely positioned, trim the excess at the ceiling and baseboard using a sharp utility knife and a suitable straightedge where appropriate.
Use controlled cuts instead of trying to remove a large amount of excess in one pass. Keep your fingers clear of the blade and avoid cutting into the wall or damaging adjacent trim.
Replace a dull blade if it begins pulling or tearing the wallpaper. Clean, precise trimming helps the finished installation look neat and professional.
Step 7: Continue Across the Wall
Repeat the same process for each remaining strip: align the pattern, peel back a small section of liner, attach the wallpaper, smooth outward, and trim as needed.
Pause periodically to inspect the overall wall from a few steps away. This makes it easier to spot a crooked strip, a pattern mismatch, or a visible gap before you cover more of the surface.
For a large wall, a helper can support the material while you position it. If you are working alone, shorter, manageable sections of exposed backing will make the job easier to control.
How to Install Wallpaper Around Corners, Windows, and Outlets
Flat, uninterrupted walls are usually the easiest places to work. Corners, window frames, doorways, and electrical fittings require more planning because the material must fit around changes in the wall surface.
Inside and Outside Corners
Corners are not always perfectly square, so avoid assuming that a strip can simply be wrapped around without adjustment.
At an inside corner, measure how much wallpaper is needed to reach the corner and follow the manufacturer’s instructions for finishing the edge and beginning the next wall. Depending on the product and corner condition, this may involve a small return or a separate strip aligned from a fresh guide line.
For an outside corner, check how the wallpaper is intended to wrap around the edge. Avoid stretching it tightly over a sharp corner, as this can cause the pattern to distort or the adhesive to lift.
If the corner is uneven, do not force the material to follow the surface. A clean, carefully planned join may produce a better result than a stretched strip.
Windows, Doors, and Other Obstacles
When you reach a window or doorway, apply the wallpaper over the relevant area only if the manufacturer’s instructions permit it. Then make small, controlled cuts to help the material lie around the opening.
For a window, leave enough material to cover the surrounding wall or return where appropriate. Trim gradually rather than cutting a large opening before you know exactly where the edges will fall.
For doors and other wall features, use a sharp knife and straightedge where suitable. Smooth the wallpaper first, then trim the excess carefully along the frame.
Always check the pattern alignment before cutting away material that you may need for the surrounding edges.
Electrical Outlets and Switches
Electrical fittings require extra care.
Before removing an outlet or switch faceplate, turn off the relevant circuit at the breaker and verify that the power is off. If you are not comfortable identifying the correct circuit or handling the fitting safely, ask a qualified electrician for help.
Never apply wallpaper over an exposed, energized electrical fitting.
Once the area is safe, follow the manufacturer’s guidance for cutting around the opening. Make small cuts inside the area that will be covered by the faceplate, avoiding unnecessary removal of material.
Reinstall the faceplate correctly once the wallpaper is finished and the area is safe to handle.
Can You Put Peel-and-Stick Wallpaper on Concrete, Uneven Walls, or in a Bathroom?
The answer depends on the surface condition and the exact wallpaper product.
Concrete Walls
Concrete can be rough, porous, dusty, or affected by moisture. These conditions can make it difficult for peel-and-stick adhesive to form a consistent bond.
Do not apply wallpaper directly to raw concrete unless the product specifically allows it. The surface may need an appropriate, fully cured, smooth coating or other preparation system approved by the wallpaper manufacturer.
Make sure there is no active moisture problem. Covering a damp wall can conceal the underlying issue without solving it.
Uneven or Textured Walls
Small imperfections may be less noticeable under some wallpaper designs, but raised texture can prevent the adhesive from contacting the wall evenly.
Heavy texture can also show through the wallpaper and make the finished surface look uneven. Some manufacturers advise against installing their products on textured surfaces altogether.
Check the product specifications and test a sample. Do not assume that a thicker wallpaper will solve a surface-compatibility problem.
Bathrooms and Humid Areas
Peel-and-stick wallpaper may be suitable for certain bathroom walls, but product suitability and moisture exposure matter.
A well-ventilated bathroom with a dry, smooth wall is different from a shower enclosure or a surface that receives frequent direct splashes. Unless the product is specifically rated for that use, avoid placing it where it will be exposed to persistent water.
Pay attention to ventilation, condensation, and the condition of the wall. Moisture can contribute to lifting seams and other adhesion problems.
Follow the manufacturer’s guidance for the intended room and surface, and do not cover existing mold or water damage.
Common Peel-and-Stick Wallpaper Mistakes and How to Avoid Them
Even a straightforward DIY project can become frustrating if you rush the preparation or overlook small details.
Installing over a dirty wall: Dust and grease can interfere with adhesion. Clean the surface using a suitable method and allow it to dry fully.
Ignoring paint-curing instructions: Paint that feels dry may not be ready for adhesive wallpaper. Check the wallpaper and paint manufacturers’ requirements before starting.
Skipping the starting line: A crooked first strip can make the entire wall look uneven. Use a level or plumb line rather than relying on the corner.
Removing all the backing at once: Exposing the entire adhesive surface makes long strips harder to control. Peel the liner away gradually.
Pulling the material to remove wrinkles: Stretching can distort the design or cause gaps later. Lift and reposition the material only as permitted by the product instructions, then smooth it without tension.
Forgetting the pattern repeat: Strips may appear aligned at the top but drift out of position farther down. Check the design along the full strip before pressing the adhesive firmly into place.
Using the wrong seam technique: Some products require edges to meet, while others specify a different arrangement. Follow the instructions for your particular wallpaper.
Using a dull knife: A dull blade can tear the wallpaper and leave ragged edges. Use a sharp blade and cut carefully.
Assuming every wall is suitable: Texture, moisture, loose paint, and porous surfaces can undermine the installation. Test the surface and check the manufacturer’s limitations first.
Ignoring small bubbles or lifted edges: Inspect each strip as you go. Address problems according to the manufacturer’s guidance before they become harder to correct.
How to Remove Peel-and-Stick Wallpaper Without Unnecessary Wall Damage
One attraction of peel-and-stick wallpaper is that many products can be removed without traditional wallpaper stripping methods. However, removal is not guaranteed to be damage-free.
Start by checking the manufacturer’s removal instructions. Choose an inconspicuous edge, then gently lift the wallpaper and peel it back slowly at the recommended angle.
Avoid sudden pulling, which may remove paint or damage a weaker wall surface. If the wallpaper resists, stop and consult the product instructions rather than applying excessive force.
Do not automatically use a hair dryer or another heat source. Some products may respond to gentle warming, but heat can also damage finishes or the wallpaper itself. Use heat only if the manufacturer recommends it and explains how to do so safely.
After removal, inspect the wall for adhesive residue or paint damage. Clean residue only with a method suitable for the existing finish. Repair and repaint damaged areas if necessary before applying another wall covering.
If you are renting, document the wall’s condition before installation and test removal on a small area. This is particularly important if the paint is old, poorly bonded, or already peeling.
Frequently Asked Questions
1. How hard is it to put up peel-and-stick wallpaper?
Peel-and-stick wallpaper is generally manageable for beginners because it does not require separate wallpaper paste. The most challenging parts are preparing the wall, keeping the first strip straight, matching patterns, and working around corners or openings. A smooth, suitable surface and careful installation make the process easier.
2. How long does it take to install peel-and-stick wallpaper?
The time depends on the size of the wall, the pattern, the number of obstacles, and how much preparation is needed. A small, straightforward wall may be relatively quick to cover, while a large room with windows, corners, and patterned wallpaper takes longer. Allow additional time for cleaning, repairs, measuring, cutting, and any required paint-curing period.
3. Are you supposed to overlap peel-and-stick wallpaper?
Not always. The correct seam arrangement depends on the manufacturer’s instructions for the particular product. Some wallpapers are designed for edge-to-edge application, while others may specify a different seam method. Check the roll label or installation guide before joining strips.
4. Can you install peel-and-stick wallpaper by yourself?
Yes, many people can install peel-and-stick wallpaper alone, particularly on small, uncomplicated walls. Work with manageable sections of exposed backing and keep the strip supported as you position it. A helper can be useful for long strips, large patterns, high walls, and difficult corners.
5. What should you do if bubbles appear after installation?
First, check the manufacturer’s troubleshooting instructions. If the wallpaper is still adjustable, gently lift and reposition the affected section only as permitted, then smooth from the center toward the edges.
Do not automatically puncture every bubble or apply heat. A bubble may result from trapped air, an unsuitable surface, or an adhesion problem, and the appropriate fix depends on the cause and product. If bubbles keep returning or the edges begin lifting, reassess the wall condition and contact the manufacturer.
Check Your Work Before You Finish
Before putting away your tools, inspect the entire wall in good lighting. Step back to check the overall appearance, then look more closely at seams and edges.
Use this final checklist:
- The strips follow a straight vertical alignment.
- Patterns match where required.
- Seams follow the manufacturer’s instructions.
- No obvious bubbles, wrinkles, or trapped debris remain.
- Edges and corners are securely positioned.
- Excess material has been trimmed cleanly.
- Wallpaper is not covering electrical fittings or ventilation openings improperly.
- The wall remains dry, and no moisture or surface problems have been concealed.
Give the wallpaper any settling or care period specified by the manufacturer. Avoid washing, scrubbing, or exposing it to moisture until the product instructions say it is appropriate.
Putting up peel-and-stick wallpaper is easier when you treat preparation and alignment as carefully as the application itself. Choose a suitable wall, measure accurately, work gradually, and follow the product’s instructions for seams and removal. These steps will help you create a cleaner finish and reduce the chance of avoidable problems.
Disclaimer
Wallpaper results vary depending on the product, wall condition, paint, humidity, and installation technique. Always follow the manufacturer’s instructions and test an inconspicuous area before beginning. If you are unsure how to handle electrical fittings safely, consult a qualified electrician.